Showing posts with label Birthday Cake. Show all posts

Tuesday, April 18, 2017

Volcano Cake (how did I forget this!?)

I am getting old and forgetful.
I am.
OR how else can I possibly have forgotten to post about this cake?
I made this cake for my son's 8th. Birthday, last year.
We planned and discussed it in great detail.
We kept it under wraps, a surprise for our guests!

Last year S wanted a Volcano Cake. The idea had a firm grip on our minds and we could not think beyond it.
He wanted a chocolate overload.
I agreed.
The cake was chocolate, with chocolate filling and ganache frosting. If that isn't an overload, I don't know what is!

There are tutorials on YouTube for making volcano cake. I looked at all those and finally made mine.
For the Ganache, here are some links for you to follow
Ganache 101 (Martha Stewart)
Natasha's Kitchen
Milk Chocolate Ganache ( I am Baker)
White Chocolate Ganache

For the cake, I made
1 x 10 inch cake as the base
4 x 6 inch cakes for the mountain
Milk chocolate ganache to use as a filling and Dark chocolate ganache to frost the cake.
White chocolate ganache to make the 'lava'.

You will also need:

  • A cake board
  • Decorations ( trees and mini dinosaurs etc.)
  • One small plastic/ glass cup to fit into the mouth of the mountain (I used a tea light holder)
  • Dry Ice (Handling and Storing Dry Ice)
  • Tongs 
  • Water
  • Sharp serrated knife ( to trim the cake)
  • [OPTIONAL] Cookie Cutter: round ( to make the 'mouth' of the volcano, size similar to the cup you plan on using). If you don't have a cookie cutter, use the knife.
  • 1/2- 3/4 cup white butter cream or whipped cream frosting (colored green to make grass at the mountain base)

To begin : Prepare the ganache. This can be made a few days in advance and stored in airtight containers in the fridge.

To prep the cake:
Chill the prepared cakes in the fridge
If you like, you can fill the large cake with frosting, slice the cake in to 2, horizontally and spread ganache between the layers and chill in the fridge.
You can also do the same with the smaller cakes.

The frosting between the layers can be different. Some options are:

  • Nutella
  • Ganache
  • Whipped cream (you can use store brought Cool Whip )
  • Butter cream frosting (vanilla or chocolate)

While the cakes are chilling, prepare the 'lava' using white chocolate ganache and color it. Set aside.

To begin, put a dab of frosting on the cake board and place the 10 inch cake on it.

Frost it using the prepared Ganache

On a baking sheet or tray, layer the 6 inch cakes one on top of the other gluing each cake with the help of ganache to the other.

Cut a small circle using the cookie cutter or knife on 2 of the top layer cake. the circle should be the size of  the cup you will place inside it to hold the dry ice. Frost around the circle so the crumbs do not go everywhere.

Trim them using a sharp serrated knife to make a mountain shape. Keep it a bit rough, like a mountain is, you do not need to be perfect.

Crumb coat the cake with a thin layer of ganache to seal in all the crumbs and chill for about 30 mins.

Now apply a generous layer of ganache on the mountain and spread it as evenly as possible on the surface to cover every inch. Smooth the cake gently, since there are a few uneven surfaces, be careful, you want to preserve the 'rocky' look.

Spoon some 'red lava' ganache in tot he circle that you have cut out and then drizzle some over the sides to mimic lava pouring out.

Gently place the plastic cup/ tea light holder into the cavity and press it down very gently so that it is snug and does not show up on top.

Fill a  frosting bag with the green icing and fit it with a Wilton tip 233 (Grass tip).
Pipe grass all around the base (on the 10 inch cake) and then use any accessories you want. Pipe some grass around the accessories to hide the flat base.

If you plan to use any figurines ( action figures or mini dinosaurs, dab a spot of ganache to the bottom of the figures, on their feet and stick them on the cake board or on the cake).


From left to right : Tea light holder to place dry ice, dry ice in the cup,  pour water gently on the dry ice to make it smoke


Before you cut the cake:

Chill the cake in the fridge. If it's an outdoor party, the cake will come to room temperature by the time you cut it.

To make the volcano erupt, using a pair of tongs, carefully place a couple of pieces of dry ice in the plastic/tea light holder in the mountain.

Make sure that you do not touch the dry ice. It is also a good idea to make sure that there are no kids around you at this time. Curiosity can be a terrible thing in this case. you don't want any child getting burns and upsetting the entire party.

To make the volcano smoke, pour water gently on the dry ice and it will immediately start 'erupting'! 
It is just so much fun to watch the children and adults enjoying this volcanic eruption! 

My son loved the attention his cake got and he made sure that everyone understood that the cake idea was his and he told me exactly what he wanted! 


Enjoy the applause and the cake! 


We are now working on this years cake! Stay tuned.


Pin It

Sunday, January 10, 2016

Sweet Beginnings

On the last day of warm weather, we visited a nearby beach. It was fantastic. Warm sun and a playful breeze. The water was a bit too cold for my liking and I was shocked at how parents took out babies (in diapers) into the cold water and also that the itty-bitties were squealing with joy.
Of course, standing in there, knee deep in the water I also adapted to it and loved it. 
My son had a blast! He did not want to come out of the water. 

We had to drag him out screaming and kicking and promising the beach on every sunny and warm weekend.
We know where we will be, come summer.

Then came the end of the vacation (happy dance). 

With more time on my hands and a friend celebrating her birthday, I decided to make her a cake. 
I have a small group of friends here and we decided to surprise her with cake and some brunch items. 

The cake was a 6 inch (x2) Chocolate cake, with Whipped cream between the layers. The frosting  and the decoration was done using Buttercream


Butter cream cake decorations

While I have done a course on cake decorating, I also draw inspiration from many cake decorators online.
It's so much fun to watch the videos and dream making cakes as beautiful as those.  I wish I could make such stunning cakes, I know it's all about practice, practice and more practice.

I like Vanessa's YouTube channel and her videos are very informative and she makes it look easy.
I hope to learn a lot more from her channel and also get the opportunity to make many more cakes!

As usual, I was decorating till the last minute and did not have the time to take pictures with a good camera. The pictures I have are taken on a smart phone.
Note to self: also work on organization and time management this year ( you suck at this).

I also really need to work on frosting my cake. I'm stingy when slathering on butter cream because it is *so* sweet, I'm always worried that the sweetness will overpower everything and make people regret taking a bite. This is something that does not give my cakes a very 'finished' or 'polished' look, if you get my point. But, I'll work on it.

Here's wishing you all a happy new year and may all your dreams come true! Stay positive and happy!

Pin It

Wednesday, December 23, 2015

Sweet things and hoping for a better new year!

As we come to the end of another year, it's time to reflect. Time to plan and make new year resolutions. In my case, I have stopped making any, I don't keep them. I don't need the guilt on top of everything.

But like you all, I am hoping for a better new year and I'm going to try my best to make it a good one.
I have learned a lot this year, some through personal experience, some from friends and their experiences.

In the end, I know one thing for sure, I have so much to be thankful for.
People have a lot going on in their lives and are battling situations every day. They still smile and trudge on.
This is one lesson I will carry with me, not just in the new year, but always, I am blessed and I am thankful for that.

Now, after this heavy dosage, let me get on to a better topic. Under such circumstances, weather is the safest topic.
You all know how I like to crib about the weather.I'm not cribbing here, just sayin'.
The weather in FL is still *very* warm. While many of you are bundled up in layers and others in a jacket, we still go around in shorts and wipe the sweat off our brow and still switch on the AC.
No kidding, we sweat. Yuck! I know, it's healthy and all that, but honestly.... yuck!

I'm taking it slow on the baking front, I made a batch of chocolate chip cookies, which never fail and this time, they did. I was shocked. They taste good, no doubt, but, they went flat. I have no clue why, I'm guessing it was the baking soda. I will make another batch soon, once I have the courage and another fresh pack of baking soda.

I do want to share a picture ( a poor one, sadly) of the last cake I baked for my friend T. I made this in October and was waiting for better pictures taken on a good quality SLR by another guest. But, he hasn't obliged.
In any case, the photo shows the details and I want to share them with you all.

This picture was taken on my iPhone and in a hurry. The children and the birthday girl were eager to cut the cake!

This was a basic chocolate cake, 9 inch and 2 layers with whipped cream filling and the decoration is butter cream. I used my favorite, Wilton 104 to make the roses and the star tip for the basket weave. 

I had a lot of fun making this cake and learning too. I know now, for example, that I suck at frosting a cake. I just cannot dollop a gob of butter cream on the cake and spread it in a thick layer. Butter cream is SO sweet and I am very hesitant when applying a thick layer on. I accept it and prefer to make a basket weave, hoping, that it used less frosting. I may be wrong. 
I love making floral cakes! 


With all the pumpkin and squashes flooding the market, I made the 'subji' version a lot. The family finally got a little tired of it, despite the constant variation. So with just half a butternut squash left and no one willing I had to make them in to ''Ghaarge', or Pumpkin Poories. 


In this version, however, I made some changes, I did not use any rice flour. I used some fine rava/ semolina ( just a couple of tablespoons) and whole wheat flour.
I used a bit more jaggery, my son likes his sweets properly 'sweetened'. I like it that way too. Not cloyingly sweet, mind you, but just right for us. So I ended up adding an extra 2 tbsp jaggery.


The dough is a tad sticky and difficult to roll ( traditionally these are patted into a round shape and deep fried)  but I managed and the end result is right here!
My son loved them and a friend, with whom I shared these liked them a lot as did her 2 adorable little daughters.

Here is a quick re-cap of the recipe:

I used

Butternut squash ( medium sized ) grated, about 2- 2.5 cups.
3/4 cup Crumbled jaggery  ( plus 2-3 tbsp, in my case) 
1/4 tsp  ( or 2-3 hefty pinches) Salt
1 tbsp Oil  to be used while kneading
2 tbsp Ghee
1 - 1.5 cups Whole wheat Flour / Atta
2 pinches Cardamom powder
Oil to deep fry the poories

Heat Ghee in a kadhai and add the grated pumpkin /squash. Cook it till it is soft. This takes about 3-5 minutes on  medium heat.
Switch off the heat and add in the crumbled jaggery and mix well. The jaggery will melt and the mix will become a gooey golden syrupy mass. Add half tbs oil.

Mix the flour, rava, cardamom powder and salt and gradually add the dry ingredients to the wet and make a dough. The dough must be firm. Towards the end add the remaining oil (1/2 T) and knead and form a ball.

Do not use any water when kneading the dough.

Heat oil in a wok (about 2 inches). While the oil heats up, roll the poories or pat them into small circular discs.
I made a large round 'roti' /'tortilla' and used a round cookie cutter to shape them. 4 poories to one roti.

The dough will stick to the rolling pin and board, just dust some flour between rounds and take it off.

Do not dust the poories. This will only make the oil murky.

Once the oil is hot ( drop a small piece of the dough and if it rises to the top steadily, you are set) slide in 3-4 poories ( depending on the size of your kadhai) and deep fry these beauties to a golden brown. Do not crowd the kadhai.

Drain on paper towels and store in a tight-fit lidded container ( you know what I mean).
These can be stored at room temperature for a couple of days. Beyond that, no idea, we never need to store any! These are good!

* You can also add a hefty pinch of Nutmeg /Jaiphal powder to the mix, it tastes good.

Enjoy these poories as a snack.


Here's wishing you all a VERY Happy New Year and see you all soon! Till then, take care of yourself and your loved ones! 
Pin It

Tuesday, July 08, 2014

Left Over, make over. Cake, berries and cream, Voila! summer dessert!

Over the past few months, I had the opportunity to make cakes for my friends and their children. Most of them being my son's age. 
It is fun to bake and to make a cake the child has dreamed of. Kids have fantastic ideas. 
The satisfaction of making their eyes sparkle on their special day and of course the kind words parents shower on me really make it so worth the effort. 

It all started with Sonali asking me to make a Black Forest cake for her husband's birthday (Sonali's favorite cake) which was a hit! 
That was followed by the same for Sonali's Birthday, naturally. 

Cake, berries, whipped cream

Then a small cricket enthusiast celebrated his 7th. Birthday.
His Mother and I put our heads together and came up with the idea of a cricket themed cake. She gave me full freedom in regard to the design.


If you ignore the mess in the background ( that is keeping my son busy, he was SO interested in 'decorating this cake' that I had to give him something else to mess with, that yellow fondant mat, I asked him to make some accents with that mat, the poor baby ran around getting things ready to make 'em) 
The cake was a 2 layer butter cake with a whipped chocolate ganache in the middle and a Cream cheese- butter cream frosting.
The 'grass' is cake crumbled and colored green and then toasted till crisp.
The cricket pitch is fondant ( home made, marshmallow Fondant) 
The cricket bat and the player are hand made ( my first attempt) with Gum paste.
The ball is Fondant and the stumps are made with cake pop/ lollipop sticks


The second opportunity came when my dear friend A, was taking a cake as a surprise for a friend's birthday. She wanted a black forest.
During the same time, my son had the last of his Marathi classes. I made a batch of Eggless Chocolate Cupcakes and decorated them with Nutella Butter cream and packed them all fancy, the kids loved them! 


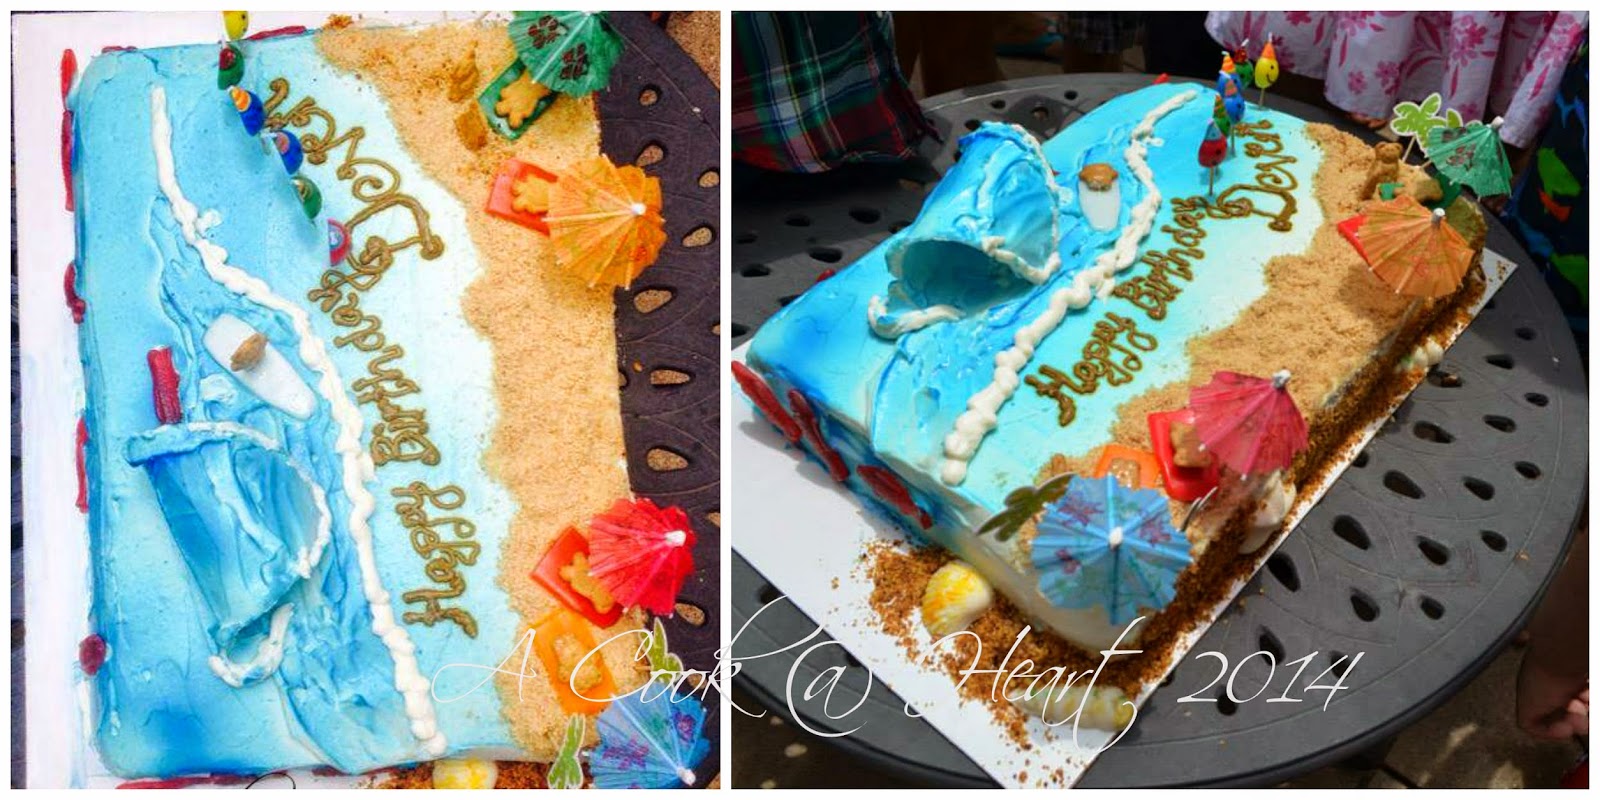
And just last month, my friend T's son turned 6 and they had a big party and the theme was 'aqua'. It was a pool party with an entertainer ( with a water slide) and the kids had fun.
The parents and I sat down and decided to make a cake that was 'beach themed'. 

 The cake was Vanilla and Chocolate marble cake with a whipped cream frosting in the layers as well as on top. 

I used Blue mist to color the ocean and used a Foam cup to make the wave and added a dollop of cream. 

White whipped cream was used to make the ocean foam.

The 'sand' was made with crumbled graham cookies

The Graham Teddies are laid on 'Air Heads' candy beach towels and the Surfer Teddy is also on an Airhead surf board.
Can you spy the shells on the cake board? these are made  using candy molds ( from Michaels) and melting chocolate.

And then there was my Spider Man cake for my son. 

What with all these cakes made, I have a lot of leveling to do and so there are always the domes to 
either throw or eat. 
I hate wasting food ( look in my fridge, you will find small Rubbermaid or Pyrex food containers containing daal or vegetable, just those 5-6 tbsp. that was left over :) ) 

And so, these 'domes' get a makeover! 


summer dessert

What you need is: 

Left over cake ( cut in cubes)
Whipped cream
Sliced and macerated Strawberries ( or Raspberries or a medley of berries)

Place cubes in the bottom of the serving cup/bowl of choice.
Top with the sweet berries with juices.
Swirl (or spoon) whipped cream .
Add a few more cubes of cake and repeat with the berries and cream.
Top with a fresh (washed) strawberry and serve.


These were a hit with my son! It meets the 'Kid Approved' category award. 
For left over Chocolate cake domes, you can pair it up with either fresh berries or even Cherry Pie filling and whipped cream, Black Forest in a cup! 


This makes a light and easy dessert option and looks SO pretty! A wonderful and easy to make summer dessert.
Pin It

Thursday, July 03, 2014

Spider Man, Spider Man, does whatever a spider can.....


A month ago, the Little one turned 6. 
Not so little anymore, huh? 

Still looks little to me.

And then I see, the kinda new school trousers skimming the ankles and I think, " I just got those. they look new ( unlike the  trousers I got at the beginning of school year, those are in such a bad condition, if I have my son wear them today, they are short, worn and torn and frayed, why he'd look like Oliver Twist !)
Makes me smile to see him grown up and yet, such a sweet innocent little heart tugger (you know what I mean)! 

School was still in session when he celebrated his birthday. We gleefully packed the goody bags that he proudly took to school.
Sadly, the school does not allow Kindergartners to have any celebration at all, so making and sending a cake was not an option. I made a small cake at home and we had a small celebration.

There was talk of the birthday party. But that got muddled with apartment hunting, which was exhausting but .... all's well that ends well.We found something suitable and sealed that deal.

The topic of the birthday party was on! 
It was decided that I would host a small Mother and kids pool party. Mid-week, my friends agreed and it was settled. The moms would also get in the pool and splash away! 
I have good friends, they agreed on such short notice. 

The main thing in a birthday party is the cake. Last year, Little S wanted a Burger cake. This year, it was Spider-Man.
Surprising, because he is not really a spider man fan (I am). But, if that's what he wants, that's what he gets.
I looked around and finally settled for this.
And though this could have been loads better, I am glad, I tried and most importantly, the birthday boy was thrilled.


The cake was my old reliable, Vanilla cake. The filling between the layers ( I kept it at 2 layers only) was macerated Strawberries ( wash, dry and chop the berries into slices and sprinkle with powdered sugar, cover and let them sit in the fridge) and whipped cream. For that, you need, 2 cups Heavy Whipping Cream, 1/4 ( or less, say 2 tbsp., your preference) Confectioners sugar and 1 tsp Vanilla extract. Chill the bowl and beaters for about 15-20 mins and then start the process.
Add the ingredients in the bowl of your stand mixer (or a regular bowl and your hand mixer) and whip on high speed until soft peaks form.

Follow the video instructions for assembly.

I used Butter cream for the top layer of frosting and Gel color to get this vibrant shade of red.
The one change I made was, I used Salted Butter, instead of unsalted butter, it helps tone down the cloying sweetness of  the frosting. I went with this frosting because it holds up well in the heat and would not turn runny or spoil in any way. Plus, butter cream is a dream to work with.

I had a wonderful time making this cake but ( yes, there is a 'but'), I dislike using so much color.
I gave this some thought and I wonder if spraying the cake with red color would have helped? It would have made things easy for me!
It's all learning. Maybe next time.

That border got cleaned up before cutting the cake

That's it from me. Enjoy the long weekend folks and stay safe !
Pin It

Tuesday, April 29, 2014

Egg less Chocolate cake / cupcakes

Last weekend we watched Captain America (2) movie. We all (little S included ) voted for it. 
I was thrilled. I grew up on a steady dose of Marvel Comics and all these superheroes were and are my favorites. At one time I desperately wanted to be a mutant, like the X-men and wished and wished for some strange power to manifest itself on every birthday. 
I could not let a spider bite me, I flee at the sight of anything that creeps, crawl or slithers. I was definitely no Asgardian. With hi-fi technology limited only to the multi-billionaires and only in the USA, I was left with just my imagination and the only option available to me, to be a mutant.
Years of disappointment only made me read all possible comic books I could lay my hands on.

Then there was the fairies stage, I wanted some fairy to grant me wishes. Or at least take me to fairy land ( just like in Enid Blyton's books).

After that came the detective stage ( this was after the adventurer stage, where I wanted to be that lucky kid who found some treasure or a gang of smugglers). I realized (after reading a lot of Sherlock Holmes, I as neither as intelligent or as intrepid as him) I was not quite cut out for that sort of a thing. 

While that sort of dream faded over time, the charm of comic books remained strong. And so, every super hero movie that is released is a visual treat for me. 
I was glued to the screen during the movie making sure that little S had his supply of popcorn and chips. After these were done, he got antsy and I transferred him to his father.
The movie was good. 

Just like my generation had their favorite super heroes, my son's generation has theirs. As of now, Power Rangers, Avengers, Spider-man and Ninjago rule.

A very special 4 year old (R), is a HUGE (yes, yes, in capitals) fan of Ninjago. He gets his from his elder brother.  So naturally, his birthday had to be a Ninjago themed celebration.

His Mom (Samta), wanted cupcakes to take and share with R's  pre-school friends. 
Kids love chocolate ( and so do most adults, chocolate is the universal language) and we fixed chocolate flavor. And Samta and her family are vegetarians and prefer egg less cakes. 
I decided to make egg less chocolate cupcakes with butter cream frosting and fondant decorations.

I found a Quick and Easy Chocolate cake recipe that I have tried with great success. this recipe makes two, 9 x 2 round layers or 24 cupcakes.


DeDe Wison's Quick n Easy Chocolate Cake

3 cups All Purpose Flour (APF)
2 cups Sugar
2/3 cup, sifted, Natural Cocoa
2 tsp. Baking Soda
1 tsp Salt
2 cups Water at room temp.
2/3 cup Oil 
2 Tbsp. Apple cider Vinegar/ white vinegar
1 tsp Vanilla extract

Pre heat the oven to 350 F

Grease the cake pan or get the muffin pan lined and ready.

Whisk the dry ingredients (flour, cocoa, sugar and baking soda) and set aside.

Using a whisk/ had held mixer or your stand mixer, mix oil, water, vinegar and vanilla

Combine the wet ingredients with the dry and mix until well combined and smooth.

Divide the batter evenly in the pans and bake for 30 mins. or until a tooth pick inserted comes out clean.

Cool the cake in the pan over a rack for about 10 mins and then invert on to the rack to cool completely.


This cake is moist and very delicious. I was always apprehensive about egg less baking and that I would be a big flop at it. This recipe  has made me confident :) 

For the cupcakes, I used my butter cream recipe for frosting (the yellow part) and covered the cupcakes in fondant. The eyes and brows are made using fondant too.

I am not a fondant fan and can never eat it, but I cannot deny that it looks good on cakes. 

Coming up (soon) is another cake I had the opportunity to bake for a 7 year old! 
See you soon.
Pin It

Wednesday, July 03, 2013

A basket (cake) of flowers!

Every August, my cousins and I would plan.. it was Aaji's (Grandmother) Birthday. 
I would go to my cousins home and my Grandmother lived just a few minutes walk from there.
We would buy a cake from Monginis and wait impatiently for midnight. 
10 minutes to midnight, we would start out and carefully carry the cake, gift and flowers and walk to her home, on the silent streets. 
As we entered the apartment owners community, we would start giggling and our eyes would twinkle with  anticipation at her surprise.  We would light the candle on the cake and stand outside the door.
At exactly midnight, we would ring the bell and wait breathlessly for her to open the door. And when she did, we would sing Happy Birthday To You.....  rather tunelessly as we were so high strung with excitement.
It was the happiest of times, we planned our midnight venture with great care and looked forward to it so much! Maybe Aaji knew or suspected our plan or later even waited for it, knowing that we would turn up, but the love and happiness in her eyes was a treat to behold. She always acted surprised and made her birthday memorable for us! 

We are all far apart now, my cousins and I and of course, these small surprises are history. 
But I am one lucky girl! I have friends ( and their parents) who are like minded! 

In April, K Auntie (whom I had not met before) and I put our heads together ( via telephone calls) and conspired to put together a surprise for her daughter and my friend Sonali's birthday. It was a hush hush plan and I got what Auntie wanted for Sonali, I had already planned on baking a cake. Though it was  rushed, the cake was delicious and we all enjoyed it.

Come June, Sonali and I put our heads together- this time to plan a surprise for Auntie (visiting Dallas), for her birthday. This time I  had ample notice and could plan carefully.

I made a 4 layer cake. I used box mix for the cake. The flavor was Orangesicle ( specially requested by Sonali). The frosting was my usual, heavy whipping cream and cream cheese
The flowers are all hand made-I made the flowers a day in advance so they would be dry and ready to place on the cake. I made them using Royal Icing (recipe follows)

I baked the cake as per the box instructions, in a 9 inch spring foam pan, which is very simple and fail proof.

Cool and level the cakes ( use a leveler or a sharp serrated knife)

Cut each cake in half, horizontally.

Brush the base cake top with a simple syrup of sugar and water.

Slather the top with a thick layer of frosting. you can also add some cut fruit, like strawberries, raspberries to the frosting ( I did not add fruit)

Carefully align and place the next layer on top, press down slightly.

Brush with sugar water syrup and top with a thick dollop of frosting.

Repeat with all 4 layers.

Spread a thin layer of the frosting all over and around the cake. This will seal in all the crumbs before you start decorating. Chill for 15-20 minutes before final decoration.

I used a Basket weave all around the cake

Here is a video demonstrating the weave. It needs a bit of practice. I used Wilton Star Tip (#21) for the weave)


ROYAL ICING:
4 Cups of  Powdered sugar / confectioners Sugar
3 Tbsp Meringue Powder
5-6 Tbsp Warm Water

Mix the confectioners sugar and Meringue powder.
Add water and beat all the ingredients together till the icing forms soft peaks ( about 6-8 minutes) in a stand mixer. It may take a bit longer with a hand held mixer.

I made apple blossoms (the tiny ones) and then went on to just using the 104 tip to make flowers that look like 'sadafuli' flowers  ( check the red flower on the extreme right) 
I used the round tip and the 104 tip to make Roses. 
The leaves are piped using the whipping and cream cheese frosting tinted with green and using the Wilton leaf tips.
The flowers are made using Wilton technique. 


Once the cake is assembled and you have done the basket weave, it it just a matter of placing the flowers artistically.

There is no end to the combinations that you can make with the flowers.

I chose to use the roses and the sadafuli type flowers on to and have the smaller blossoms cascading down the side of the cake.


I *must* mention one very important detail! My 5 year old was very keen to help me in making and decorating the cake. He stayed by my side all  the time and when I was weaving the basket around the cake he, very gently placed his small hand on my arm with a, "I want to help, Mumma"
At first, I admit, I was not very happy about this, specially as I was making this weave after ages and was unsure, but when I saw the expression of total sincerity on his little face and eyes aglow with excitement, I could not refuse and I am so glad I did not. 
The look of pure happiness on his face was so motivating, I would have willingly made another cake just to have him 'decorating' by my side, aching back be damned!
He also helped bring all the flowers (very carefully) from the table they were drying on, to help place on the cake. Take a look at the picture below, he has helped place a couple of roses, small and larger blossoms and not a flaw! I am so proud of my li'll man! 


The cake was a hit. The look on Auntie's face (as well as all the other guests) was my reward!

Without sounding a whiny wimp, I want to add, I wish my parents were here and I had made this cake for my Mom. She would have totally flipped! She always likes my decorations ( there is something to be said about a Mom's unconditional love, she flipped for all the initial cakes too, which as you can imagine were totally amateurish!)
My Dad has a very discerning eye and he too was all praise for my effort!  What more can a person want!
I wish.............

Wishing you all a Happy 4th. of July! Enjoy the long weekend with your loved ones and don't skip the sun block! 
Pin It

Wednesday, June 12, 2013

Mommy, I want a Cheese Burger Cake!

I have questioned, I have doubted, I have spent sleepless nights, shed tears  and laughed out loud, loved with all my heart and soul... for 5 years, I  have been up and down this roller coaster, every day and loved it.

The young 'un turned 5, so very quickly. From butter ball to a smart and handsome boy with a merry twinkle in his eye.

We celebrated his birthday in a quiet way at home as it was a weekday and the poor baby was unwell, a day earlier, he had 'water and sand day' in school and he caught the bug there. The nurse called me  from her office saying that he had thrown up and was running a temperature. I rushed to school, full of anxiety, he was sleeping in the nurse's office, curled up, looking tiny and his backpack on his shoulders and a paper crown on his head ( he distributed treat bags on that day as it was a holiday on his birthday and the teacher fitted him with the usual paper birthday boy crown and everyone sang the birthday song). 
I felt a stab of pain, looking at him, laying down on his side, the nurse could have had some sense and taken his backpack off his back! I gently lifted him in my arms and he hugged me  and lay his hot, fevered brow  against my neck and said,  "it was the Popsicles Mommy, they made me eku (throw up)".

A day later, on his birthday, he was better, but weak and no appetite. but he wanted to cut a cake! 
So when he was napping, I made a small cake, no fuss, and quick (we had planned a party over the weekend with his little friends and their families)


This was a simple layered Vanilla cake layered with whipped and cream cheese frosting and strawberry jam/ jelly, the chocolate words were made by melting candy melts, putting the melted chocolate in a piping bag and tracing the letters.

By the day of the party, he was fine and up to his usual antics! For once, I did not complain, well, not too much and only once threatened to 'cancel the party if you do not stop jumping from chair to sofa'. What can I say in my defense? I had a lot on my hands, with his illness, the party planning, prepping....

This year, he wanted a Cheese Burger Cake. Unlike most 5 year olds, who want a super hero cake, my sonny boy had cheese burger on his mind. we took inspiration from youtube- Rosanna Pansino, a video that my son watched, repeatedly, fascinated, first because of the cat and later for the cake.

The idea of the cheese burger had taken firm hold. I was happy, this is an easy cake to make!
Here is a look at the cake, just as I finished it, right in time for the party (minutes before the party, actually!)


I used 2 Butter cake (box) mixes.

The bottom of the 'bun' was baked in a 9 inch round pan as was the brownie 'meat patty'
The top of the Burger bun posed a challenge, the 2 quart Pyrex bowl was not big enough, so I used a 'Kadhai'(Indian wok) that I have. It was a perfect fit (whew!)

The cakes and the brownie patty were cooled. The cakes had to be leveled. The Frosting was my usual,whipped and cream cheese frosting.
The frosting is perfect for us, it has slight tanginess that is not unwelcome, it is mildly sweet and light and airy, unlike butter cream frosting that uses a high ratio of butter to sugar ratio (1:4), yikes!
The cream cheese gives it sturdiness and the frosting did not melt or misbehave in any way, despite the heat.

I used Wilton's Brown color and added it slowly to the cream to get a tan shade to resemble a bun.
I skipped the 'sesame seeds' on the bun as I could not find any candy coated sunflower seeds and felt no inclination to make any at home.

The 'lettuce, tomato and cheese' slices were fruit roll ups ( found in any grocery store), I used a leaf pattern cutter (from my Wilton kit) and pulled the leaf a bit to give it a lettuce-y look and round cutter (use any cookie cutter) to cut out the tomato slices.

Notes:

  1. Bake the cakes and brownie a day ahead. chill in the fridge and then level. this reduces the crumbs
  2. Brush the cakes (leveled side) with a simple sugar-water mix, to seal in the crumbs and keep the cake moist. don't overdo it.
  3. Chill the mixer bowl and beaters in the freezer until you are ready to frost.
  4. Pull out the heavy cream and cream cheese at the last moment.
  5. Frost the round cake ( bottom part of the burger bun)  and place the brownie 'patty' on top. make sure the patty and cake are aligned perfectly.
  6. Gently, place the 'lettuce leaves' under the brownie patty .
  7. Alternate the 'tomato' and 'cheese' on the brownie and press the corners to make them stick ( they will stick as the fruit roll ups are - well, sticky)
  8. Frost the top Bun, separately and use a big, flat spatula ( pancake spatula) to pick up the bun and VERY carefully place it on the brownie patty, aligning it perfectly, you get one chance to get it right! 
  9. Top with candy coated sunflower seeds, this is optional.


The cake was a hit and most importantly, the Birthday Boy was thrilled! His eyes reflected the  happiness and I felt like I had won a billion dollar lottery!

Our guests made the party really special with their wholehearted participation and the love and good wishes they showered on the birthday boy (and the generous gifts they gave made him one happy boy!)

Here are a few pictures of the party I'd like to share with you all and a small flashback ( thanks to my Mom!)
The Venue ( left) and our little guests ready to play games (right)

Flashback! 
Enjoy the rest of the week! See you soon.
Pin It

Wednesday, May 15, 2013

A cake for a Birthday Princess

Every little girl is a princess, don't you think? And more so on her birthday. 
My son calls her Tai (meaning elder sister) and she turned 7, Sujata's little Princess is one year older.

A few weeks ago, our little Princess and I looked at several cake pictures on Pinterest and made 'expert comments' and she and I both liked one cake, instantly. We decided that I was going to make it for her birthday. 

I promised her, but I was a bit unsure... I mean, it is one thing to want to make a cake and another to nail it. you don't want a disappointed 7 year old on her special day.
Daunting as it was, I stuck to my plan and set out to make a Princess Doll Cake for our little Princess.

Barbie Doll Cake

The Prep:

I opted for a regular Barbie Doll from the store (The Dancing Shoes Barbie), instead of a doll insert. that way the birthday girl gets a new doll to add to her collection.

I used box mix for the cake, while I do have a very dependable Vanilla cake recipe, I was not willing to risk anything and 'better safe than sorry', right?

The frosting was Whipped cream and Cream cheese ( recipe below)

I made some Gum Paste Flowers and bought the decorating 'pearls'  to accent the cake.

For the Doll's skirt, I used round cake pans and a Pyrex bowl ( all 8 inch diameter) and a mini angel cake bundt pan.

Making the Princess Doll Cake:
Since I used the doll, and she is tall, the cake had to accordingly to be tall too, at least 8.5 inches.
Make the cake as per the instructions. I made these 3 ( 2 round cakes and one round, baked in a Pyrex 2 quart bowl)  as you can see in the picture below and a small angel cake bundt (not in picture).

Prep for the Doll's skirt

I made the cakes one day in advance. Once the cakes are cooled, level them, using a cake leveler or a serrated knife and take off the dome.
Alternately, you can use a strip of cloth ( an old thick kitchen towel) soaked in water and wrapped around on the outside of the cake pan while baking or buy Bake Even strips at any craft store, this will help bake the cakes with an even flat-top.

Prep the Doll, wrap the doll  waist down in cling wrap.This will keep her clean.

To make the Frosting:

To me,this was my real challenge. I like butter cream frosting for it's sturdiness and how easy it makes decorating. What I dislike, is how sweet it is.  even for a sweet lover that I am, I  clench my teeth at how-very-sweet it is.

I like whipped cream frosting because it is mildly sweet, feels light ( if you are eating cake, you are not counting calories!).
My concern is, whipped cream is not sturdy, it just does not hold shape as well and makes decorating a tad difficult and not so well defined.
My job therefore was to find a way to make the frosting sturdy.
Search revealed that gelatin is an ideal stabilizer, however, many of the party were vegetarians and so using this option was ruled out.
The other option was using pudding powder, but I was still on the look out and my search was well rewarded!
Prep the doll, level the cake and  make the whipped cream frosting

Source: Here 
1 (8 oz.) packet Cream Cheese (regular)
1/2 cup Confectioners sugar  I used a little more than the recommended 1/2 cup, I added about 2-3 tbsp extra)
1 tsp. vanilla Flavor ( Almond will work well too)
2 cups Heavy Whipping Cream
Food coloring ( I used McCormick Neon colors, a few drops of the blue)

Chill the bowl and the beaters in the freezer for about 10-15 mins before you want to make the frosting.
Once ready, pull out the cream cheese from the fridge and add it to the chilled bowl and add sugar. Cream the two until smooth.
Add the vanilla extract and mix it. With the beaters still going, slowly add the whipping cream and then the food color and beat on medium speed  till soft peaks form.
I doubled the recipe as my cake had to be about 8.5 inches tall

Cake decoration Work-in-Progress. Piping rosettes and  Gum paste flowers to accent the doll's skirt

To start working on the cake:

Using the leveler or a serrated knife, cut the dome cake in 2; horizontally.

Use a round cookie / biscuit cutter and punch out holes in the middle of the dome shaped cake, the bundt and one round cake. 

Leave one round cake as is for the bottom layer.

To keep the cake moist, I use a very mild sugar water solution. Using a pastry brush, apply the sugar water all over the leveled part, this also helps in locking any crumbs.

Place one 8 inch round cake as the bottom layer and 'paint' all over with the sugar- water solution, add a generous dollop of the frosting and spread it out evenly using an offset spatula.

Brush the second round cake with the sugar water and gently place it over the base cake. Apply a generous dollop of the frosting. 

Follow the same steps to place all layers of the cake.

The next step is to crumb coat the cake.Spread a thin layer of the  frosting all over the cake and place it in the fridge for a few minutes ( about 15 -20 mins)
All Done! 

To Decorate the cake:

Fit a decorating bag with Wilton's Tip # 18 (for slightly bigger rosettes, use tip # 21).

Fill the pastry bag with the frosting and pipe rosettes, beginning at the bottom and go around.

If there are any gaps between the rosettes,  cover them up, later, with stars ( using the same tip) 

Use decorations of your choice, I used  gum paste apple blossom flowers ( the bright green ones) that I made a few days ago and CakeMate-Perfect Pearls. 
These can be found in the Baking Supplies aisle.Use your imagination ! 


Keep the cake in the fridge until ready to cut. 

NOTES:

This is definitely my choice for frosting  on cakes, beats butter-cream frosting hands down!

It is very important to chill the bowl and beaters in the freezer before you set out to making the frosting. 

Alternately, you can take a big bowl, fill it half way ( or a bit less) with ice cubes and place another bowl on top and make the frosting.

You can also use fresh seasonal fruit to layer in the cake with the frosting.


The birthday girl and all the guests were very happy with the cake!  I am SO glad I tried it and it was a success!


I am sending this post to Cucina di Barbara (Barbara's Kitchen) and participating in the fabulous giveaway!


Pin It
Share

LinkWithin

Related Posts Plugin for WordPress, Blogger...
Page copy protected against web site content infringement by Copyscape