Friday, September 19, 2014

The Perfect Pizza

Years ago, one cold winter night, the husband and I, after strolling through the Christmassy streets and admiring the beautiful lights and decorations, finally paid heed to the gnawing pangs of hunger that only a cold winter night can awaken in a person.
The urgent need to stuff our faces with something hot and filling was mounting and we turned our steps purposefully towards where we would find food.
We walked quickly and entered a pizza restaurant. I wish now, I could recollect the place or name of that restaurant, but all I remember are some details, like the color scheme was red and white, of course, had a 'cave like oven', there was a small table inside that we bagged and placed our order for pizza. 
I could not take my eyes off that 'cave', it was the first time I had seen a wood burning oven and the whole thing was a novel experience to me. 
I was amazed at how deftly the pizza dough was tossed in the air and caught, "dayyum (you know what I mean), look at that, those are mad skills and here I was, feeling proud that I could make round-round fulkas!" 
The expert then shoved the whole pie from 'an oar' in to the oven where the blazing fire baked it to absolute perfection in no time at all.
The terms pizza paddle, pizza stone were alien to me and I  just processed the info in terms that made sense to me.
It took me a while to bake my first pizza. I was over the moon. I stuck to this recipe and never thought of trying anything else.
Why let go of a good thing, right?

WRONG.

Let it go  (I know you just sang that part :) )

There is a difference between good pizza and GREAT pizza.

Last week I tried something new, rather apprehensively. Though baking is not as intimidating to me now, I do not consider it easy.
But how could I not pay heed to something that read so well?
Turns out, this was the Bestest Pizza ever ( according to M as well as Little S)
I was so pleased that a picture of a small pan pizza while baking was posted on the Facebook Page and  I got several requests for the recipe.

The only reason I could not post earlier was ( brace yourself, this is a sob story) the laptop, with all my pictures, crashed. I have no clue why ( of course I got blamed for being careless and not taking backup despite having a back up disk... yada...yada) and I still cherish the fond hope that someone, somewhere will help recover the darn laptop, just long enough for me to rescue my pictures and videos.
And let me add, while the iPad is fine and everything nice, where and how the aitch am I going to upload pictures from my camera? Aitch,  it won't even let me paste a link in the draft post.
Anyhoo, a miserable face and constant cribbing and whining and moping finally gave me access to M's laptop and here I am clicking away, happily.
No picture, I'm afraid, but not too long, I have promised my friends, that I will make pizza for them and I will take pictures then.

In the mean time, here is the source of this fantastic recipe and  my adaptation below.

To make the base
Take 5 cups of flour ( maida)
2 tsp salt
2 tsp sugar or honey
2 cups water - room temp
1 tsp instant yeast
1 tbsp oil

Start with combining flour, yeast* and salt and mix well to combine
If using stand mixer use paddle ( if u don't have a paddle attachment, use the dough hook). On low speed mix the dry ingredients - just to ensure distribution.
Now add the liquid.


*If using regular, active dry yeast, let it bloom in warm water to which sugar is added and then add this to the flour

On the mixer, use low Speed and paddle and mix till the dough absorbs the liquid. There shouldn't be any dry flour  on the sides or bottom.
Takes about a minute
If using hand ( wooden spoon) stir well till the same result is achieved - all liquid is mixed in dry ingredients.


Let the dough stand for 2-4 mins
Now, on the mixer, start on medium-low speed and let it go on for another minute.
If using hand, follow same mixing procedure of mixing with the sturdy wooden spoon.
The dough should be soft and slightly sticky.

Now u need to use your counter top.
Pour some oil on the clean counter top and spread oil in a large circle ( like an ex-large pizza shape)
Now, gently dump the dough on the oily surface and pat it.
Use a stretch and fold method.
This simply means, after you have gently patted the dough into a circle, fold it. First fold on the top and then at the bottom, u should have a rectangular block with round edges.
Fold the round edges over one another.
Cover this dough with a clean  bowl.
Let it stand for 5 minutes.
Repeat the stretch and fold
For 3 more times (total of 4 times).
After every 5 minutes , u will notice how the dough changes. The gluten is working here.
The dough becomes firm.

At this stage, you can divide the dough ( maybe into 2 parts. One to be used now and other frozen for later.
Oil the dough u want to freeze and transfer to a freezer safe bag or container and put it away

After the above, transfer the remaining dough ball to a well oiled bowl ( I used the big Pyrex one) and cover the bowl with plastic wrap. Make sure the bowl is big enough to accommodate the doubled dough as it ferments.
Stick this bowl in the fridge and leave it  overnight to ferment slowly. This slow fermentation is the key to a perfect crust.

When u are ready to make the pizza, pull the dough out 90 mins before  you start.
Leave it on the counter top.
Start by preheating the oven to the highest level ( mine goes to 550) so yours should do the same or about 500 at least
I use my pizza stone and that is the best way to make an awesome crust. The stone retains heat very well and that helps the crust.
Keep in mind that the pizza stone needs time to heat thoroughly, I'd say 35-45 mins. 
If you don't have one, use what you normally do.

Do the prep (sauce,chopping veges/ meat, grate cheese) and keep everything at hand.

Once the dough is at room temp, lightly flour the (clean) counter top and lay the dough ball and pat it gently with your finger tips and form a circle.
Now comes the stretching part.
Flour the back if your hands and gently lift the dough onto your balled hand ( think like a boxing stance) now gently turn the dough on your fists and do so along the edges, let gravity do the rest.
Let the dough rest in between if you think it's not panning properly. Letting the dough rest will ensure that it will stretch well after a while and make the dough supple.
If using hands to stretch the dough is difficult or you are just not ready for it, go ahead, lay it on the paddle and stretch it with your hands or even a rolling pin, but be gentle)
Once the dough is even and large, transfer it into a lightly floured paddle ( I do not have one- I use my large wooden cutting board) and even out any unevenness ( ummm.. I know that did not sound right, but I hope you get my point)
Now add sauce. Spread it out carefully, starting at the center and going outward. Leave the border bare.
Add the cheese now (use mozzarella - cheddar  and if u like, sprinkle some Parmesan)
Lay the vegetables over the cheese.

By now the oven and stone are very hot. Be very careful ( I prefer to wear my sunglasses when I work with such a hot oven) and open the oven door.
Lower the paddle and in back and forth motion? Shake the pizza on to the stone.
Close the oven door and leave as it for about 2 mins.
After 2 mins, open the door, carefully, and turn the pizza in a clock wise or anti clockwise, half way,  direction to ensure even cooking.
At this stage, you will notice how the dough has puffed up and has started getting brown.
After you have turned the pizza, let it bake for another minute or 2. This will ensure that  the crust has baked to a nice golden brown and the bottom is also well done .
Pull out the pizza carefully and place it on the chopping board and cut into wedges.
Serve with chilli flakes and grated parm cheese or marinara to give it a pizzeria touch.

I must mention here, I went all out this time and made marinara sauce at home too. For this, I got messaged Shilpa, I remembered having read the recipe on her site as well as on her FB page.
She promptly replied with the recipe ( and also told me that the original came from Pelicano).
I made the sauce as per the recipe and it is a keeper.
The only suggestion my son had was, to use more. That is proof enough.

Notes:
I got a few questions regarding the recipe (the base) and decided to clarify these as part of the notes

- The pizza stone has to be 'really hot' in order to get the best crust.
- It takes a good 40-45 mins for the stone to heat up and retain that kind of heat. Once I put the dough on the counter top and cut the vegetables, I switch on the oven and leave it, so I get good 50-60 minute heating time (and hence the sunglasses when I open the oven door)
- Yes, you have to set the oven to the highest temperature it will go to
- Does it take just minutes to bake? yes, it does. But do use youe judgement here, you will see the dough bubble and start turning brown, let it turn dark and then change the direction and let it bake some more
- check the bottom of the pizza with a long handled spatula, it should look well done (brown, but not dark!)


That's it for now, folks. I'll be back soon with some pictures.
Enjoy the weekend.
Pin It

Tuesday, July 08, 2014

Left Over, make over. Cake, berries and cream, Voila! summer dessert!

Over the past few months, I had the opportunity to make cakes for my friends and their children. Most of them being my son's age. 
It is fun to bake and to make a cake the child has dreamed of. Kids have fantastic ideas. 
The satisfaction of making their eyes sparkle on their special day and of course the kind words parents shower on me really make it so worth the effort. 

It all started with Sonali asking me to make a Black Forest cake for her husband's birthday (Sonali's favorite cake) which was a hit! 
That was followed by the same for Sonali's Birthday, naturally. 

Cake, berries, whipped cream

Then a small cricket enthusiast celebrated his 7th. Birthday.
His Mother and I put our heads together and came up with the idea of a cricket themed cake. She gave me full freedom in regard to the design.


If you ignore the mess in the background ( that is keeping my son busy, he was SO interested in 'decorating this cake' that I had to give him something else to mess with, that yellow fondant mat, I asked him to make some accents with that mat, the poor baby ran around getting things ready to make 'em) 
The cake was a 2 layer butter cake with a whipped chocolate ganache in the middle and a Cream cheese- butter cream frosting.
The 'grass' is cake crumbled and colored green and then toasted till crisp.
The cricket pitch is fondant ( home made, marshmallow Fondant) 
The cricket bat and the player are hand made ( my first attempt) with Gum paste.
The ball is Fondant and the stumps are made with cake pop/ lollipop sticks


The second opportunity came when my dear friend A, was taking a cake as a surprise for a friend's birthday. She wanted a black forest.
During the same time, my son had the last of his Marathi classes. I made a batch of Eggless Chocolate Cupcakes and decorated them with Nutella Butter cream and packed them all fancy, the kids loved them! 


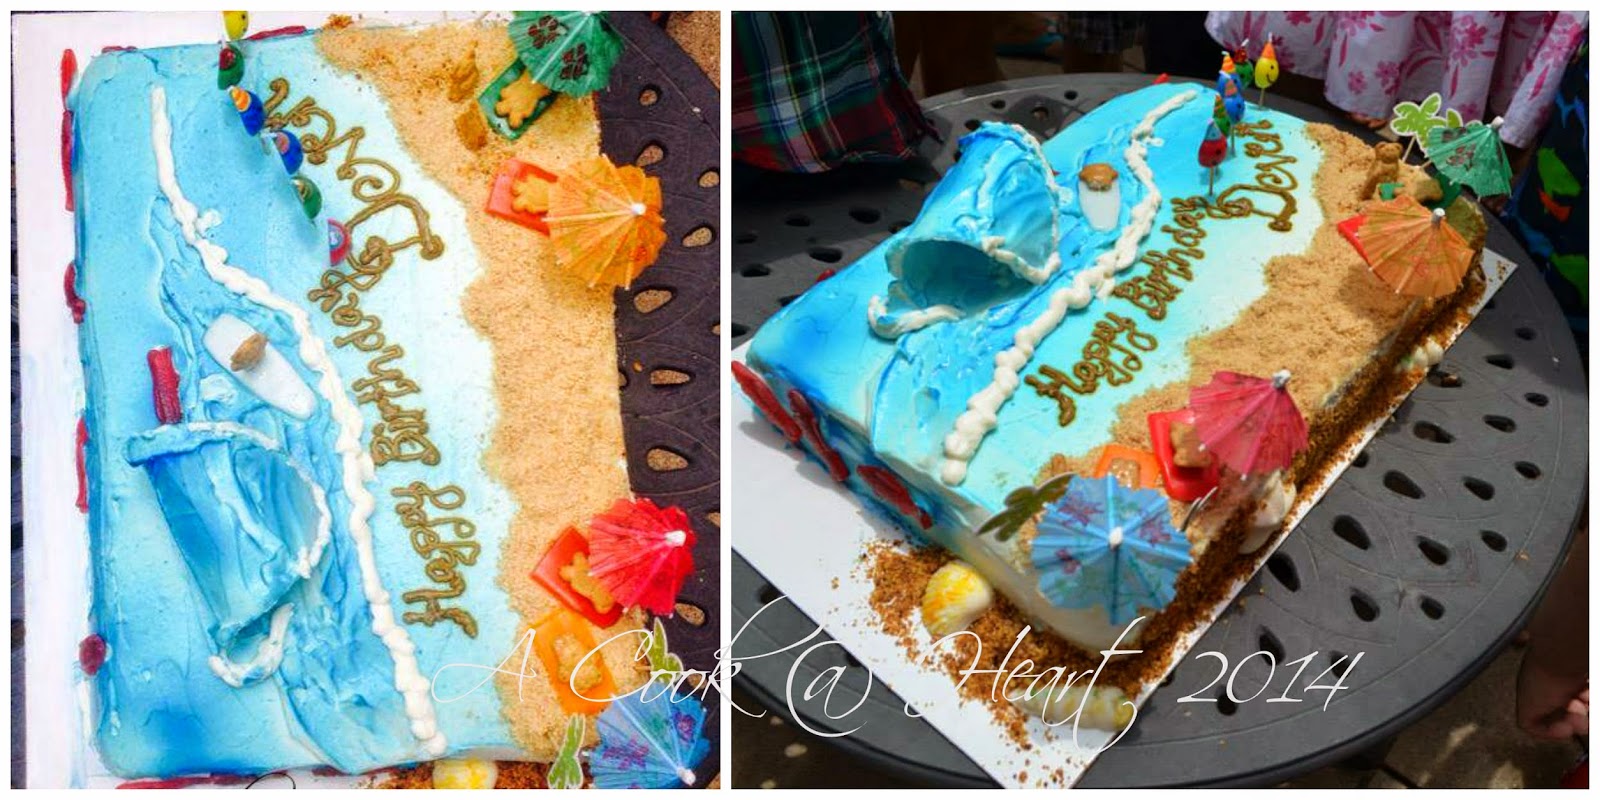
And just last month, my friend T's son turned 6 and they had a big party and the theme was 'aqua'. It was a pool party with an entertainer ( with a water slide) and the kids had fun.
The parents and I sat down and decided to make a cake that was 'beach themed'. 

 The cake was Vanilla and Chocolate marble cake with a whipped cream frosting in the layers as well as on top. 

I used Blue mist to color the ocean and used a Foam cup to make the wave and added a dollop of cream. 

White whipped cream was used to make the ocean foam.

The 'sand' was made with crumbled graham cookies

The Graham Teddies are laid on 'Air Heads' candy beach towels and the Surfer Teddy is also on an Airhead surf board.
Can you spy the shells on the cake board? these are made  using candy molds ( from Michaels) and melting chocolate.

And then there was my Spider Man cake for my son. 

What with all these cakes made, I have a lot of leveling to do and so there are always the domes to 
either throw or eat. 
I hate wasting food ( look in my fridge, you will find small Rubbermaid or Pyrex food containers containing daal or vegetable, just those 5-6 tbsp. that was left over :) ) 

And so, these 'domes' get a makeover! 


summer dessert

What you need is: 

Left over cake ( cut in cubes)
Whipped cream
Sliced and macerated Strawberries ( or Raspberries or a medley of berries)

Place cubes in the bottom of the serving cup/bowl of choice.
Top with the sweet berries with juices.
Swirl (or spoon) whipped cream .
Add a few more cubes of cake and repeat with the berries and cream.
Top with a fresh (washed) strawberry and serve.


These were a hit with my son! It meets the 'Kid Approved' category award. 
For left over Chocolate cake domes, you can pair it up with either fresh berries or even Cherry Pie filling and whipped cream, Black Forest in a cup! 


This makes a light and easy dessert option and looks SO pretty! A wonderful and easy to make summer dessert.
Pin It

Thursday, July 03, 2014

Spider Man, Spider Man, does whatever a spider can.....


A month ago, the Little one turned 6. 
Not so little anymore, huh? 

Still looks little to me.

And then I see, the kinda new school trousers skimming the ankles and I think, " I just got those. they look new ( unlike the  trousers I got at the beginning of school year, those are in such a bad condition, if I have my son wear them today, they are short, worn and torn and frayed, why he'd look like Oliver Twist !)
Makes me smile to see him grown up and yet, such a sweet innocent little heart tugger (you know what I mean)! 

School was still in session when he celebrated his birthday. We gleefully packed the goody bags that he proudly took to school.
Sadly, the school does not allow Kindergartners to have any celebration at all, so making and sending a cake was not an option. I made a small cake at home and we had a small celebration.

There was talk of the birthday party. But that got muddled with apartment hunting, which was exhausting but .... all's well that ends well.We found something suitable and sealed that deal.

The topic of the birthday party was on! 
It was decided that I would host a small Mother and kids pool party. Mid-week, my friends agreed and it was settled. The moms would also get in the pool and splash away! 
I have good friends, they agreed on such short notice. 

The main thing in a birthday party is the cake. Last year, Little S wanted a Burger cake. This year, it was Spider-Man.
Surprising, because he is not really a spider man fan (I am). But, if that's what he wants, that's what he gets.
I looked around and finally settled for this.
And though this could have been loads better, I am glad, I tried and most importantly, the birthday boy was thrilled.


The cake was my old reliable, Vanilla cake. The filling between the layers ( I kept it at 2 layers only) was macerated Strawberries ( wash, dry and chop the berries into slices and sprinkle with powdered sugar, cover and let them sit in the fridge) and whipped cream. For that, you need, 2 cups Heavy Whipping Cream, 1/4 ( or less, say 2 tbsp., your preference) Confectioners sugar and 1 tsp Vanilla extract. Chill the bowl and beaters for about 15-20 mins and then start the process.
Add the ingredients in the bowl of your stand mixer (or a regular bowl and your hand mixer) and whip on high speed until soft peaks form.

Follow the video instructions for assembly.

I used Butter cream for the top layer of frosting and Gel color to get this vibrant shade of red.
The one change I made was, I used Salted Butter, instead of unsalted butter, it helps tone down the cloying sweetness of  the frosting. I went with this frosting because it holds up well in the heat and would not turn runny or spoil in any way. Plus, butter cream is a dream to work with.

I had a wonderful time making this cake but ( yes, there is a 'but'), I dislike using so much color.
I gave this some thought and I wonder if spraying the cake with red color would have helped? It would have made things easy for me!
It's all learning. Maybe next time.

That border got cleaned up before cutting the cake

That's it from me. Enjoy the long weekend folks and stay safe !
Pin It

Sunday, June 08, 2014

Rava Oats Dosa

We lived in Wadala ( Mumbai) and my (late) Grandmother lived in Thane. A small distance that involved traveling by local train. 
Every holiday, we would go to her home. The whole family would meet. My aunts lived within walking distance from my Grandmother and my Uncle, with her. It was an overflowing house when we all met. 
Just the way we liked it.

We would start out early and walk to the station and get in the line to take tickets and then walk to the platform to wait for the train. I would walk to the 'Ladies' compartment with my Mom and that meant passing the Paper and Magazine stall. 
I loved looking at the colorful books, papers and magazines,but what I used to be excited about was the story books and comics for children.
Some 30 plus years ago, Tinkle, Chandamama, Chacha Chaudhary, Phantom, Mandrake the Magician etc. were a rage and later Archie comics and of course Marvel comics. Though these (Archie and Marvel) were not so easily available on he station stands. 

If we had about 4-5 minutes until the train arrived, my mother would look at the magazines ( Femina, Women's Era, yes!yes! those were popular and of course the filmy stuff, Stardust, Filmfare and in cheap print, Mayapuri ). I would inch towards the comics and touch them reverently, then I'd sidle up to my mom's side and tug at her  saree pallav and gesture, smile and beg, beg, beg with my eyes. The tactic usually worked. she would usually buy me a comic I wanted.


To travel from Wadala to Thane, in those days, we used to change trains. Like a typical Bombay kid, I was used to traveling in the local trains and knew exactly what to do, I'd tuck the comic book under my arm ( if I was wearing a fancy frock) or into my jeans waist band ( not pocket, the waist  was safer)  and stand... waiting. As soon as the rain stopped ( and the ladies had exited) I'd JUMP in and scramble to get a seat, a window seat preferably, whip out my comic and place it either next to me or on the opposite seat to reserve it for my Mom. Once we were seated comfortably, I'd start reading and stop only when changing trains. 

This week, when I went to the library to pick up some books, I saw a flyer for a book sale and decided I had to! go .
After spending a good amount of time walking thru the aisles and then at the cook book shelf (more on that later), I wandered to the kids section and after looking (and reading) the books on the table nearby, I found, to my delight, some of my childhood favorites!  
I grabbed them and let me tell you, I'm still lovin' them! 

Busy days and end of school term next week means the little one will be home all day. To all those who say, YAY! it's summer! Let's go out. I invite you to Dallas. 
I'm going back to my safe, air conditioned, cocoon. Thank you. Enjoy your summer.

I have also decided to fatten up the little one. He is scrawny. when I see well nourished children, I sigh. When I see chubby kids, I often wonder, how? h-o-w?? 
He takes after his father. Scrawny. 

Humph! 

I try various things on the Scrawny ones. In between I started giving Little S, fulkas and a vegetable stir-fry. He protests, of course he does. But I am well prepared. This will invite criticism, but I switch on the T.V and feed him. Calories are calories. 

In all these after school snacks, I prefer making Dosas for him. Hot off the griddle , smeared with ghee (for him) sometimes I just spread cheese inside and serve it with some ketchup. He seems not to object.

Instant Dosas are a boon in such cases. I have loved Rava Dosa for as long as I remember. Lace like, crisp and paper thin. Oh! I recall eating them at restaurants ( my Mom used to order it and I'd 'share' with her). As I stand at the stove making these, there are a few things I have changed. My Rava dosa is not oily as those in restaurants and not as paper thin, as a result. And to kick up the health factor a bit, I add lightly roasted and powdered oats. These are more tummy filling than the original version.Ideal for a weekend breakfast or an after school snack.


You need:

2/3 cup Oats ( regular oats) , dry roast these- the color changes slightly and they smell toasty, cool and powder.
1/4 cup EACH Rice Flour and Rava / sooji
1/2  big or 1 medium Red Onion chopped, fine
Chiffonade a few Curry leaves
1 tsp Jeera / Cumin seeds
1-2 Tbsp finely chopped Cilantro
Salt to taste
1 tsp finely chopped Green chilies
3 Cups Water (or more as required to make a super thin batter)

Mix all the ingredients listed above and carefully add water, mixing well as you pour. This is important. dumping all the water in at once will lead to clumping, you can sort it out, but that s just a waste of time.

Taste and check the salt adequacy. Cover and keep aside for 10 mins.

When ready to make dosa, first heat the tawa / griddle , very well.  If you are using a non stick griddle, like I do, just spray oil (PAM or similar) and wipe off with a clean tissue.

Stir the dosa batter well ( by this time, the solid has sunk to the bottom and it looks like muddy water, a good stir  is needed) add more water if needed, while the batter is sitting, it absorbs water and becomes slightly thick. Remember you want a very thin batter.

To make this dosa, unlike the regular dosa, you will NOT drop batter in the middle of the griddle and spread it out into a circle. No ! What you will do instead is, scoop the batter in the ladle, start on the outside of the griddle and just 'pour' the batter in a circle. Go from the outside of the griddle in the middle. The batter spreads well and because the griddle is super hot, it becomes lacy.

Drizzle some oil ( or spray)  / butter or ghee ( for the scrawny ones) as it cooks.
Most people stop the cooking as soon as the bottom is crisp and golden. I usually flip the dosa and cook briefly on the other side too.

These crisp golden lacy dosas are best served right off the griddle with a chutney of your choice and sambar. Sometimes I serve dosas with just chutney(s) and the second chutney usually is Molgha Podi with a drizzle of oil. To make these for dinner, stuff the dosa with potato masala.


NOTES:

- You can increase the amount of oats to 1 cup
- You can cook the onions before adding them to the batter. Heat a tsp oil, add some mustard seed , when they pop, add cumin, when the cumin sizzles, add the curry leaves, green chilies and onion and sprinkle a pinch of salt and cook till translucent. Add this to the batter and make dosas
-If you like, add 1/2 tsp of black pepper powder. Exclude for kids.
-You can skip the onion to make regular rava / rava-oats dosa.


Enjoy your Sunday, folks! Have a good week ahead.
Pin It

Tuesday, April 29, 2014

Egg less Chocolate cake / cupcakes

Last weekend we watched Captain America (2) movie. We all (little S included ) voted for it. 
I was thrilled. I grew up on a steady dose of Marvel Comics and all these superheroes were and are my favorites. At one time I desperately wanted to be a mutant, like the X-men and wished and wished for some strange power to manifest itself on every birthday. 
I could not let a spider bite me, I flee at the sight of anything that creeps, crawl or slithers. I was definitely no Asgardian. With hi-fi technology limited only to the multi-billionaires and only in the USA, I was left with just my imagination and the only option available to me, to be a mutant.
Years of disappointment only made me read all possible comic books I could lay my hands on.

Then there was the fairies stage, I wanted some fairy to grant me wishes. Or at least take me to fairy land ( just like in Enid Blyton's books).

After that came the detective stage ( this was after the adventurer stage, where I wanted to be that lucky kid who found some treasure or a gang of smugglers). I realized (after reading a lot of Sherlock Holmes, I as neither as intelligent or as intrepid as him) I was not quite cut out for that sort of a thing. 

While that sort of dream faded over time, the charm of comic books remained strong. And so, every super hero movie that is released is a visual treat for me. 
I was glued to the screen during the movie making sure that little S had his supply of popcorn and chips. After these were done, he got antsy and I transferred him to his father.
The movie was good. 

Just like my generation had their favorite super heroes, my son's generation has theirs. As of now, Power Rangers, Avengers, Spider-man and Ninjago rule.

A very special 4 year old (R), is a HUGE (yes, yes, in capitals) fan of Ninjago. He gets his from his elder brother.  So naturally, his birthday had to be a Ninjago themed celebration.

His Mom (Samta), wanted cupcakes to take and share with R's  pre-school friends. 
Kids love chocolate ( and so do most adults, chocolate is the universal language) and we fixed chocolate flavor. And Samta and her family are vegetarians and prefer egg less cakes. 
I decided to make egg less chocolate cupcakes with butter cream frosting and fondant decorations.

I found a Quick and Easy Chocolate cake recipe that I have tried with great success. this recipe makes two, 9 x 2 round layers or 24 cupcakes.


DeDe Wison's Quick n Easy Chocolate Cake

3 cups All Purpose Flour (APF)
2 cups Sugar
2/3 cup, sifted, Natural Cocoa
2 tsp. Baking Soda
1 tsp Salt
2 cups Water at room temp.
2/3 cup Oil 
2 Tbsp. Apple cider Vinegar/ white vinegar
1 tsp Vanilla extract

Pre heat the oven to 350 F

Grease the cake pan or get the muffin pan lined and ready.

Whisk the dry ingredients (flour, cocoa, sugar and baking soda) and set aside.

Using a whisk/ had held mixer or your stand mixer, mix oil, water, vinegar and vanilla

Combine the wet ingredients with the dry and mix until well combined and smooth.

Divide the batter evenly in the pans and bake for 30 mins. or until a tooth pick inserted comes out clean.

Cool the cake in the pan over a rack for about 10 mins and then invert on to the rack to cool completely.


This cake is moist and very delicious. I was always apprehensive about egg less baking and that I would be a big flop at it. This recipe  has made me confident :) 

For the cupcakes, I used my butter cream recipe for frosting (the yellow part) and covered the cupcakes in fondant. The eyes and brows are made using fondant too.

I am not a fondant fan and can never eat it, but I cannot deny that it looks good on cakes. 

Coming up (soon) is another cake I had the opportunity to bake for a 7 year old! 
See you soon.
Pin It

Wednesday, April 23, 2014

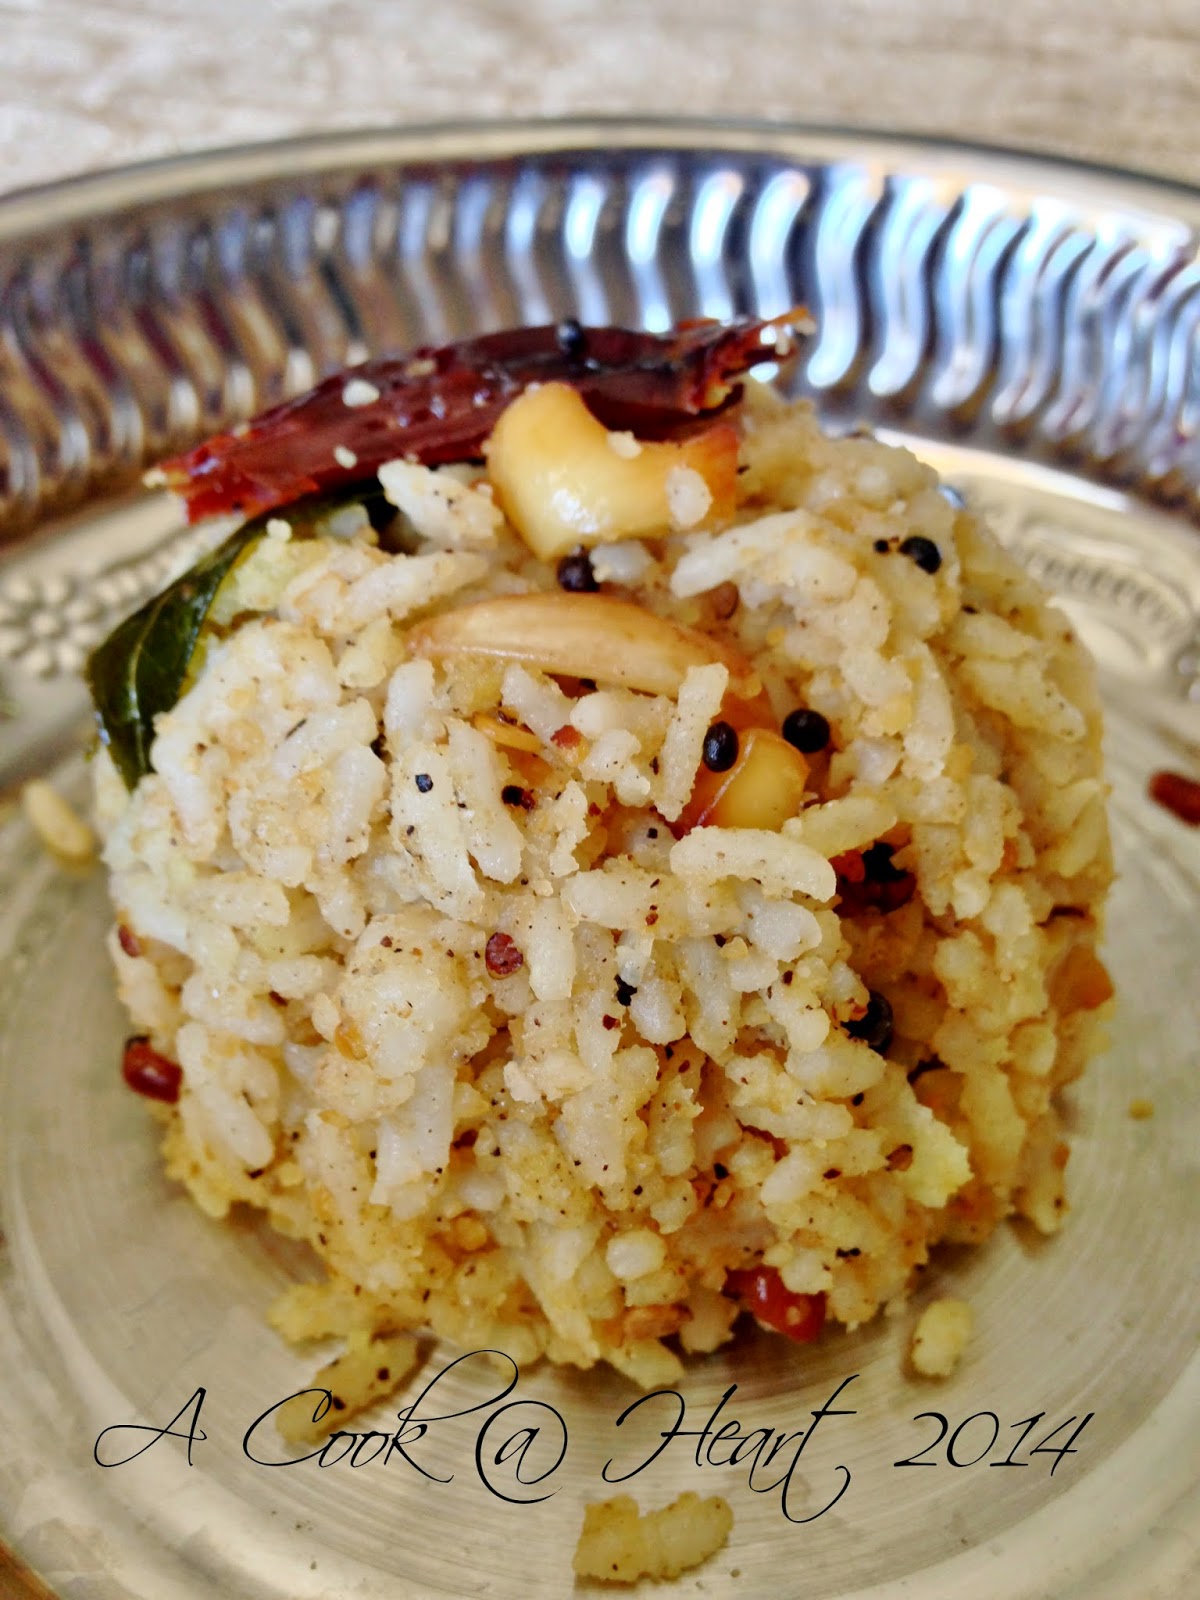
Ulundu Sadham ( Black gram daal rice) : A quick lunch box option

"Oh look at that giant bug! hahahahaa! April Fool! "
"Look, Loooook, what is that?" hahahaha! April Fool!"
" Looooooook, a giant... monster ( animal/ bug/person).. hahahah! April Fool" chants Little S in a sing-song voice.
He loves April Fools and refuses to believe that we fool others only on the first day of April. 
It's been a long 3 weeks of April fooling in our car and home.
It reminds me of all the silly pranks I pulled on my parents, mind you, some were good.
And so, just as my dad participated in all my pranks (whether he fell for them or not) I do the same for Li'll S. All the way back from school, going for karate and on the way back. 
It's been a long 3 weeks......

I have been cooking a good deal, jut not posting. It's weird, I want to but something holds me back. It isn't lack of time, just motivation, I guess and that I am reading books and watching TV. 
On my last trip to the library, I picked up Climbing the mango trees by Madhur Jaffrey  and am thoroughly enjoying reading about her memories of growing up in India. It also brings back a surge of memories of my childhood and how some things do not change with time.

I am also watching a series on Netflix, 'Midsomer Murders' which Nupur mentioned on her blog and I find them very engrossing. 
I mentioned the series to some friends here and they are thrilled to have something to watch in the afternoons (one friend and I share our liking for Brit books as well as TV series, as she rightly put it, "English  drama is so classy..." I agree, there is a quiet dignity to how everything is portrayed). 

And now we move on the topic of cooking ( which is the reason, this blog exists) I must add, we have cut down on white rice, significantly. Earlier no meal was complete without rice. Many a times, rice and daal were our meal, but that has changed now. And when I do make rice, there is always some left over. This left over rice is usually sauteed with vegetables and converted to fried rice or a quick Lemon rice for M's lunch box.
There are so many variations to transform plain ol' white rice into a spectacular dish with layers of flavors. 
I prefer working with left over rice, it's quick and easy.
For my recipe today, I use left over rice and the recipe is adapted from Dakshin by Chandra Padmanabhan.


I used:

approx. 2 Cups Cooked Rice
approx. 10-12 Cashew Nut pieces 
1 Green chili, slit ( seeds removed)

In a pan, dry roast, 2 tbsp. Urad daal, 1 tsp. Black Peppercorns (kali miri), 2 tbsp. Sesame seeds and 1 1/2 tbsp dry flaked Coconut.
Cool the roasted spices and grind to a powder in the coffee mill.

Heat oil in  wok / kadhai/ saute pan. Add 1 tsp. mustard seeds and 1 tsp each urad and chana daal ( I usually have this mix in my spice container and never measure, I just add it, eyeballing the amount) As the mustard seeds pop and the daals turn golden, sprinkle in a couple of hefty pinches of Asafetida and then add one (halved) dry red chili, the green chili  and a few curry leaves.
Stir the tempering and then add the rice and the spice powder and salt to taste. Mix well, be gentle though, don't break the rice. Taste to check salt. Switch off the flame and serve.


NOTES: 

-If you cannot tolerate heat, reduce the amount of peppercorn to half or as less as you prefer, ( that is a safer and better option in case kids are going to eat it) but do not skip it.

-This rice is best served warm, however it keeps well and tastes good at room temperature too. 

- The original recipe uses fresh cooked rice

- You can use fresh coconut, however that means the shelf life of the rice is short. 


Pin It

Tuesday, April 08, 2014

Basbousa ( Libyan Semolina Cake)

I always thought my father was missing out on a lot where his birthday was concerned. He did not eat cake. I don't remember getting an egg less cake , did we even get one in the late 70's or 80's in India?
A traditional sweet was the highlight of the day.
How disappointing! Not having a (cream) cake, not blowing out the candles and cutting the cake with a chorus singing "happy birthday to you.... (and then trailing off with ) may God, bless you..." 
No paper plates with the customary slice of (cream) cake and wafers (chips) and Rasna. 
But Baba cannot tolerate the idea of a cake with eggs. When ever I bake, he always asks, " kaccha anda ghatlis ka?" (did you add eggs?). My answer is mostly yes. Though that is changing now! More on that later.

So, about 6 years ago, when my parents were visiting me, my father celebrated is birthday with us. I decided to bake a cake. An egg less one. This was an intimidating task, for one, I was scared ----less where baking was concerned and two, I was a new mother, my little S was about 2 weeks old. 
To cut a long story short, I made a Rava Cake, which at that time, seemed like a good (and the only idea). I made the cake, he cut the cake, we all ate the cake. We declared it 'baked Sheera' and that was it! I shoved the idea of egg less cakes in the deepest recesses of my mind and kept them locked.
Years later, a few weeks ago, in fact, a friend e-mailed me and we discussed some menu items for some guests she had invited. We mailed back and forth and she mentioned that she was making Basbousa for dessert. 
I could not help but laugh and think of my desperate attempt at making a cake for my dad and ending up with a pan of 'baked sheera'.
But Basbousa sounded so unlike baked sheera and was definitely on my 'must try' list.  

I made this for a small potluck we Bus Stop Moms had planned and it was very well received! I have this picture only because I saved a piece for M.

Source: here

1.5  Cup Semolina ( I used the regular coarse Sooji, next time I will use the Fine variety)
1/2 Cup All Purpose Flour
1/2 Cup  Sugar
1 tsp. Baking pwd
3/4 Cup Oil ( I used Canola)
1/2 Cup Milk ( I used Whole milk)

FOR SYRUP
1 Cup Water
1 Cup Sugar
1 Wedge lemon


Heat water in a pot and add sugar, dissolve to mix squeeze lemon. 

Once it boils, turn down heat to low and simmer for 15 min. Remove from the heat and cool syrup.


Drop almonds in hot water to blanch and remove the skin, set aside.

Pre-heat the oven to 350F.

Lightly grease a 9" pan, keep aside.

In a large mixing bowl, add dry ingredients- semolina, flour, baking powder and mix well, then add sugar, stir to combine- add oil and milk- mix until smooth

Pour into greased pan and tap gently on the counter top to make it smooth.

Carefully, score the batter in the pan (make square or diamonds) place a blanched almond on each square

Bake at 350 F  for about 30 mins until edges are golden brown.

Remove from the oven and once again, run a knife thru the already scored batter marks

Cut right thru with a sharp serrated knife and bake again for about 15 mins

Remove the basbousa from the oven and pour the syrup evenly on the top to cover it completely.(You should have about 3/4 cup of thick syrup)

Let the syrup soak in and  then cut the squares and serve! 

Pin It

Friday, March 21, 2014

Muffiins, Bran Muffins for breakfast-on-the-go.

I am a picky eater. I have issues with textures. 
When I was little, I would peer into the yogurt bowl ( home made yogurt) and squint painfully to check if there was any 'malai' and if there was, I'd reject the whole thing. My parents wold strain the milk and set the yogurt. I would again squint painfully and with a spoon in hand, scrape off the top layer of yogurt to reveal the silky smooth yogurt below. 
As my tea cooled, a film would cover it. Arrgh! I'd run into the kitchen and get a super fine tea- strainer and a fresh cup, strain my tea and drink it. 
I could do all this at home but it was not so easy when I was visiting someone. I'd politely decline tea or coffee even though I was in sore need of the much needed four o'clock cuppa. Sometimes I'd fake and say I am allergic.

M does not see eye-to-eye with my picky nature. He tsk-tsks every time I pick and trash the plasticky film from the top of milk (when I need to boil it). He wonders why I run miles from food that is slimy-ish (like eggplant or oats). He loves oats, eats them for his breakfast, everyday. No sugar needed. GULP!
I prefer these oatmeal bars.
Then one day, M comes home from Sprouts and has bag of  wheat bran. I slapped my forehead and in the very 'wifey way' asked, " arey ha bhusa kashala anlay ata?"He went on and on about this stuff.  I huffed and I puffed.
Then one day, M actually tried to eat the bran like he ate oats. I could not take my eyes off the the rhythmic way his jaws were working and also noticing that he was not gulping. I nodded approvingly, "Bran is good. Loads of fiber. Loads of benefits. Very good" I added, rubbing it in.
I am perverse that way.

Finally, he decided that good or not, bran was better used in some other form. He mentioned it to me, in passing that, bran muffins were good for health.

The idea of a muffin was a good one though. And it would finish up the bran. This recipe caught my attention. 
I made a few changes to the recipe (not the measurement, of course), substitution, really. The changes worked very well and we all enjoyed the muffins, M shared some with his colleagues too. 
These muffins are very moist and slightly sweet making them a treat. They are good for breakfast-on-the-go.


Here is the recipe with my substitutions:

  • 2 cups  Wheat Bran
  • 1 cup date and nut snack  or just dates- pureed
  • 1/2 cup  dark raisins
  • 1 cup, plus 1/2 cup water
  • 1/2 cup  buttermilk ( if you do not have store brought buttermilk, use 1/2 cup milk and add 1/2 tsp Vinegar, let it stand for a few mins, then use it)  or plain low- or non-fat yogurt
  • a few swipes of fresh orange zest (unsprayed) (I did not have any, I left it out)
  • 1/2 cup  packed light brown sugar
  • 1/2 cup  vegetable oil
  • 1 large egg
  • 1 large egg white
  • 3/4 cup  flour
  • 1 teaspoon baking powder
  • 1 teaspoon baking soda
  • 1/2 teaspoon salt

  • Preheat the oven to 350F. Line a 12-cup muffin tin 

  •  Spread the wheat bran on a baking sheet and toast in the oven for six to eight minutes, stirring a few times so it cooks evenly. Let cool.

  • Meanwhile, heat 1 cup of the date snack / dates with 1/2 cup of the water. Simmer for ten minutes, or until the water is all absorbed. Puree the date snack / dates until smooth.
In a large bowl, mix together the toasted bran, buttermilk or yogurt, 1 cup water, then mix in the date puree, orange zest, and brown sugar.
Stir in the oil, egg and egg white.
Mix together the flours, baking powder, baking soda, and salt, and sift directly into the wet ingredients. Stir until the ingredients are just combined, then mix in the 1/2 cup raisins.
Spoon the batter into the muffin tins, making sure the batter is mounded slightly in each one. 
Bake for 25 to 30 minutes, or until the muffins feel set in the center.

breakfast on the go


Have a great weekend! With the weather clearing up, it is splendid outside! Pack these muffins in your picnic basket and enjoy the weather.
Pin It

Monday, March 17, 2014

Curry Leaf Bread in a Bread Maker

Every Sunday, we go to the Hindu Temple and our little one attends classes that teach him about the various Gods and Goddesses we worship. It is more like story time and that is what we would like to keep it at. After this class, he toddles off to the regional Language class. 
We have enrolled him for Marathi. 
I usually sit with him in the class and help him to write Marathi alphabets ( and thorough;y enjoy myself  over the pronunciations) . 
Over the past few months, these classroom sessions have been fun and also helped me make some friends.
With most Mom's with Kindergartners, we all bond well and have the same complaints and funny anecdotes to share. The teachers are also a lot of fun and keep the atmosphere light and easy going, which helps the instruction.
The class lasts an hour and by noon, all the little ones (and the parent attending with the child) are hungry. A little bite is always welcome!


Just last month, I made a small investment and added, to the already large amount of gadgets in my tiny and cramped kitchen, a Bread Maker Machine.
Source: Google Search
I found this on craigslist. I was a bit skeptical when I went to see it, but the person assured me it was in working order. Of course, the couple also added they used it only to make roti dough. I bought it. For the price, it was a good deal.
I came home and Little S and I looked at it carefully and decided to go ahead and bake a loaf of fresh bread.
It couldn't be simpler. And the results were great! I was dancing! No more kneading. Oh yes! I could live with that.

And so, 2 weeks ago, I made this fantastic and fragrant Curry Leaf Bread in my Bread Machine and shared it with the Marathi Class Teachers and friends. 
the loaf was sliced in to slightly thick slices and slathered with butter. Everyone loved it and all the pieces were quickly polished off. I was thrilled to bits.


This recipe is a keeper and here is my slightly tweaked version: ( for use with a Bread Machine

In a large mixing bowl, combine 4 cups All Purpose flour, 1 tsp. Turmeric powder, 1 tsp. crushed Cumin Seeds, 2 Tbsp. Finely chopped Fresh Curry Leaves.

In a microwave safe bowl, add 11/4 cup Water, 2 Tbsp. Unsalted Butter and microwave for 50-60 seconds, until the butter has melted.
The Water + Butter mixture must not too hot (about 110 F) 
Add this Water + Butter mixture to the bread pan, to this, add 1.5 tsp. Kosher Salt and 2 Tbsp. Sugar.
Carefully add the Flour Mixture on top of the liquid.
Make a shallow well on top of the flour mixture and add 1 packet (2 1/4 tsp.) Active Dry Yeast.

Close the lid and set the machine for White bread, 2 Lb. Loaf with a Medium Dark crust.

That's it. Really...

A fresh, fragrant loaf will be ready in 3 hours.
Un-mold and cool completely on a rack. Use a sharp serrated knife to cut slices and smear butter  and serve.


NOTES:

- I used only Water in this recipe, the original recipe calls for Water and Evaporated milk. I am planning on trying it  the next time I make this loaf.

- The original recipe is for baking the loaf in a regular oven. Read the instructions carefully ( the original recipe link is provided above)  and follow it.

- I have observed that the bread maker makes wonderful loaves, but they tend to be a bit dry on the second day. This reminds me of the fresh loaf or Paav we get in India. These are preservative free and have a short shelf life. So if you make this bread, share it with family and friends and enjoy it while it is fresh. 

- I plan on making this bread again and the next time around, I plan of increasing the liquid and fat amount a bit more. If this experiment is successful, it will be updated here :)

- For a bread maker, add the liquids at the bottom, top with flour and make a well in the flour ( shallow well, do not let the liquid show) and add yeast to the well. Select the right cycle and relax The machine does all the work.

Spring break is almost over  and we are back from a small relaxing and fun holiday and schools are all set to open. The weather is still misbehaving at our end and has even more mood swings than a pms'ing woman. We had a disappointing Holi and played indoors with just some dry color, thanks to my friend Sujata who dropped in and added some color into the dull day! 

How did you celebrate Holi? Do share some colorful tidbits from your part of the world, I'd love to know!

ETA: I made this loaf yesterday with Evaporated milk and water ( as per original recipe) and the bread was moister and oh! So tasty! the last slice was eaten today morning. Not a crumb left.
Pin It
Share

LinkWithin

Related Posts Plugin for WordPress, Blogger...
Page copy protected against web site content infringement by Copyscape