Monday, December 24, 2018

A test of strength and endurance and the Quickest Tomato Soup (inspired by OPOS ) for comfort.

October 2017 was an important month, for us. My son earned his Recommended Black Belt in his Tae Kwon Do training. 

We were that one, very crucial year away from the coveted First Dan Black Belt. We were given a folder with the curriculum and what was required to test. 
It was a lot, I thought. How will my baby do all that?  I watched him during his classes. I saw him do well in his forms and weapons classes. I saw him falter and get nervous during his sparring lessons.

As the weeks went by, his skills got better and I sighed with relief. But, we went to India for the summer and while that was a fantastic trip, it robbed us of 2 months of lessons, It was a lot to cover up. How was my 10 year old going to do this? That was the mom in me. Over protective and anxious. 

As the time for the test came closer, he trained harder than ever. 
And finally, it was time. 
The testing was a 2 day affair. Day 1 where his physical strength and endurance were tested. 
As I sat chewing my nails and worrying, he kept doing all that was demanded. He panted and held his sides after every test, his face and hair slick with sweat. Some of the other aspirants lay down with the exertion, only to stand up in a minute for the next test. Every muscle in his body was sore and screaming for rest. 3 hours and 1 water break later, we trudged  home, exhausted.
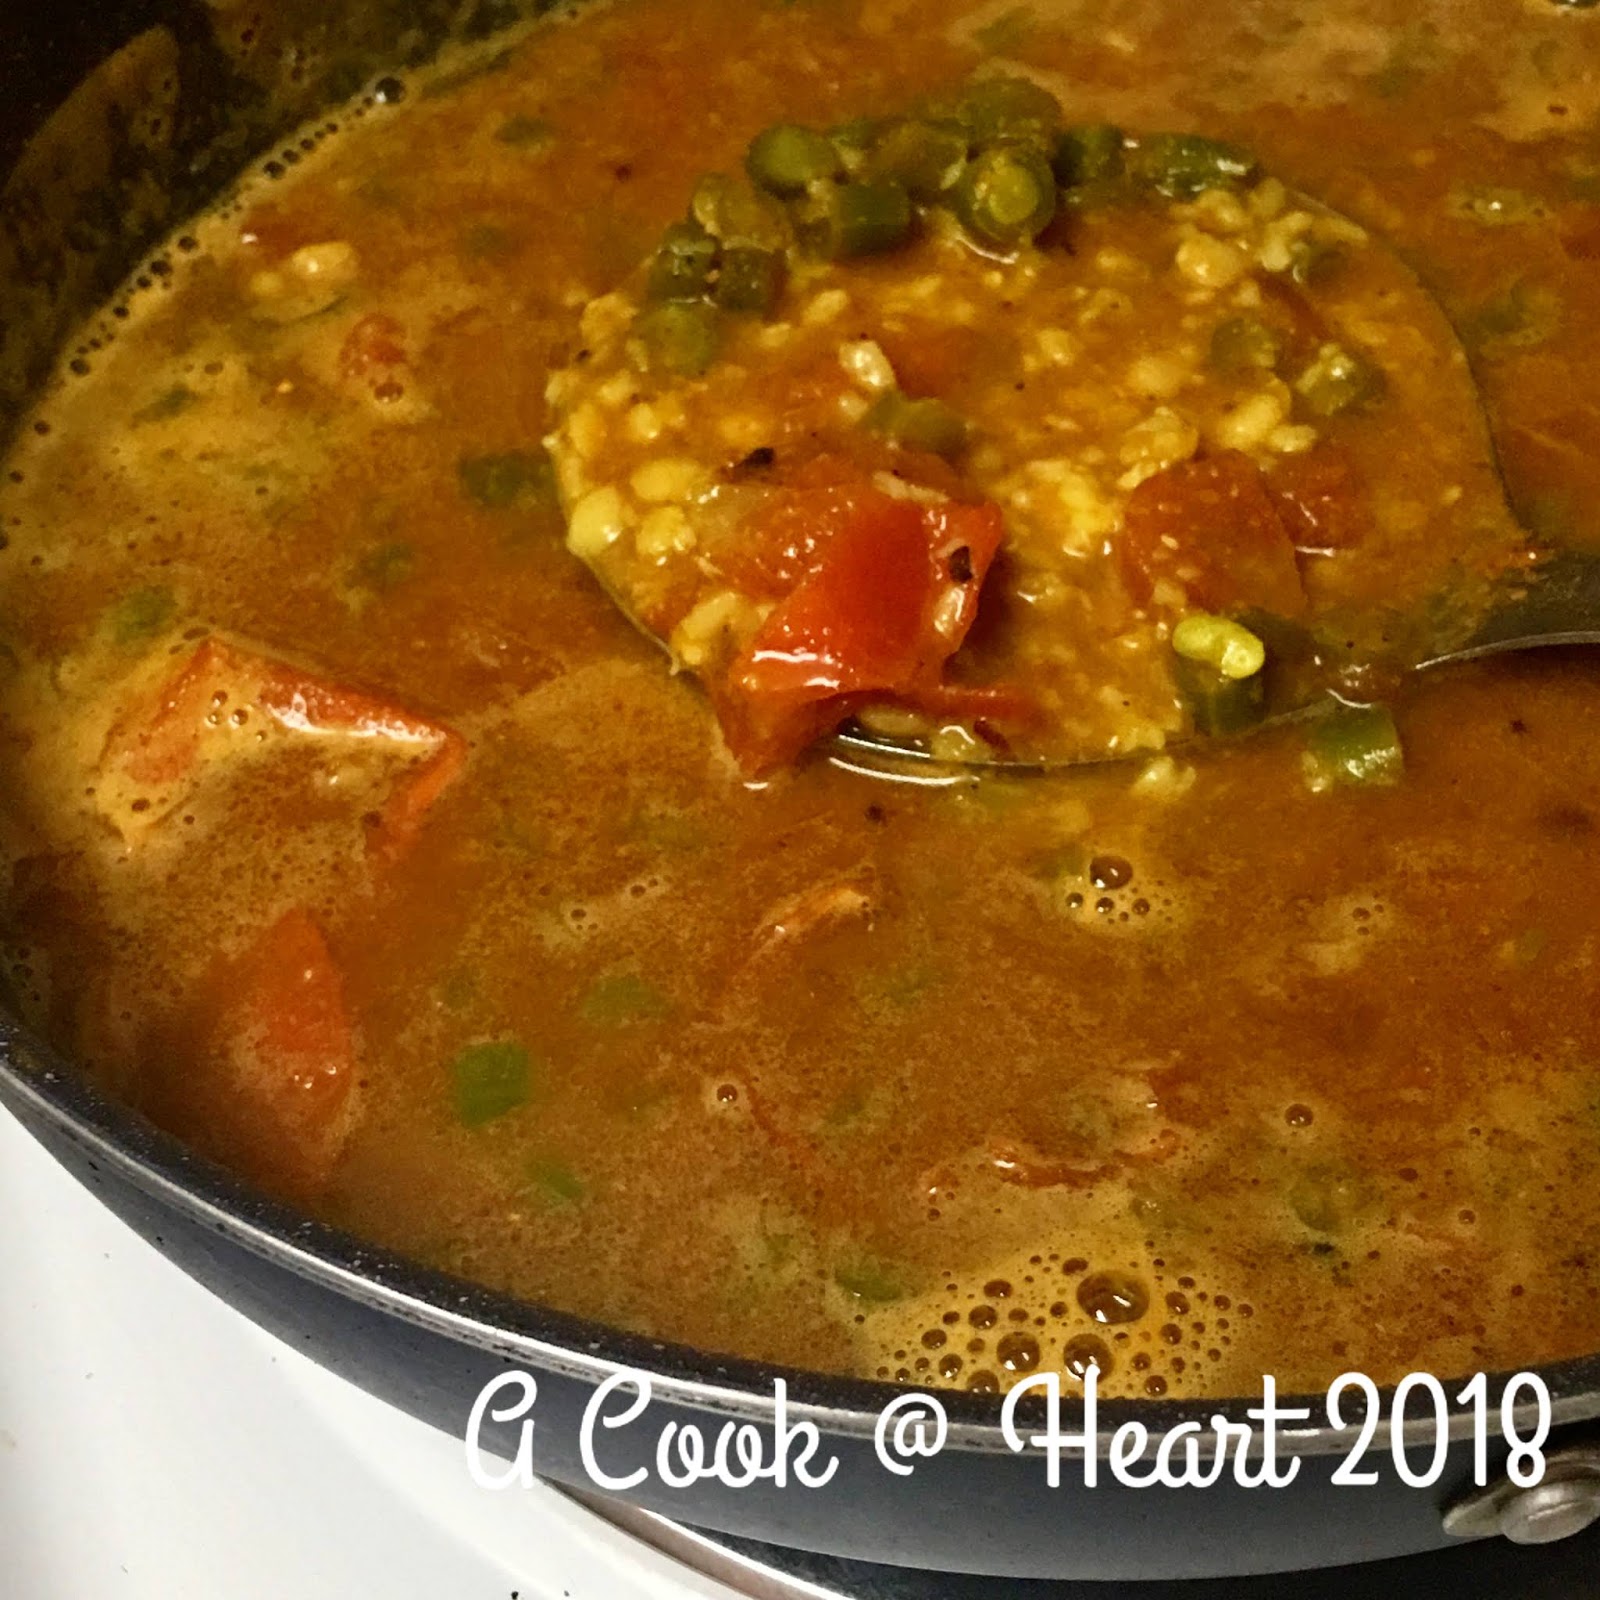
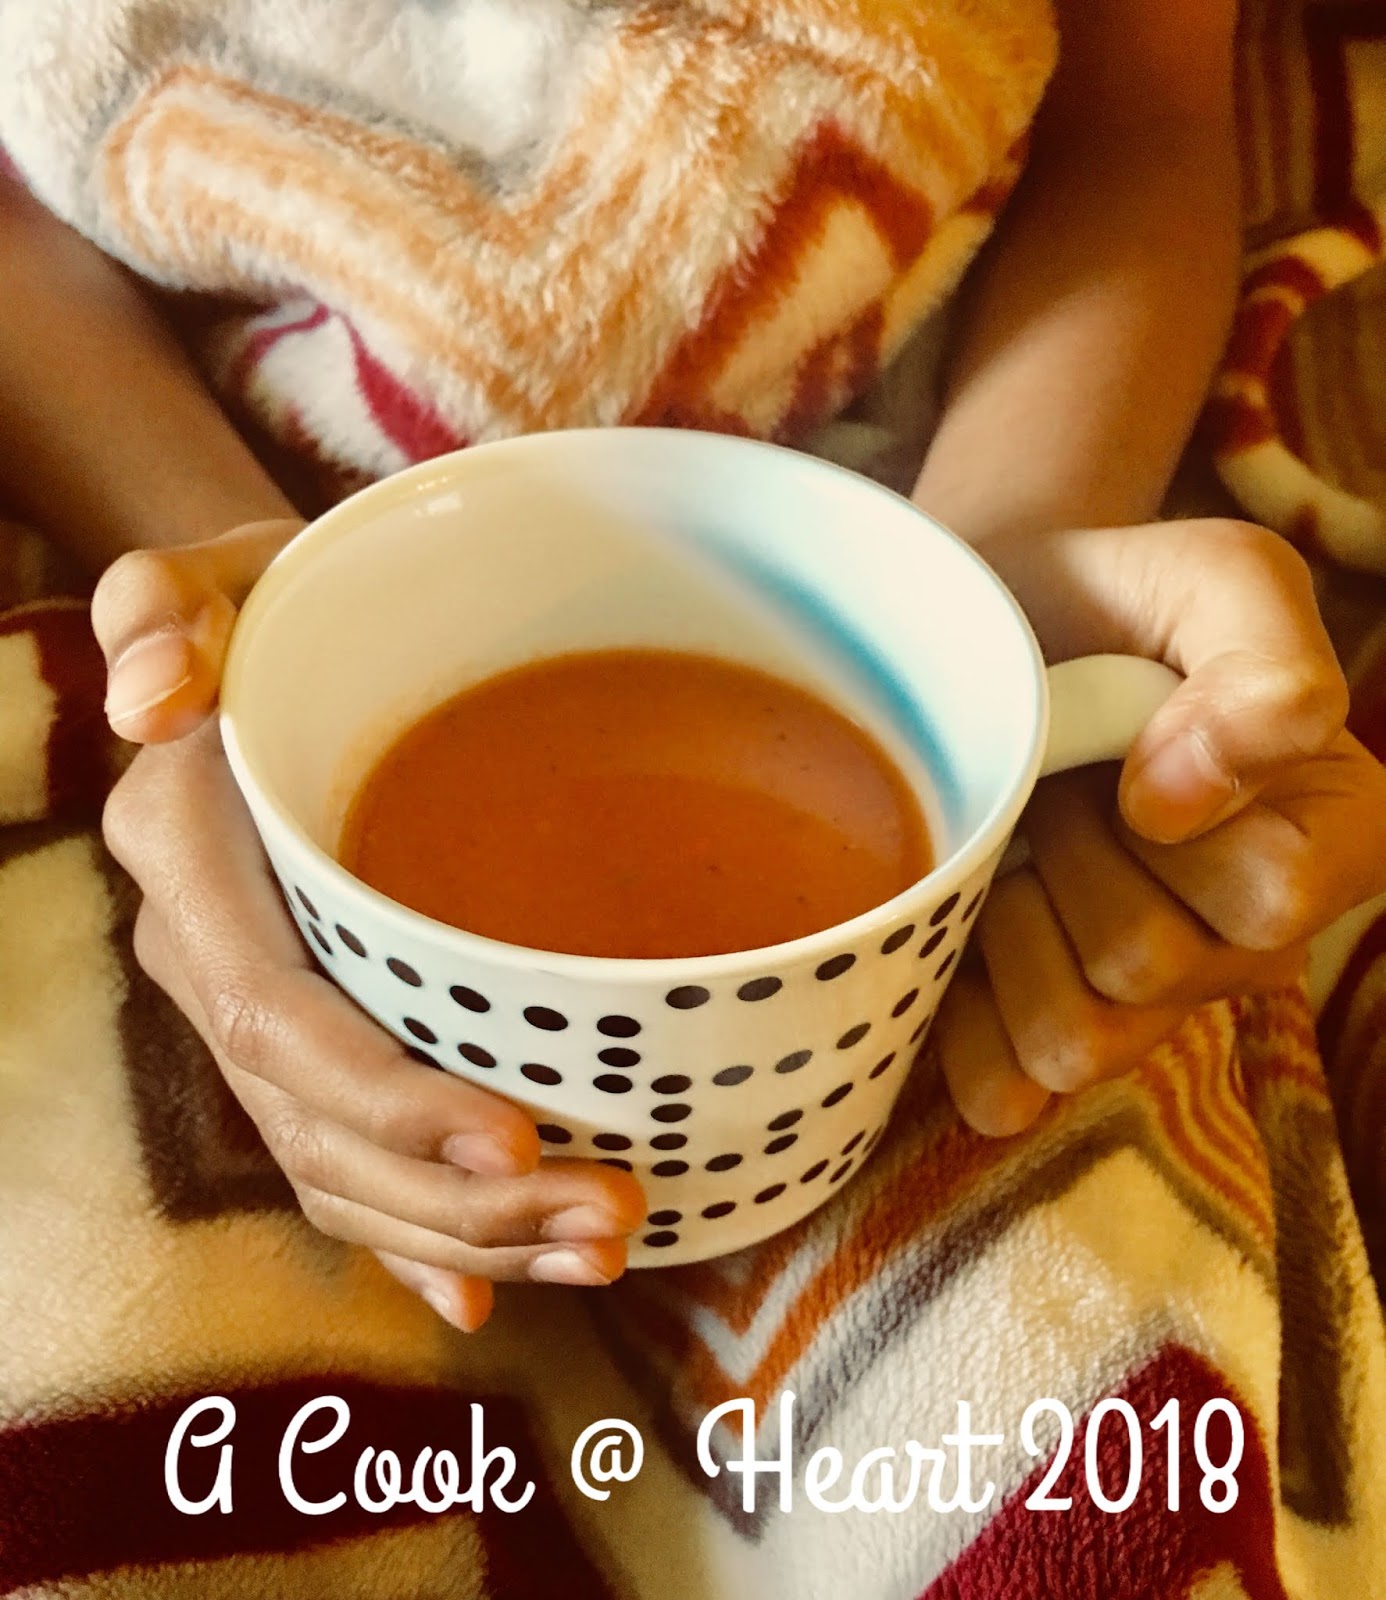
At the end of the day, we were happy, exhausted and above all, in need of comforting food. Since we had gone over the estimated time, All I could do was whip up this amazingly quick Tomato Soup and grill some cheese sandwiches on the side. I OPOSed the soup  (recipe below) and it was ready before my sandwiches! 

To continue... Day 2 was an all day test, which ideally would've begun with a 5k run, but weather did not permit it, so that was postponed. The written test, poomsae, weapons, sparring, self-defense and board breaking were the order of the day. 
As a parent, no matter of how much you support your child and push him / her to excel, when you see your child getting kicked and punched in sparring or surrounded by 4 other black belts who kick, punch, pull, push, pile on to him and he defends himself, you want to just get on the mat and wallop the daylights out of them and save your baby! It was the hardest 30 minutes of my life. I wanted to jump in that fray and save my baby, in hind sight, I do realize that any of those black belts would have kicked my a$$. These kids are strong. 
I remember when S was practicing for a tournament (his kicks for the board breaking event) and I held a target for him to kick. He almost broke my wrist with the first kick!  I love my boy, I love how well he can kick, but I refuse, point blank, to hold anything he wants to kick. I refuse to be reduced to a mewling adult writhing on the ground in agony. 

It's been 3 weeks since the test and we finally have the results. 
Li'll S has earned his First Dan Black Belt! 
I am SO very proud of him! 

To come back to the recipe... 

As always, I must first add, if you are interested in learning about this One Pot One Shot method  by Chef Rama Krishnan , begin at the very beginning. 
Do this ( follow the link to learn all about how to standardize your pressure cooker)
Follow the lessons one by one and then, once confident, try other recipes. 

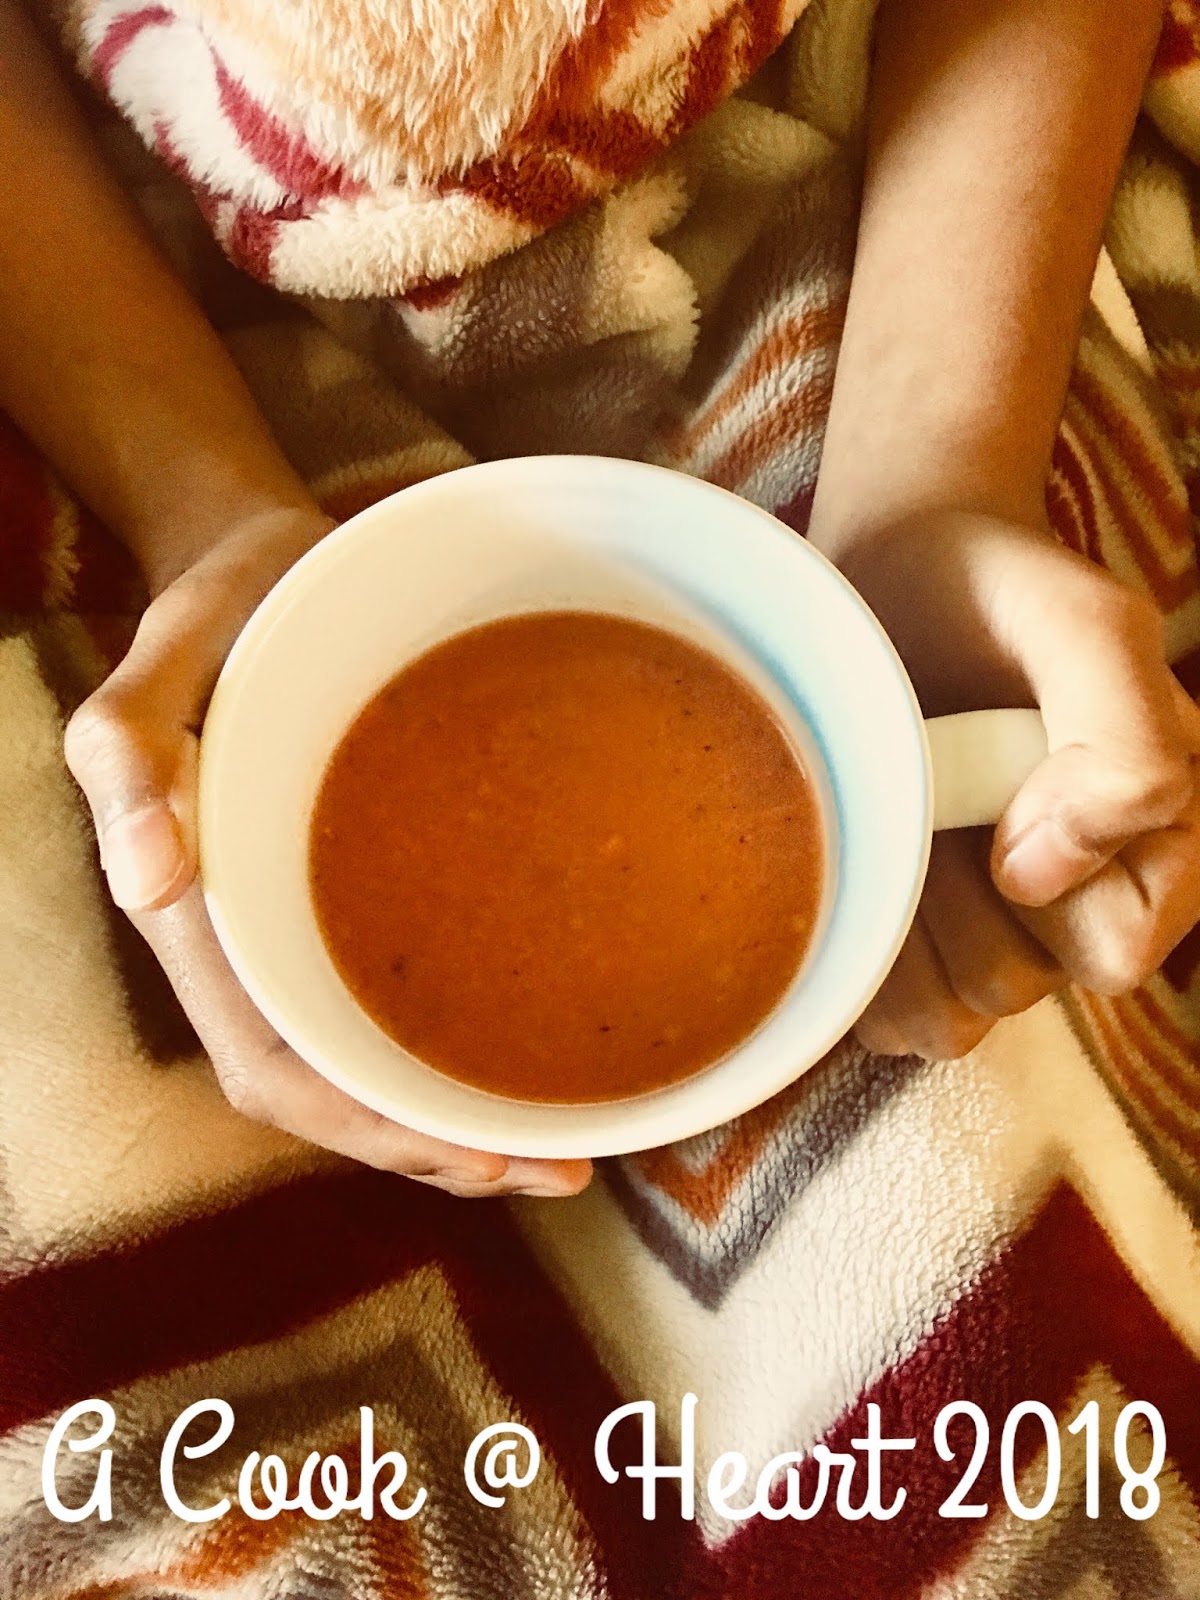
This is the quickest soup you will ever make from scratch. 

You need :
2 Ltr. Pressure Cooker ( make sure that you have standardized it)
5 Tbsp Water
1 small onion chopped
3-4 Tsp Butter
1 clove of Garlic
4-5 Roma Tomatoes ( about 250 gms.)

Slice the tops off the tomatoes and de-seed.
Chop the onion. 
Peel the clove of garlic. 

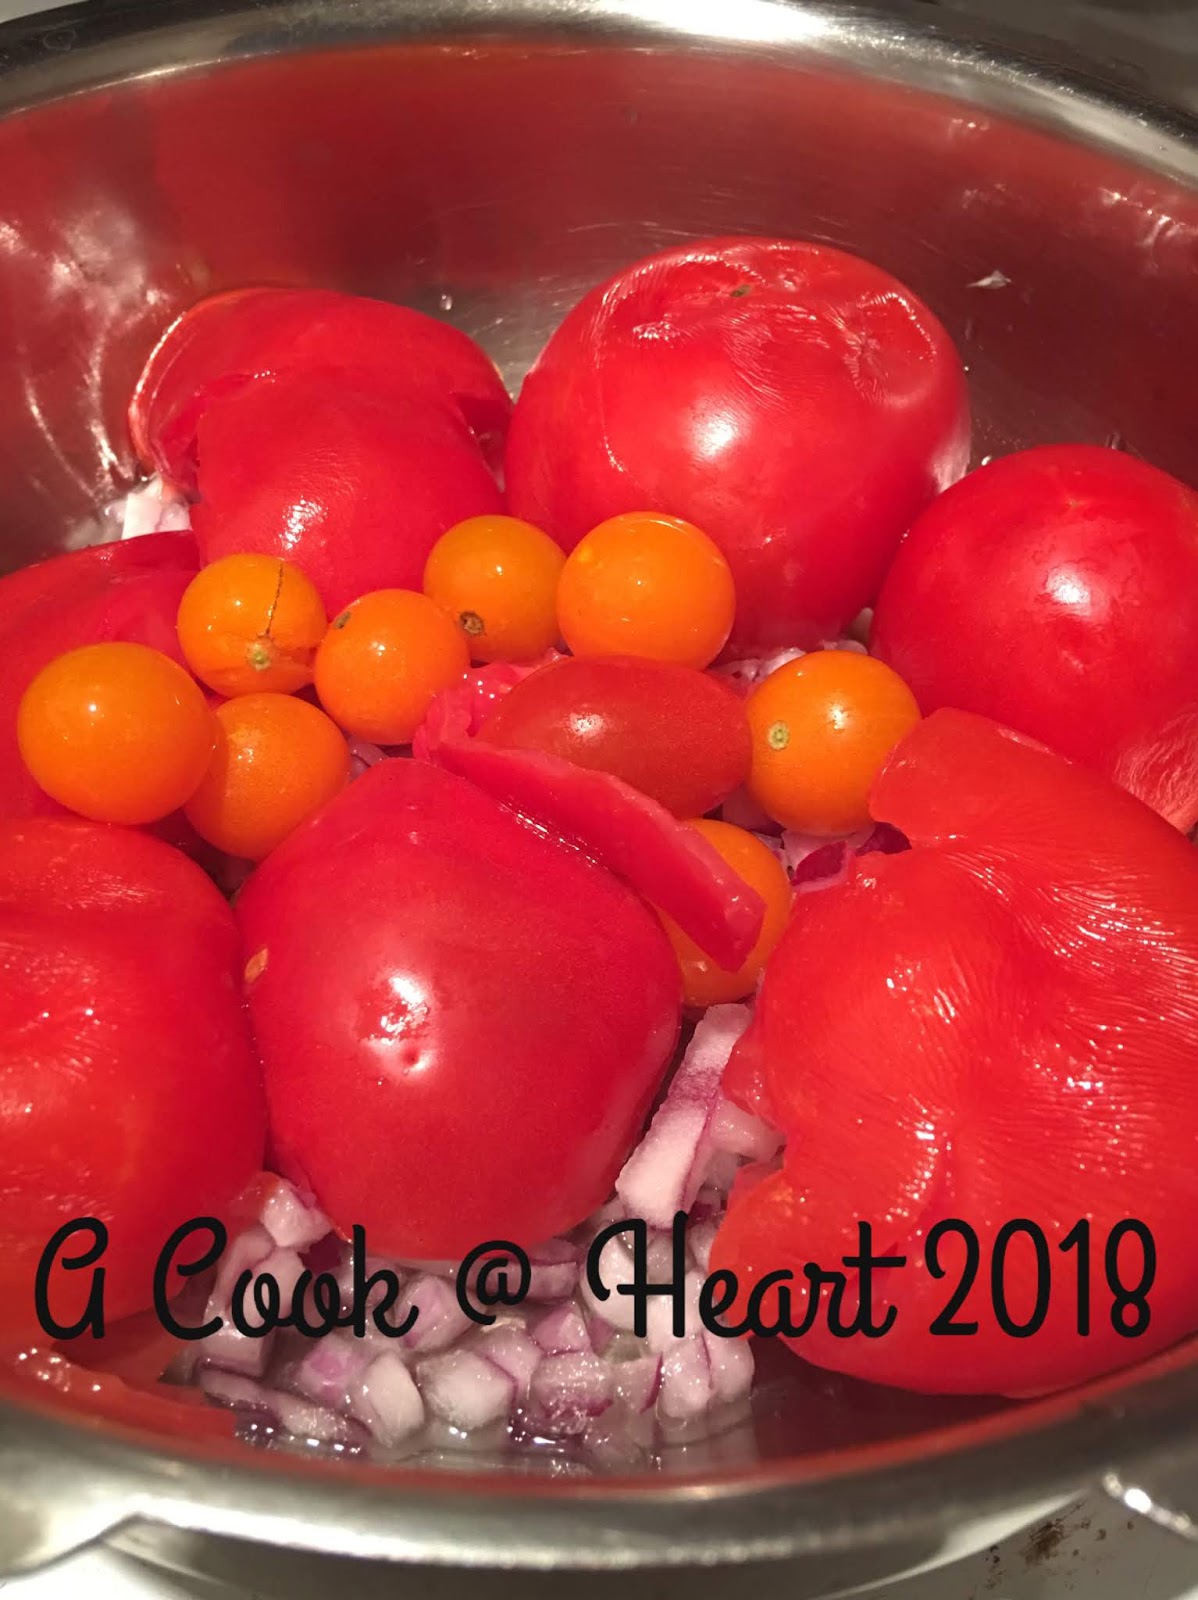
In the Pressure cooker, Layer as follows:

Add the water at the base.

Top with Butter

Add the Garlic clove

Add the onions 

Layer tomatoes on top.
I had these tiny tomatoes, so I just lobbed them in.

Seal the pressure cooker with the weight / whistle and cook on high for 5 minutes. 

Switch off the heat and release pressure, carefully. Use a spatula to lift the weight slightly to let the steam escape.


At this stage, if you want, carefully lift and discard the tomato skin ( I always do).

Add salt and pepper powder to taste. Add a spoonful of sugar to balance the flavors. I did not add as the little orange tomatoes were sweet and they balanced it out.

Blend the tomatoes. I used my immersion blender. 

Add water/ stock if needed to dilute the soup to suit how thick you want it. 

There you have it! All done. 
Add croutons, a splash of cream if desired. 
Serve hot. 
Check out the other OPOSed recipes here.

Wish all those celebrating, a VERY HAPPY AND MERRY CHRISTMAS! 

HAPPY NEW YEAR WISHES, IN ADVANCE! 


Pin It

Wednesday, December 05, 2018

Beans Kootu (a South Indian stew made with french beans)

My father had a very good friend, Oak Kaka. My dad and he would address each other as 'Maharaj'.  He was a very jovial person and had the merriest, twinkly grey eyes. He liked cricket as much as my father does and would often join  my father to watch a match.
I absolutely dislike cricket. Never understood the charm of grown up men chasing an itty-bitty ball like madmen.
But the men-folk loved it.
What I liked was, the colorful language that flowed freely. Oak kaka was outspoken in his criticism of any foul by any Indian cricket team member. His voice carried in to the other rooms  and I picked up the new vocabulary, eagerly, like any kid!

When the riots erupted in Mumbai in the '80's,  we all heard horror stories where people were stopped in the middle of the street and asked what religion they belonged to. What would you reply when you are faced with some fanatic, holding a weapon in your face? If you said one religion and he was the other, he'd slice you up, without a moments thought!
Oak kaka was stopped on a street when he was hurrying home, to safety. I only heard bits and pieces, but the gist was, he was yanked out of his cab, a sword was held to his chest and he was asked what religion he followed. Nothing but sheer presence of mind saved him, that day. He stammered out, "Parsi" and was let go. I thought that was brilliant! 

Oak kaka like french beans, They were his favorite veggie. He called it 'furshi'.
When I made this kootu (koot), I thought of him and felt that he would have enjoyed it as much as the simple stir-fry

A couple of months ago, I made a new acquaintance. R, had moved in to our apartment community in the summer and we met through common friends, when out for a morning walk. 
That's one of the things I enjoy on my walks, the crisp cool breeze, the absolutely beautiful mountains on all sides, the clouds hanging low and chatting with friends as we walk.
One day, R called some of us to her home for a small religious function and served us lunch. She made this kootu, which was delicious. I had to get the recipe.
The following week, R showed me how to.

Since then, this is one of our favorite ways of eating french beans. Ladled over piping hot, white rice, it is absolutely lip-smackingly delicious.

You need:

2 cups Beans, chopped
1 Tomato, chopped
1 cup, Toor and Moong Daal, cooked together and mashed
A key lime sized ball of tamarind soaked in 1/4 cup warm water and extract the pulp (discard the solids)
1tbsp Sambar Powder
1 Tbsp Cilantro, chopped ( tender stems ok)

To grind :
1 tbsp Chana daal
1.5 tbsp Coriander seeds
1-3 Dry red chillies ( adjust to suit your tolerance for heat)
1 tbsp Coconut ( fresh, grated) (you can add more, but I don't like it too 'coconutty')
Salt to taste

To Temper
2 tsp Oil
1 tsp Mustard seeds
Pinch Asafetida
Curry leaves


Wash the toor and moong daal in 3-4 changes of water and pressure cook the daals (add twice the amount of water )till soft and mushy.

Wash, de-vein the beans and chop.
Chop the tomato in cubes
In a small pressure cooker, add 2-3 tbsp water at the bottom and then add the beans and tomato.
Pressure cook on high for 2 whistles. Immediately release the pressure.

Till the time the beans cook, start the next prep.

Make the spice paste. In a pan, heat just a couple of drops of oil. Add the chana daal, the coriander seeds and the dry red chilies. Toast till the daal turns light golden , the coriander seeds are aromatic and the chilies turn bright red.
Cool and then grind with the fresh shredded coconut adding a little water to get a smooth paste.


In a deep sauce pan, heat oil for the tempering, Add the chana daal, mustard seeds.

Heat 1 tbsp oil. Add mustard seed, chana daal and curry leaves. Once the mustard seeds pop, the daal bronws (not too dark, please!), add the cooked beans and tomato.


Add Tamarind water and let it come to a boil.


As it comes to a boil, add the sambar podi and mix well to ensure there are no lumps.

Add the cooked and mashed daal. and mix well. 

 Now add it the masala paste (the one that has coconut in it) and cilantro.


One rolling boil and its ready to serve.


 This kootu tastes best with plain white rice. A bit of pickle and papad only make it taste better ( and you over eat!, but in a good way).

Pin It

Friday, September 21, 2018

The story of a dog named Quilla and a recipe for Bottled Tadka, inspired by OPOS Style.

For as long as I can remember, I've wanted a dog. 
I would, in my childhood, come home with random puppies I'd adopted from the street. Every time I did this, my mother would shut the door in my face. I was never allowed to step in. 
My heart would break, every single time. 
To make up for that, I befriended every dog in the colony I lived in. But it was never the same. I needed a dog of my own. 

My son is also very fond of dogs, just like I am. He wants needs a dog, but M, is against the idea. 
My heart just shattered into a million fragments, I had wild hopes that my dream would come true after my marriage... my son is sad too. 
To compensate, we go to the Humane society and walk dogs. 
It isn't the same. 

So, in September, for the Labor Day, I planned a small getaway. We went to Kanab. My plan was to visit the Best Friends Animal Sanctuary I've been planning this vacation since last winter.
We set up our volunteering session (it's a 3 hour shift) and in return, we could take a dog  with us, to our hotel room, for a sleepover! It was the closest thing to owning a dog, just for one night. 
We did a tour of the sanctuary and then volunteered. The afternoon was very hot and so dog walking was out of question, we did the cleaning up part and then helped with doggie dinner time.
If you want any details, leave a comment or email me and I will share all I know.
For now, I will let the pictures do the talking

It starts here, the Sanctuary is located in Kanab, with a stunning backdrop of Angel Canyon. It's a sprawling facility which accommodates dogs, cats, horses, pigs, birds.  You need your car to go from one point to another.
#bestfriendsanimalsanctuarykanabutah
It all starts here.
 We wanted to work and volunteer with dogs and were assigned  to Fairways. Volunteer duties vary, in the mornings it involves feeding and walking the dogs. We were there in the afternoon, so our duties involved cleaning, filling the pails with fresh cool drinking water and then feeding.


#NKUT
My boys on cleaning duty. If you must know, I was on poop cleaning duty :) poop- diaper... once a mom, always a mom! 
I was looking forward to our doggie sleepover more than anything! At last, all our jobs were done and we got to meet 'our' dog, Quilla. She is a Pit bull Terrier mix.
M, who is usually *very*.... very wary of dogs  also warmed up to her. She is the sweetest thing. All she wanted was cuddles and to be loved and we made sure she got plenty of those.
Our reward for volunteering
 It was so much fun, taking her on walks, well, she took us for walks, I must admit. The best part was how happy, S was around her and talking to her. He'd go, "no, Quilla, nooo. Follow me, come on ! come with me.... " specially when he saw others watching and smiling. Because she was just too strong for him, I held on to her leash, Li'll S just walked by her, chest puffed out because he had a dog. 
I strutted a bit too (~ blush~). I couldn't help it.I was just so happy! 

Giving me company
 She is such a quiet dog, we did not hear a peep out of her all evening. And so intelligent! She sensed that M was a bit nervous... so she would go up to him, crawling on her tummy and look up at him, her tail wagging and eyes silently demanding love. She got what she wanted, every single time.

Quilla
 Where Li'll S and I were concerned, she didn't need to ask! We were more than ready to hug her and pet her! We needed it more than she did, I guess.
It's ALWAYS hug time! 
This was the best part of our holiday. The next day we went to Bryce Canyon National Park, it was beautiful. We also had fun in the snow fall at Bryce Point. All in all a very happy holiday.

As always on a road trip, I prefer to carry my Electric Pressure Cooker / Instant Pot with me. We eat out during the day, but for dinner, after a long day of hiking or walking and climbing, we love home made food. Simple and uncomplicated, comfort food. 
For my family, this translates to making Khichadi (rice + moong daal+ tadka / tempering) and pickles.  Yogurt, if available.
I usually make khichadi packets, add water and salt to taste and cook. But this time, I did not plan well, so washing and drying the rice and lentils in time was difficult. The risk of carrying damp rice and lentils is, they become sticky and moldy. Its goes in the trash bin, To avoid that, I carried rice and lentils separately and decided to wash and cook as needed. and I made Bottled Tadka. 

Now, if you are wondering, if she is carrying an IP, whats the issue? Make a tadka in the inner pot, right? Wrong!  The thing is, I did not want to carry all the ingredients for the tadka : oil in a small bottle and ziplocs with spices. I made my life easy with this hack! 

For those of you who haven't heard of OPOS (One Shot One Pot) technique,  it is exactly as the name suggests, one pot cooking, in one shot developed by Chef Rama Krishna. 

The idea is to layer food in a sequence and cook it on high heat, in a 2 liter pressure cooker. Because food is cooked on high heat, it's pressure baking. The convenience is the best part.. well, that and the fact that the foods retain a vibrant color and taste great too! 

*If you are interested in learning this technique, there are simple rules to follow ( this only ensures your success). The first thing to do is, standardize your 2 liter cooker. Watch the entire video and follow the timing, Once this is done, go on to other recipes. 

To make Bottled Tadka, this is the basic and simple version. You can make variations to it. I make this version as I find it useful for almost all dishes I opos.

In your 2 liter pressure cooker ( wiped clean of any moisture), add 1 Cup of Oil. I used Canola.

#Bottletadkaopos
One Cup oil

To this, add 1/4 cup Mustard seeds / Rai/ Sarson/ Mohori

1/4 cup Mustard seed
Add halved red chilies. I added about 15-18.
Halved red chilies
 Add some curry leaves. I had dried curry leaves my aunt gave me. If you are using fresh curry leaves, wash and pat the leaves dry and then add them.
Add curry leaves
If you have asafetida in the 'stone' form, add it now. If you use powdered asafetida, like I do, do not add it. just wait.

Now close the lid and start the stove on High Heat. This is the time you need to be a bit alert. Start a stopwatch on your cell ( it gets easy after a few tries, but initially, the stop watch helps). You need to keep listening to the mustard seeds popping sound. 
In my case, the popping started at about 2 minutes and 25 seconds. 
As soon as the popping slows down, whip the cooker off the heat ( in my case, since I have coils, they stay hot for a long time and hence I just whip the cooker off the heat and set it aside on a cool coil) and let the pressure settle normally.  I had the cooker off the coil by 3 minutes,
The pressure will settle quickly. Open the cooker lid, the oil is still very hot. Add asafetida and stir it in. Done! 
Add asafetida to the hot oil

 Let the tadka cool. Transfer it to a clear glass bottle and once it is room temperature, it is ready to be refrigerated and used as required.

You can make variation to the tadka as per your requirement. If you need a tadka with lentils in it, like Urad and Channa Daal, to make it a South Indian tadka, add the daals after the mustard seeds.

Ready to be bottled
This will stay fresh for a long time in the fridge. Maybe a month. But I use it every day, and for daals / amti/ sambar/ rasam so I have never really checked how long it stays fresh. 
The thing is, when I was in India for 2 months over summer, I made a big batch of this for M and he barely used a quarter of it. I used the rest after coming back home and it was still good! 
#oposBottledTadka
Bottled and ready

The above mentioned quantity made one bottle full, in my case, I used a Priya Pickle bottle I had. I got this bottle full and a couple of tablespoons over that. 
OPOS, Bottled Tadka, OPOS bottle tadka

This tadka can be used to temper not just daals, but simple vegetable stir-fry ( french beans, potato masal for poori or dosa, ivy gourd) and can also be added  when making khichadi (like I did on this road trip) or to dahi-butti (yougrt rice). All you need is a bit of pickle! mm-mm-mmm! 


That's it from me today. Hope you all have a fantastic weekend, doing just what you please! 
Pin It

Wednesday, September 05, 2018

Kawan Samosa. Baked, Not Fried.

Every now and then, I have this intense samosa craving and it just won't go away! 
I think the Indian grocery store in my neighborhood has samosas on weekends, but I rarely go there on weekends, the store is small and overcrowded. It just isn't worth the trouble. 

That still doesn't solve my problem. I'm still without samosas. 
The craving still won't go away. 
The joy of munching on a samosa is unlike any other. 
It reminds me of movie halls and interval times when I would rush to the concession stand to buy greasy, absolutely lip smacking, piping hot samosas.

I don't feel like buying a pack of frozen samosas, they take up too much space in the freezer. 

So how do I get my samosa fix?  I guess I must make them myself. But, (here I go again), the deep frying? I don't want to do that because samosas need to be fried at low temps and for a long time to get the outer cover that, flaky texture. 

So then, I saw this brilliant hack on a Facebook forum. They used Plain Kawan Parathas to make the cover and baked them. Brilliant or what!?

So of course, I buy a packet of Kawan Parathas and prepare to feast on samosas.


For the filling, I use this recipe. It is simple and tasty. 

We now come to the most important part, making the samosa.

**Please note, I am making no claims that this is a healthier version or any such nonsense. This is a calorie rich recipe. If you are on a diet, this isn't for you. 

If you are still reading this, i must urge you to head tot he nearest Indian grocery store and buy a packet of Kawan Plain Paratha or if you have them in your freezer, pull them out and set them on the counter to thaw while you read this.


Preheat the oven to 350F
Prep the tray you want to use. I used my old tray and lined it with parchment paper. 
The thawed parathas can be very sticky, so be careful as you work. 
I used the parathas when they were just the tiniest bit hard ( the heat from your hand as you fold them will make them soft).
Place a paratha (with the plastic backing) on a smooth surface ( counter top / rolling board) . 
using a pizza cutter or a knife ( your choice. I found the pizza wheel easy to use) 
You will get two semi circles. 
Follow the pictures to make a 'cone' 
Fold the straight edges towards the middle of the round part. 


Press the ends to seal ( leaving the broad part open). Scoop the stuffing into the cone.


Now seal the samosa by bringing the sides together and form a triangle.


Similarly, make all the samosas and place them on the baking tray. 

Bake for about 15 mins till the samosas are golden brown. Oven temperatures vary and so, keep an eye on the tray at the 15th. minute. If the color isn't perfect, bake for another 2-3 minutes, 
Remove from the oven and place on a cooling rack for a couple of minutes ( the stuffing will be VERY hot )  or serve immediately with chutneys of your choice or ketchup.


Notes:
- These samosas are best served hot
- You need not make a cone and stuff the potato mixture in it. It can get fiddly. Just fold the semi-circle into a triangle and seal the edges. 
Pin It

Tuesday, June 26, 2018

OPOS Pineapple Sheera / Kesari

The best tasting sheera is, when it is made for a puja. But it was always one made with bananas. I always thought there was one way of making sheera, that was either plain or as a variation (and strictly on puja )with bananas. The thought that any other fruit can be used was alien. 
Imagine my surprise and delight when I tried a spoonful of Pineapple sheera! It was a flavor bomb and I was left craving more.

When M came to see me ( the arranged marriage scenario) we served him Pineapple Sheera, to date I wonder if that clinched the deal.


Here I have made this sheera /kesari using OPOS (One Pot One Shot) method, developed by Chef Rama Krishna, which cut down on time and extra steps. 
OPOS method uses layering method and cooking on high heat for a short time. This ensures that food is cooked properly, retains nutrients and also color (for vegetables like ivy gourd, spinach beans).


Here is my recipe, inspired by OPOS technique.

1/2 cup, Double roasted Rava*
3/4 Cup Sugar (1 cup, if you like it sweet)
1 cup Pineapple chunks
3 Tbsp Ghee 
2-3 Cloves
a few Raisins (optional)
Saffron strands (optional) 
1/8 tsp Pineapple Essence
2-3 drops Yellow food color (optional)
Pinch salt
2 Cardamom pods, powdered
1 cup Water


* If you are in India, you can easily get double roasted rava in any grocery store. If you cannot get your hands on any, roast rava over medium flame, cool and roast it again. This can be stored and used as needed.


To start off, (since I do not get double roasted rava), heat 1 tsp ghee and add cloves to it, once the ghee is perfumed, add the rava and roast it till it is aromatic and a few shades dark.


In a 2L pressure cooker, add 1 cup water, sugar, pineapple chunks, ghee, cardamom powder, saffron (if using)


Cook on high heat for 1 whistle (ensure that the heat does not come up the sides of the cooker it covers the bottom/ base only). Switch off the heat and in a couple of minutes, manually release the pressure. Be VERY careful, do not apply force. Use a spatula or tongs to lift up the whistle and let the steam escape. 
Open the pressure cooker and slowly add the roasted rava, stirring continuously to avoid lumps. 
Seal the cooker and let the mixture cook in the retained heat. Do not switch on the stove. 

Wait for 10 mins. to let the rava cook and absorb all the liquid.
Open and stir gently to ensure it is all mixed well.
Serve warm.

Notes:

-You can use Bananas instead of Pineapple (or fruit of your choice, ex banana, mango)

-Cloves pair well with pineapple sheera, if using another fruit, avoid these, cardamom should do the job.

- As always, make sure you standardize your equipment, if you haven't, here's how.


Pin It

Wednesday, May 09, 2018

Doodhatla Pithla

Every Marathi household has a copy of this, either borrowed from mom or one that was gifted to a new bride. 
I'm talking about Kamala bai Ogale's famous cookbook, 'Ruchira'.  
This is one of the oldest cookbooks and is still very popular. The recipes (in book 1) concentrate on Marathi cuisine and include a range of simple, day to day recipes and some complex ones as well.
The book gained popularity because of the dependable recipes but in my opinion, also because, it used simple measurement tools, the 'vaati' (katori / steel bowl) and 'chamcha' (steel spoon used in every kitchen). This made it easy for the Indian home maker and cook, who largely depended on eyeballing everything when cooking. 

My Mother has an old copy of Ruchira, I never really looked at it, it was just... there. It was because I did not have enough time on my hands to cook (because of work pressure) or just because it was in Marathi, which I was not too comfortable reading. 
But I love reading it now and cooking from the book. 

I grew up up in  a Marathi- Kannada  home, my Mom mostly made Maharashtrian food and it wasn't until I started blogging that I realized how vast the range of recipes was. 
There are so many variations to everyday recipes and just when you think you know a bit more, you realize, ah! no! that was just the tip of the iceberg. 

Take for example, the humble 'pithla'.
This ubiquitous 'curry', is something most people won't bother talking about. It's one of those, 'taken for granted' recipes. When there is a shortage of time or ingredients, this is the go-to recipe. 
It requires few ingredients, the base is 'besan' (chickpea flour) add to boiling (tempered) water. 
There are variations, like using garlic or even a different base (I've used kulith - horsegram flour).
But what I never imagined was using milk, instead of water.

So when I was leafing through the recipes in Ruchira, I spied, 'Dudhatla pithla' I was intrigued. 
I would never have imagined using milk in a recipe that wasn't sweet. You learn something new, everyday! 
  
This recipe comes together in a jiffy and is very mild and makes a nice change, once in a while. 


Marathi Pithla, Milk pithla, dudh pithla

This recipe is very forgiving, just be careful as it is milk based and follow the steps as mentioned to ensure that the milk does not curdle. 

I halved the proportion, that was more than enough for the 3 of us. 

I used 
2 Cups of Milk
1/4 cup Besan
1 Green chili, chopped 
1/2 tsp Cumin seeds, powdered
Salt to taste
Chopped Cilantro to garnish
Fresh coconut  to garnish ( I did not use )
2 Tbs Oil
1tsp Mustard seeds
Hefty pinch, Asafetida
1/4tsp Turmeric powder
Curry leaves.

Dissolve the besan in 1/4 cup milk and make a smooth paste. Set aside.
Heat a deep sauce pot or a kadhai. Add the oil and one the oil is hot (not smoking),add the mustard seeds.
As the mustard seeds pops, lower the heat and add the asafetida, turmeric, curry leaves  and the chopped green chili. Add the cumin powder and stir to mix. 
Now add the milk (1 1/2 cup) and stir to combine. Let the milk come to a boil, add the besan (mixed in milk) and stir to mix it in well.
Once the besan is cooked ( the consistency changes, it becomes tick and has a slight shine) add the salt.
Let it cook for a couple of minutes.
Garnish with coconut and cilantro before serving.
Serve ladled over plain, steaming hot rice with some pickles and papad for a comforting meal.


Notes:

-This is a mild Pithla, add another green chili if you want to amp up the heat. But this proportion is kid approved. 

- Be careful with the heat, keeping the flame on high or induction on high, will result in milk burning and smelling awful. Keep the heat at medium and stir frequently. 


Pin It

Friday, April 13, 2018

East meets West. Gulab Jamun Cheesecake bites

A family get together at my Ajji's (Grandmother) home was always the happiest of times. We all sat together talking, laughing, with the 'kid gang' doing idiotic stuff and hooting with hysterical laughter at ourselves. 
There was music, my Mama (maternal uncle) had a vast collection of cassettes and we would listen to tape after tape of Lata, Rafi, Kishor Kumar or perhaps Manna Dey. 

Ajji made lots of food to feed her hungry family and dessert, favored by the 'bachhe mandali' (kids) was gulab jamun (except during Ganpati festival, then it was ALWAYS puran poli and modak).

We, cousins, would peep into the big pot full of plump gulab jamuns and mentally pick out the biggest and the best looking. So when it was actually time to eat dessert, we would point to the ones we wanted. Our parents would rebuke us saying they all are the same, but Ajji never said a word, she would patiently pick out the ones we pointed to and serve us. It was her love that made them the best gulan jamuns in the universe. 

We would sit on the floor, cross legged and out 'vati' (steel bowl) in front of us and Mama would dim the lights, and then he would play songs. We knew many of these songs and we would sing along and enjoy our dessert. 
Satisfied, we would then curl up in our respective mom's laps and listen to the melodies in the background as they gently lulled us to sleep. 

As time passed, we all went our separate ways, job, marriage, moving to a new city or country, but with those precious, precious memories warming our hearts when we missed one another and most importantly, missed Ajji. 

I sat at the dining table, holding a tin of Haldiram's Gulab Jamun a guest had brought, thinking of all those days, missing home and family.

That wouldn't do, at all! Shaking off the nostalgia, I packed the tin in the pantry and went about doing what needed to be done. 

But when I picked up this book from the library, I could not resist trying out the cheesecake. 
I love, love, love cheesecake. 
The first time I made this recipe, it turned out delicious, but I had to make some adjustments. The recipe was for 6 cheesecakes ( small ). I needed to adjust the quantity a bit as well as the baking time 
to get it right. 
 I topped my first batch with Strawberry preserves and fresh strawberry. 
My son was thrilled and loved this mini cheesecake. As against the regular Graham crackers, I used some lemon cookies I had at home for the crust. The light burst of lemon and the strawberries worked well. 
It certainly was very tasty, but a tad over baked, in my opinion. The top sunk in the middle too.
We didn't care about the sunken top, we loved every single bite. 
Mini bites disappear fast. 


I made a second batch, this time I made small changes. With the previous batch, I followed the exact measurements and that yielded 11 mini cheesecake bites. If I had made them smaller, I could have made 12, but that would have been a bit too mini, for my liking. So with the second batch I adjusted the baking time and the quantity (added 2 tbsp cream cheese).
It worked out well, the cheesecake bites were perfect and 12 in number. 

Batch 2 had some Nutella swirled into each bite.


The last batch I made were a fusion batch, East meets West.
I pulled out the tin sitting in the pantry. This, would make great dessert.

Here's how:

1 1/2 cup Marie Biscuits (available in all Indian stores), crushed

2 Tbsp Unsalted butter, melted

1/3 cup Granulated sugar ( I took off some from this as the gulab jamun is also rather sweet, but this is optional)

One 8 oz. packet + 2 tbsp  Cream Cheese , softened (room temp)

1 large Egg

2-3 cardamom pods (remove the seeds and powder them)

6 Gulab Jamun pieces, halved ( do not use any syrup) I used ready made, if you have home made, those, IMHO are EVEN better! 


Do the prep:

Make sure the ingredients ( cream cheese, egg, gulab jamun are at room temp. Melt the butter and let it come to room temp) are ready and set in place.

Preheat the oven to 350 F 

Make sure the small inner disc of the cheesecake pan is in place and ready.

Pick out the gulab jamun and let them sit on a plate, I kept mine in a colander to let the excess syrup out. Halve them. Set aside.


Crush the cookies, I used my chopper to crush the cookies and then I added the melted butter to the chopper and pulsed it to make the base. If you do not have a chopper or a food processor, just add the cookies to a ziploc bag and use a rolling pin to crush and make a powder. Remove from the bag and add the melted butter to make the base.

Portion the mix into the cheese cake pan and press down well to create a smooth base. Set aside.


In a deep saucepan, add the soft cream cheese, and using a hand / immersion blender with the wire whisk attachment, whip the cream cheese till it is lump free, smooth and fluffy. 
You can also use the stand mixer bowl, but since the quantity is so little, it won't work as well. You can also use a manual whisk.

Add the cardamom powder and the egg and beat until just combined.
Spoon a little of this batter into the prepared cheesecake pan, over the cookie base. Place one halved piece of gulab jamun in the center and then pour the cheesecake batter over the jamun. Ensure that just 2/3 of the 'cake well' is filled.
Repeat for the remaining pieces. 


Bake in the oven (middle rack) of the oven for 8 mins. ( this is what worked for me. As oven temperatures vary, keep an eye, you might need an additional minute or so)

Pull out the pan and set it to cool. The cheesecake tops will have the slightest jiggle/ look sort of uncooked in the middle, at this stage. That is perfect.

Let the cheesecake bites cool in the pan for a bit. Then carefully remove ( push the removable plate at the bottom to pop the bites up) the cheesecake and place them on  a rack to cool completely.


Cool them in the fridge to set completely. 
Serve once they are chilled and set.


Notes:

- In all the 3 batches, I used different base cookies. Lemon cookies (for the cheese cake with strawberry topping), Graham Crackers ( for Original Cheesecake) and Marie biscuits (for the fusion Gulab Jamun cheese cake). All 3 worked well.

-The top will sink a little, don't worry about it.

-Unlike the traditional cheesecake, we do not use a water bath.

-As per the original recipe, this makes 6 mini cheese cakes

- This is a make ahead dessert.

Pin It
Share

LinkWithin

Related Posts Plugin for WordPress, Blogger...
Page copy protected against web site content infringement by Copyscape