
Wow... I wish I had a genie like this... oh, and more than just 3 wishes!!
This is my very first attempt (like many of you) at cooking Middle Eastern food. In fact when I saw this theme on
Meeta's blog I wanted to try it out! All I knew then, was that there is this dish called
Falafel, which I had once seen on some Cookery Show on Star TV... that was
waaaay back, when I was a student in India, and I also recollected that this was a vegetarian preparation.
So I popped into the library and made a beeline for the cookbook section... where, a few weeks ago I had seen this book on middle eastern cooking , glanced thru it, but since I had a lot of books already, I shoved it back in to the shelf!
Thankfully I found it there, grabbed it and headed home, where I could sit and go thru the whole book.

What first struck me was the simplicity of the ingredients (for the recipes I chose). The combination of two or three spices bring out the wonderful flavors of the dish. I followed the recipes to the T.
Ruz Wa Banadoura... if that has confused you, how does Rice with Tomato sound? That's just what this is!!
And here's how you make it:
1 Small Onion, chopped
1 tbsp. Olive oil
1 Small Ripe Tomato, Diced
2 cups Water
1 tbsp. Tomato Paste
1/2 tsp. Black Pepper
1 cup Rice
Salt to taste
Saute the onion in the olive oil until transparent.
Add the diced tomato and cook for a couple of minutes
Add water, tomato paste and pepper
Bring to a boil, then add the rice
Cover and simmer over low heat for 20
mins. or until rice is tender and the juice has been absorbed.

For the Falafel :1 lb. dry Chickpeas (Kabuli chana / dry choley)
1 medium Onion
1 cup chopped Parsley
1 cup chopped Cilantro
1 tbsp. ground Corriander
1 tbsp. Cumin
1/2 tsp. Black Pepper
1 tbsp. Baking powder
Salt to tasteSoak the Chickpeas in cold water for 24 hrs.
Mix all the ingredients, except, the baking powder
Grind the mixture in a food processor until it turns to a paste
Add the baking powder and let the mixture set for 30 minutes.
Then, shape into patties
Deep fry (in Olive oil)
* Traditionally
falafel are deep fried, but if you want to drastically cut down on the calories, they can be broiled in the oven

For the lack of a better pic...
**
Leson I learnt... I do not have a food processor... and so, I had a tough time grinding the mixture... all I have is a small Chopper and a Blender (which needs an adequate amount of water to work well!) So (after a few unladylike words!) I first ran the whole thing in the chopper.. then
thru the blender, ended up using water when not required.. the end result was not
disappointing ( as my friends, who have eaten
falafel before, told me), but on the whole...
tedious.
Falafel is served on mini pita loaves with its condiments of chopped onion mixed with sumac, sliced tomatoes, pickled turnips and
tahini sauce. I liked them as they are too! As an accompaniment / dip I used (store bought) Hummus
Tahina sauce, and mixed ground garlic, lemon juice and some red chilly flakes in it (for a bit of a punch!)

Till date I had only heard of
Pita Bread, but never tasted, and so I was a little apprehensive of making them. So I hunted around on the net and finally settled down for
this recipe and boy, was it GOOD!! I was thrilled to see the dough rise.. then the pita bread puff up in the oven!! Here's how they turned out...

For your convenience, here is the recipe ( link above )
Pita Bread
Makes 8 pitas
3 cups flour
1 1/2 teaspoons salt
1 Tablespoon sugar or honey
1 packet yeast (or, if from bulk, 2 teaspoons yeast)
1 1/4 to 1 1/2 cups water, roughly at room temperature
2 tablespoons olive oil, vegetable oil, butter, or shortening
If you are using active dry yeast, follow the instructions on the packet to active it (see the note on yeast above). Otherwise, mix the yeast in with the flour, salt, and sugar. Add the olive oil and 1 1/4 cup water and stir together with a wooden spoon. All of the ingredients should form a ball. If some of the flour will not stick to the ball, add more water (I had to add an extra 1/4 cup).
Once all of the ingredients form a ball, place the ball on a work surface, such as a cutting board, and knead the dough for approximately 10 minutes (or until your hands get tired). If you are using an electric mixer, mix it at low speed for 10 minutes.
(The purpose of kneading is to thoroughly combine the ingredients and to break down the flour so that the dough will become stretchy and elastic and rise well in the oven. A simple hand kneading technique is to firmly press down on the dough with the palm of your hand, fold the dough in half toward you like you are closing an envelope, rotate the dough 90 degrees and then repeat these steps, but whatever technique you are comfortable using should work.)
When you are done kneading the dough, place it in a bowl that has been lightly coated with oil. I use canola spray oil, but you can also just pour a teaspoon of oil into the bowl and rub it around with your fingers. Form a ball out of the dough and place it into the bowl, rolling the ball of dough around in the bowl so that it has a light coat of oil on all sides. Cover the bowl with plastic wrap or a damp kitchen towel and set aside to rise until it has doubled in size, approximately 90 minutes.
When it has doubled in size, punch the dough down to release some of the trapped gases and divide it into 8 pieces. Roll each piece into a ball, cover the balls with a damp kitchen towel, and let them rest for 20 minutes. This step allows the dough to relax so that it'll be easier to shape.
While the dough is resting, preheat the oven to 400 degrees. If you have a baking stone, put it in the oven to preheat as well. If you do not have a baking stone, turn a cookie sheet upside down and place it on the middle rack of the oven while you are preheating the oven. This will be the surface on which you bake your pitas.
After the dough has relaxed for 20 minutes, spread a light coating of flour on a work surface and place one of the balls of dough there. Sprinkle a little bit of flour on top of the dough and use a rolling pin or your hands to stretch and flatten the dough. You should be able to roll it out to between 1/8 and 1/4 inch thick. If the dough does not stretch sufficiently you can cover it with the damp towel and let it rest 5 to 10 minutes before trying again.
Open the oven and place as many pitas as you can fit on the hot baking surface. They should be baked through and puffy after 3 minutes. If you want your pitas to be crispy and brown you can bake them for an additional 3 to 5 minutes, but it isn't necessary (in the batch pictured here I removed them at 3 minutes).
For the Final step... stuffing the
falafel in the pita bread....
I sliced the bread in 2. Chopped a tomato in thin slices.
I had very little lettuce, so I
usedthat too (but you cannot see it in the snap :( ... )
Arranging it was simple, open the pita pocket, layer with shredded lettuce, tomato, some hummus ,
Falafel... eat!!

Oh how I wish I could take better pics!!

This is my contribution to Monthly Mingle @
Meeta's. Thank U
Meeta, for this wonderful theme which gave me an opportunity of exploring a wonderful cuisine!!


 Now this little sucker with it's siblings, was lying in the dark regions of the fridge, untouched for a week now... I would look at it...ponder over the possibilities (which, I know are numerous).. shake my head and pick up another vegetable, talk about being prejudiced! So finally, last evening, casting aside my feelings, I pulled up the eggplant and decided to make this appetizer... a treat for M... he had a gruelling day at work and deserved something that would bring back that 'smile'!!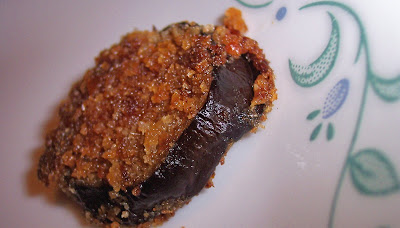
 Variations : Using a dash of Italian seasoning
 Verdict: Very NICE!! (the 'smile' is back in it's place!) I could put in a better way... as Jeeves (not his own, of course! It's Browning!!) would say...The lark's on the wing;The snail's on the thorn; God's in his Heaven --All's right with the world!





