Showing posts with label Bread.. Show all posts

Monday, March 17, 2014

Curry Leaf Bread in a Bread Maker

Every Sunday, we go to the Hindu Temple and our little one attends classes that teach him about the various Gods and Goddesses we worship. It is more like story time and that is what we would like to keep it at. After this class, he toddles off to the regional Language class. 
We have enrolled him for Marathi. 
I usually sit with him in the class and help him to write Marathi alphabets ( and thorough;y enjoy myself  over the pronunciations) . 
Over the past few months, these classroom sessions have been fun and also helped me make some friends.
With most Mom's with Kindergartners, we all bond well and have the same complaints and funny anecdotes to share. The teachers are also a lot of fun and keep the atmosphere light and easy going, which helps the instruction.
The class lasts an hour and by noon, all the little ones (and the parent attending with the child) are hungry. A little bite is always welcome!


Just last month, I made a small investment and added, to the already large amount of gadgets in my tiny and cramped kitchen, a Bread Maker Machine.
Source: Google Search
I found this on craigslist. I was a bit skeptical when I went to see it, but the person assured me it was in working order. Of course, the couple also added they used it only to make roti dough. I bought it. For the price, it was a good deal.
I came home and Little S and I looked at it carefully and decided to go ahead and bake a loaf of fresh bread.
It couldn't be simpler. And the results were great! I was dancing! No more kneading. Oh yes! I could live with that.

And so, 2 weeks ago, I made this fantastic and fragrant Curry Leaf Bread in my Bread Machine and shared it with the Marathi Class Teachers and friends. 
the loaf was sliced in to slightly thick slices and slathered with butter. Everyone loved it and all the pieces were quickly polished off. I was thrilled to bits.


This recipe is a keeper and here is my slightly tweaked version: ( for use with a Bread Machine

In a large mixing bowl, combine 4 cups All Purpose flour, 1 tsp. Turmeric powder, 1 tsp. crushed Cumin Seeds, 2 Tbsp. Finely chopped Fresh Curry Leaves.

In a microwave safe bowl, add 11/4 cup Water, 2 Tbsp. Unsalted Butter and microwave for 50-60 seconds, until the butter has melted.
The Water + Butter mixture must not too hot (about 110 F) 
Add this Water + Butter mixture to the bread pan, to this, add 1.5 tsp. Kosher Salt and 2 Tbsp. Sugar.
Carefully add the Flour Mixture on top of the liquid.
Make a shallow well on top of the flour mixture and add 1 packet (2 1/4 tsp.) Active Dry Yeast.

Close the lid and set the machine for White bread, 2 Lb. Loaf with a Medium Dark crust.

That's it. Really...

A fresh, fragrant loaf will be ready in 3 hours.
Un-mold and cool completely on a rack. Use a sharp serrated knife to cut slices and smear butter  and serve.


NOTES:

- I used only Water in this recipe, the original recipe calls for Water and Evaporated milk. I am planning on trying it  the next time I make this loaf.

- The original recipe is for baking the loaf in a regular oven. Read the instructions carefully ( the original recipe link is provided above)  and follow it.

- I have observed that the bread maker makes wonderful loaves, but they tend to be a bit dry on the second day. This reminds me of the fresh loaf or Paav we get in India. These are preservative free and have a short shelf life. So if you make this bread, share it with family and friends and enjoy it while it is fresh. 

- I plan on making this bread again and the next time around, I plan of increasing the liquid and fat amount a bit more. If this experiment is successful, it will be updated here :)

- For a bread maker, add the liquids at the bottom, top with flour and make a well in the flour ( shallow well, do not let the liquid show) and add yeast to the well. Select the right cycle and relax The machine does all the work.

Spring break is almost over  and we are back from a small relaxing and fun holiday and schools are all set to open. The weather is still misbehaving at our end and has even more mood swings than a pms'ing woman. We had a disappointing Holi and played indoors with just some dry color, thanks to my friend Sujata who dropped in and added some color into the dull day! 

How did you celebrate Holi? Do share some colorful tidbits from your part of the world, I'd love to know!

ETA: I made this loaf yesterday with Evaporated milk and water ( as per original recipe) and the bread was moister and oh! So tasty! the last slice was eaten today morning. Not a crumb left.
Pin It

Thursday, May 17, 2012

Green Chutney Sandwich : Bombay Sandwich

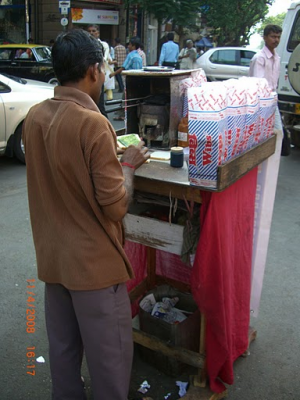
If you are ever in Churchgate, Mumbai, and you travel in the local train, when you step outside  the station, in one corner, you will find people flocking, young college going students, working men and women , around a small stall,which at first you may not even notice because of the flock. At a glance you will also notice, the flock is engaged in similar actions and you think, smiling to yourself, birds of a feather.... , and then you see what action it is, plate in one hand (left, mostly- unless that person is a left handed person, then right) and the other hand carrying a small square 'something' to the mouth and enjoying every bite. You are drawn to the flock and then you see what the fuss is all about. It's the sandwichwalla!
This sandwichwalla ( The sandwich stall owner) I am talking about used to ( and maybe he still is there) operate outside Churchgate station and my news is at least 8 -9 years old.
Rapidly preparing sandwiches, he works at a fast and smooth, unfaltering pace, slathering butter on the slices of bread creating a mound in one corner and then quickly laying these slices in a grid and smearing chutney on top. adding the vegetables ( as per customers preference) and slapping the second slice of bread on top and then using a thin but razor sharp knife, deftly cuts it into 8 little squares and slides the whole thing, neatly onto a plate. Using squeeze bottles, squirts ketchup on top and hands it to the hungry and waiting customer.

Walking thru Mumbai, you will find such small stall owners in practically every lane, catering to the hunger pangs of one and all for a small price.

                                  
I have no idea what a simple sandwich costs these days, but I remember, in my college days, it was Rs.5/- and on a student pocket money, it was affordable nutrition.

What made this sandwich so addictive was the spicy chutney, slathered onto a slice of soft buttered bread.
I have a similar version for you today. 

Cilantro chutney:

1 Large bunch, Fresh Cilantro ( leaves and tender stems)
4 Green Chilies ( reduce quantity to suit your preference)
1/2 tsp. Cumin  Seeds
1/2 tsp. Coriander seed powder
Pinch Asafetida
1/2 inch Fresh ginger knob
Salt to Taste
2 Tbsp Lemon juice

Wash the cilantro. Add all the ingredients to the blender/ mixie jar, except lemon juice and blend to a smooth paste, with minimum water.
Remove to a container, add lemon juice and mix it in.


This chutney is versatile and can be used in bhel or sev puri or ragda patties when coupled with meethi (date and tamarind) chutney

To assemble the sandwich:


For one sandwich

2 Slices of Bread ( the original uses white sliced bread)
A pat of Butter
Green
 Cilantro Chutney


Fixin's :

Thinly Sliced Cucumber
Thinly sliced Tomato
Thinly Sliced, Boiled Potato
Thinly Sliced Red Onion
Thinly sliced Boiled Beetroot
Dash of Salt and Pepper ( if required)
Tomato Ketchup

Butter both slices of bread.

On one slice, apply the Cilantro chutney ( on both, if you want, but make sure that it does not overwhelm the over all taste it is a dominating taste and the vegetables are plain / raw)

Pile on the fixin's. Choose what you want, but the most common are Cucumber, Tomato and Boiled Potato ( and the ones we almost always have on hand). Sprinkle with salt and pepper, if using.

Place the second slice, buttered side down on top and carefully slice the sandwich into squares or triangles

Serve immediately with ketchup


NOTES: 

Use water carefully when blending the chutney ingredients, you do not want a runny chutney, it makes soggy sandwiches

Mint can be added to the chutney to enhance the flavor ( about 1/4 cup fresh mint leaves)

Cream cheese can be used instead of butter, it alters the taste, but is a nice change

Substitute Whole Wheat sliced bread or a multi grain bread or Ciabatta roll ( as I have used here), instead of white bread

In most Indian stores, you will find a sandwich masala, this can be sprinkled instead of salt and pepper, it is purely optional. 

For a Gluten allergies here is a recipe for Coconut flour bread 

For a Vegan Version, substitute with vegan butter 


These sandwiches make great picnic food.
Just don't assemble and pack them to eat later on! Soggy mess- unappealing! 


We walked this path on Saturday, there was a slight breeze and the sun, mercifully behind a few clouds, in short, nothing to mar my happiness. Bombay Sandwiches for a picnic lunch and this view, priceless! 

Serenity

P.S: call it Mumbai Sandwich , if you want, either way, it tastes the same! 
Pin It

Wednesday, December 22, 2010

Classic White Pan Bread

When I was little, we did not have whole wheat bread, multi-grain bread or maybe we did , we were unaware and as far as we knew, everyone went in for the 'regular' kind of bread. It was white bread and Paav.

You either buy a loaf of Wibs or Britannia sliced bread and if you want  paav, you scoot down to the local bakery and buy a slab (called 'laadi') or even individual rolls.  Making bread at home was not even thought of and we did not have an oven. In fact, there was this bhaiyaji who would come to our home and those in the neighborhood on his cycle carrying bags full of fresh baked bread and new laid eggs. He would wrap the bread in newspaper and hand over what we wanted and I would hand over the money ( .25 paise for a paav) he would then jokingly ask me, "baida chahiye kya baby?" (baida meaning egg) and hold an egg in his hand and offer it to me, knowing fully well that we did not eat eggs and cackle when I would shudder!

I would slather the paav / bread slices with Amul butter and dip it in my tea or maybe I'd add a slosh of ketchup or jam and eat it, enjoying every soft bite. 
I never dreamed I'd make bread at home. Well, not successfully that is. Years ago, when I went to a cookery class, the instructor taught us bread, she made it look kinda easy.  By that time, we had purchased an oven at home and my cousin and I were VERY eager to try our hand at making bread. The whole thing is a bit of a blur, but I do remember this, they made excellent paper weights. 
I gave up on baking. At least for the time being. I was down, but not completely out.
I made a couple of attempts after that, with no success. Gave up, yet again.
Then I hit the jack pot......I read the recipe over and over for days, tempted yet I had not the courage. I then attempted and succeeded in making pizza. I had overcome my fear of yeast, in part. This gave me courage to try bread and boy! am I glad I did!!!

Just like the last time, I chewed my nails to zero when the bread was in the oven, this time around as well. But I should have believed. The result was a  perfect loaf! Yaaay! 
I could not keep still, I could hardly stand the wait,  I even 'fanned' the loaf with the oven mitt to cool it faster and sliced it. Look at the picture below and learn from my mistakes. Let the loaf cool. Completely.
Over excitement? Take a deep calming breath, count to 10 and then slice, if you do not do this, the knife shakes and cuts unevenly, see? No harm done to the loaf, just don't look very pretty.

I made this a couple of times and with equal success. My friends shared it with me and  gave me the thumbs up sign. I only wish my parents were here with me to enjoy it. 

Makes: Two - 8 1/2 x 4 1/2x 2 3/4 inch loaves

2 1/2 tsp ( 1 envelope) Active Dry Yeast
2 Cups warm  Water
5 - 5 1/2 Cups All Purpose flour (APF)
1 Tbs. Sugar
1Tbs. Salt
5 Tbs. Unsalted Butter or Vegetable Oil

Whisk the yeast into the warm water and set aside and prepare other ingredients

To mix dough by hand:  place 5 Cups APF, salt and sugar in a mixing bowl and stir in yeast mix and melted butter

Continue to mix until the mix resembles a rough dough

Turn the dough out onto a lightly floured  work surface and knead until the dough is smooth and elastic, about 5 mins. If the dough is too soft and sticky, add flour 1 tbs. at a time.

Place the dough in an oiled bowl and turn to oil all surfaces

Cover the bowl with plastic wrap and allow the dough to rise until doubled in bulk, about 1 hour

Turn the risen dough onto a lightly floured surface (you may need a scraper). Deflate the dough and divide into 2.

To form a loaf, make sure the surface is free of any excess flour, then stretch the dough until it is approximately the length of the pan, then fold in the short ends, then fold in the far long edge over  tot he middle. Fold over the  other long side and  compress to form a tight cylinder 

Place the loaf in the pan, seam side down and cover with plastic wrap. Repeat with second loaf and allow it to rise until double ( about 1 hour) 

When loaves are almost double, set a rack in the middle level of the oven and pre-heat to 400 deg. F

When the loaves have completely risen, place the pans in the oven and bake for 30 mins ot until golden brown and firm and internal temperature is 210 deg.

Unmold  the loaves to a cooling rack  to cool on side.

Cool completely and slice. Enjoy.
Pin It
Share

LinkWithin

Related Posts Plugin for WordPress, Blogger...
Page copy protected against web site content infringement by Copyscape