Showing posts with label All Purpose flour. Show all posts

Friday, November 08, 2013

Blondies

I am so glad October is behind me now. It was a month full of anxiety and stress, luckily, all is well now. It taught me many things and gave me many reasons to be thankful for in life. 
I learned to overcome my fear and face tough situations. Also to think on my toes. I learned who my real friends are. 

I am ready to relax and enjoy what is left of 2013. Diwali was like a fresh beginning and I was in good spirits and made Diwali goodies and enjoyed snacking, without any shame guilt. 
With 5 days of Diwali goodies and total Indian food, I wanted to divert my mind to something a little different. 
In an ideal world, I should have been eating salads and light meals, but... we do not live in an ideal world, do we now?
So I decided that the party had to go on, just in a different direction. 
Also it was Thursday, the day my little one has chess class after school and which means he and his 2 friends (who come back with me) are hungry after school. 
On most days, I carry fruit for them, it keeps them full until we reach home and they get their milk. but the bananas were kinda spotty brown, the kind that kids turn up their noses at. 

So it was simpler to make or bake something. Just that I had only 1 egg and I am not so confident when making egg less cakes ( and the one I have bookmarked needs dates, which, I did not have on hand) and I was itching to make blondies. There are any number of recipes online, just google and get it. After poring over a few, I went ahead and made these. They are VERY simple to make, a 5 year old can make them and I intend to let my little one do just that, next time- with 'dark chocolate chips' as he pointedly told me, several times (with each bite, to be precise). My excuse, I was in a hurry ( and to myself: where are those chocolate chips anyway? I know I have them, somewhere).

So if you are in a hurry and want to make something quick and sweet and tasty, try these. 
Blondies, for those who are wondering, are brownies, minus the chocolate. Dense, moist, gooey and oh-so-good that you want another piece! 

You need:

1 stick / 1/2 cup unsalted Butter
1 cup Brown Sugar
1 large Egg
Hefty pinch Salt (about 1/8 tsp)
1 cup All Purpose Flour
1 1/2 tsp Vanilla Essence
Chocolate /Butterscotch chips ( or nuts, if you prefer them)

Preheat the oven at 350 F.
Grease a pan that you will use to bake the blondies in ( I used a square cake pan and sprayed it with non-stick PAM)
Sift the flour and salt and keep it ready
Melt the butter ( microwave it in short bursts), you want just melted, not bubbling ( that would be, almost ghee)
Add the sugar to the melted butter and beat until creamy
Add in the egg and the vanilla and mix well
Add the flour + salt and mix well
Transfer to the greased pan and bake in the oven for 25 mins ( or till a toothpick inserted comes out clean) 
Cool in the pan for about 10 mins and then transfer to a rack to cool completely. I left the pan cooling and went to get ready to go get the kids from school, no harm done. I sliced them in the pan and cooled them just a tad more, to pack them an go (and of course, take pictures).


-I carefully added butterscotch chips, each blondie had one, just so that there would be no comparisons when I handed them out to the 3 hungry ( and sometimes cranky) kids. Next time, I will add about 1/4 cup small semi-sweet chips and stir them in.

-Other options are, toasted nuts- chopped, M&M's.

-I got 16 blondies ( and I kept the edge on one side- as you can see in the pictures-for myself, I love 'em)


That's it at my end. and oh! I am planning a Thanksgiving party this year!  I am so excited about it, planning the menu and reading recipes..... What is happening in your part of the world? Drop in and leave a comment.
Hope you all have a sweet weekend ahead.
Pin It

Monday, August 26, 2013

Stuffed Buns

And so it begins! The first day of school and my little one starts Kindergarten. In my last post I mentioned how eager I was for school to start. 
But just last night, I was not so sure. I wanted to cling on to him a bit longer.

M and I made the last day of vacation special for Little S. We wanted it to last just a bit longer. 
We all went to the pool last evening and the son taught the father how to swim! 
That said, Little S is brave enough to swim with his vest on. But, he did give his Daddy 'precise' instructions ( and yes, they were correct). So when Little S splashed away from us, we both collapsed and at one time went under, laughing. 
Little Boys, ROCK! 

From today, we start lunch-boxes too. I have been reading on many blogs that kids prefer non-messy food as well as 'good looking' food. So as I understand, it translates to some Indian and some non-Indian food.
Thankfully, in S's school, there are many Indians and hopefully, no one saying, "eeewww, what's that yucky thing" ( yes, I have read that too, on some blogs and was saddened that the author's child had to face it.) how vastly different when I was a school going child, almost everyone would bring poli-bhaji ( roti / flat bread and vegetables) and  any snack made at home and it was always shared with a big group. Nobody turned up their noses or said "eeeww or yuck".

But all things considered, I want to make it easy on the child too. I want to pack lunches that are easy for him to pick and eat and more importantly, nothing that will leave a stain on his clothes.

This is also an opportunity for me to introduce ( or in my case, re-introduce) foods that he has said 'no' to, rather firmly. 
Would it be bad parenting if I send these re-introduced foods in his lunch box, hoping that if he is hungry enough, he will eat?


I found these Masala Buns over at Raks Kitchen and immediately wanted to try them.

I made these buns with a different stuffing, which is one of my favorites. But it is a very versatile recipe and you can use the stuffing you want.

For example, the sprouted mung filling for a healthier twist or the famous batata-wada bhaji will taste fantastic.
For a non-Indian twist, a cheese flavored with some pizza sauce -filling which I am sure, children will love. And here is an idea, pat some Nutella in and bake. Who doesn't like Nutella?! I only hope that the Nutella does not leak and come out. Any tips on this? Please do share your inputs in the comments.

There are endless combinations, it is up to you. 


I am hoping I will be able to share some recipes that I make for my son's lunch box and I would love to hear from you as well. What do you make for your child's lunch box or snack time in school? Please share your ideas.

Here's to another year in school and wishing all itty-bitties Good Luck!  Study hard, play hard and shine on! 
Pin It

Thursday, March 10, 2011

A simple Vanilla cake using Oil

How often have you seen a child straining at his/ her Mother's hand and demanding something .. anything? 
How often have you done that as a  child? I know I have. Almost every time I stepped  out of the house with my parents, something fancy (IMHO) and utterly useless ( in my parents opinion) would engage me, so much so , that I'd refuse to budge without claiming it as my own. I was around 3 or 4 years old then.
Shortly after our  home started bearing a very strong resemblance to a toy store, my parents took to warning me at the first sight of a demand rearing it's greedy head, " Asa vaglis tar police kaka dumm bhartil, oradtil  tula... chalel ka?" ( meaning: If you behave like this, that policeman will take you to task, do you want that?)

For some time, I was down ( but not out, oh no, no.... definitely not out! ). I would meekly walk on, after putting  my soul into my eyes and looking with undisguised longing at a toy and then very meaningfully at my Mother or Father. They remained unmoved and the 'police kaka' remained in his 'chowki' and peace in my parents hearts and minds and purses.


Until one day, I could no longer bear it, I saw one particular toy I wanted needed, it felt like my existence depended on it ( yeah, right!) Necessity like this makes heroes out of the meekest, and so when I began asking for the toy, my Mother simply pointed to the policeman sitting in his booth ( this booth was in  the apartment community we lived and  most of the time, the cops would sit idle), the policeman had nothing to do and so  looked at me  and wiggled his bushy eyebrows and  and said," aaann?" That was it, the last straw on the proverbial camel's back, I looked at my Mom and  then defiantly at the cop , and mustering all the courage a 3 or 4 year old could, told him , "aaaap"  and brought a trembling finger to my pursed lips, indicating that he put a lid on it.
The cop was shocked into silence and my Mother, thoroughly embarrassed and wanting a quick exit, bought me the toy and I beamed at the world with the trophy in my hand.


Now, why am I relating all this here? Because I occasionally adopt the age old technique of 'police kaka' with my son. He is yet to assert himself with one, but something  happened the other day. 
It was a beautiful day, cool crisp breeze , not really sunny, but not cloudy either, you know what I mean... in short a perfect day for a walk after the bad weather.Little S and I went out  for a small walk. The pattern is, I walk, he skips or jumps ahead of me, looking back every few steps just to make sure I am there and also sometimes seeking non-verbal reassurance that he is allowed to skip or run as long as he sticks to the side walk. 
On this particular afternoon, we were sauntering at our own pace and suddenly he stopped in his tracks and waited for me to catch up, there was a police car parked in front of one building. In a hushed tone he told me , "poos"(his word for police). His eyes wide, he glanced up at me, I smiled and affirmed that this was a 'poos car'. I looked at the car and at that precise moment I felt his tiny warm hand slip into mine. I clasped it lovingly and firmly and fell in step with him.  Reassured that  no one, not even a 'poos' can harm him when he is with Mommy, my little boy skipped , holding  onto my hand and a triumphant smile on his lips. 

Later, as he slept, I stole a kiss and decided to bake  him a cake, for his unconditional love and trust in me, for holding my hand and touching my heart .


Source: Kaboose
Makes Two 9-inch (23-cm) round layers or one 9- x 13-inch (23 x 33 cm) rectangular cake.

  • 2 cups (500 mL) sugar
  • 4 eggs
  • 2-1/2 cups (625 mL) all-purpose flour
  • 1 cup (250 mL) milk
  • 3/4 cup (175 mL) vegetable oil
  • 2-1/4 teaspoons (11 mL) baking powder
  • 1 teaspoon (5 mL) vanilla

Cooking Instructions

  1. Preheat oven to 350 degrees F (180 degrees C). Line two 9-inch (23-cm) round cake pans or one 9x13-inch (23 x 33 cm) rectangular baking pan with parchment paper. Grease the paper and the sides of the pan well.
  2. In a large mixing bowl, with an electric mixer, beat sugar and eggs together until slightly thickened, about 1 minute. Add flour, milk, oil, baking powder, and vanilla and beat for another minute, just until the batter is smooth and creamy. Don't over beat. Pour batter into the prepared baking pan(s).
  3. Bake in preheated oven for 30 to 40 minutes or until the tops are golden and a toothpick poked into the center of the layer comes out clean. (A single rectangular pan will take longer to bake than two round ones.) Loosen the sides of the cake from the pan with a thin knife, then turn out onto a rack and peel off the paper. Let cool completely before covering with frosting, if desired.
Verdict:   
YUMMY CAKE! in Little S's words. 
This was the first time I had baked a cake with no butter, instead using oil. I was nervous, I am no baker, but this cake is really very simple and easy to make and very light and tasty. It is sweet, but not overly so, just the right amount of sugar. 
The only thing that did not stick to the recipe was the baking time indicated. My cake required about an hour, but this could be  my oven, so if you do try this, check the cake at the 30-40 minute mark.
Pin It

Friday, January 21, 2011

Chocolate Chip Cookies


There was a phase in my life when biscuits ( as we call then in India) or cookies  were a large part of my diet. In fact there were many phases like that. My parents were working and so I had the house key round my neck and  after school I could do as I chose for a couple of hours. 
My schedule did not change, I'd come from school , enter the house, fling off my shoes, throw my school bag, head right into the kitchen, gulp a huge glass of water, hunt for something to eat (though my Mother used to keep healthy and filling snacks on the dining table, I never bothered about them) open  all containers, find the biscuits - eat a few , head to the bedroom, change into fresh set of clothes ( leave the school uniform on the floor), slip on flip-flops and go straight to play with friends. 
Sometimes my friends would come home and  I was a pretty good hostess, I'd serve them water first and then  after a while I'd bring out a platter of snacks ( mainly cookies ) and most unusually, a bottle of pickles... yes, pickles. If that sounds unusual, let me give you the logic behind it. It's like this, if you eat sweet 'X' and  then sweet 'Y', it (Y) wouldn't taste as good, so in order to enjoy every variety, a bite of something spicy or salty was necessary in between  and hence, the pickles. 
Then came my MMS days, my friend ( from Delhi) had rented an apartment close to the college and I parked  myself there during exam time. There was a 'convenience' store opened in the first floor apartment , they would sell biscuits, chocolates, tea, coffee, notebooks, pen, pencil and similar stuff. We would pop down, grab packets of biscuits ( there was a Kellogg- Chocos biscuit brand we favored) and have those  for breakfast and lunch.  After exams we would grab a couple of Vada paav and rush home to prepare for the next days test paper. 

Coming to the USA opened up a world of cookies for me, there was a sea of cookies in so many flavors and I fell in love all over again. Chocolate chip cookies were my favorite and I'd pick every opportunity and reason to eat 'just one'. 
I wanted to make  them at home, I was reminded of Martha Wilson , I was addicted to comic books (still am) and loved Dennis the Menace and thought it very nice of Mrs. Wilson to bake cookies . I had never used a oven mitten and held a tray of cookies  and to me it was almost out of a fairy tale, cookies at home, unlimited supply! And now that I enjoy baking I decided to go ahead and bake cookies. It was natural that I go for chocolate chip cookies. I love them ( who doesn't!?) and my Son loves them. I can get him to do anything for a 'kiikoo', as he first called them.  M says it's hereditary, like mother- like son. Huumph! 


Source: Nestle Toll House Chocolate chip cookies

Ingredients

  • 2 1/4 cups all-purpose flour
  • 1 teaspoon baking soda
  • 1 teaspoon salt
  • 1 cup (2 sticks) butter, softened
  • 3/4 cup granulated sugar
  • 3/4 cup packed brown sugar
  • 1 teaspoon vanilla extract
  • 2 large eggs
  • 1 (the original recipe calls for 2 ) cups (12-oz. pkg.) NESTLÉ® TOLL HOUSE® Semi-Sweet Chocolate Morsels
  • 1/2 (the original recipe calls for 1) cup chopped nuts

Directions

PREHEAT oven to 375° F.


Combine flour, baking soda and salt in small bowl. 
Beat butter, granulated sugar, brown sugar and vanilla extract in large mixer bowl until  


creamy. 
Add eggs, one at a time, beating well after each addition. 
Gradually beat in flour mixture. 
Stir in morsels and nuts. 
Drop by rounded tablespoon onto ungreased baking sheets.


BAKE for 9 to 11 minutes or until golden brown. 
Cool on baking sheets for 2 minutes, remove to wire racks to cool completely. 


* Notes:

I made a few changes , I used regular granulated sugar, I did not have brown sugar on hand. 

Reduced the quantity of sugar to 1 cup + 2 tbsp.


I used 1 cup chocolate chips , M likes just a 'sprinkling' of chocolate, not an overload  :(


I used just 1/2 cup of chopped nuts for fear that little S may not chew them and then have a 

choking fit ( I was wrong, I might as well add, he can chew cookies and chips  and the like very 

well, odd how he has trouble with rice and vegetables and roti.... "heredity" M whispers)


The cookies that were in the oven for 11 mins were crisp, very enjoyable, however 

the 9 minute ones were perfect, crisp on the border, chewy on the inside . This was for my 


oven, I am not sure if oven temps. vary, but I'd suggest you check at the 9 minute mark and 


if required go to the 10 or 11 minutes


Have a Great Weekend!!! 
Pin It

Wednesday, December 22, 2010

Classic White Pan Bread

When I was little, we did not have whole wheat bread, multi-grain bread or maybe we did , we were unaware and as far as we knew, everyone went in for the 'regular' kind of bread. It was white bread and Paav.

You either buy a loaf of Wibs or Britannia sliced bread and if you want  paav, you scoot down to the local bakery and buy a slab (called 'laadi') or even individual rolls.  Making bread at home was not even thought of and we did not have an oven. In fact, there was this bhaiyaji who would come to our home and those in the neighborhood on his cycle carrying bags full of fresh baked bread and new laid eggs. He would wrap the bread in newspaper and hand over what we wanted and I would hand over the money ( .25 paise for a paav) he would then jokingly ask me, "baida chahiye kya baby?" (baida meaning egg) and hold an egg in his hand and offer it to me, knowing fully well that we did not eat eggs and cackle when I would shudder!

I would slather the paav / bread slices with Amul butter and dip it in my tea or maybe I'd add a slosh of ketchup or jam and eat it, enjoying every soft bite. 
I never dreamed I'd make bread at home. Well, not successfully that is. Years ago, when I went to a cookery class, the instructor taught us bread, she made it look kinda easy.  By that time, we had purchased an oven at home and my cousin and I were VERY eager to try our hand at making bread. The whole thing is a bit of a blur, but I do remember this, they made excellent paper weights. 
I gave up on baking. At least for the time being. I was down, but not completely out.
I made a couple of attempts after that, with no success. Gave up, yet again.
Then I hit the jack pot......I read the recipe over and over for days, tempted yet I had not the courage. I then attempted and succeeded in making pizza. I had overcome my fear of yeast, in part. This gave me courage to try bread and boy! am I glad I did!!!

Just like the last time, I chewed my nails to zero when the bread was in the oven, this time around as well. But I should have believed. The result was a  perfect loaf! Yaaay! 
I could not keep still, I could hardly stand the wait,  I even 'fanned' the loaf with the oven mitt to cool it faster and sliced it. Look at the picture below and learn from my mistakes. Let the loaf cool. Completely.
Over excitement? Take a deep calming breath, count to 10 and then slice, if you do not do this, the knife shakes and cuts unevenly, see? No harm done to the loaf, just don't look very pretty.

I made this a couple of times and with equal success. My friends shared it with me and  gave me the thumbs up sign. I only wish my parents were here with me to enjoy it. 

Makes: Two - 8 1/2 x 4 1/2x 2 3/4 inch loaves

2 1/2 tsp ( 1 envelope) Active Dry Yeast
2 Cups warm  Water
5 - 5 1/2 Cups All Purpose flour (APF)
1 Tbs. Sugar
1Tbs. Salt
5 Tbs. Unsalted Butter or Vegetable Oil

Whisk the yeast into the warm water and set aside and prepare other ingredients

To mix dough by hand:  place 5 Cups APF, salt and sugar in a mixing bowl and stir in yeast mix and melted butter

Continue to mix until the mix resembles a rough dough

Turn the dough out onto a lightly floured  work surface and knead until the dough is smooth and elastic, about 5 mins. If the dough is too soft and sticky, add flour 1 tbs. at a time.

Place the dough in an oiled bowl and turn to oil all surfaces

Cover the bowl with plastic wrap and allow the dough to rise until doubled in bulk, about 1 hour

Turn the risen dough onto a lightly floured surface (you may need a scraper). Deflate the dough and divide into 2.

To form a loaf, make sure the surface is free of any excess flour, then stretch the dough until it is approximately the length of the pan, then fold in the short ends, then fold in the far long edge over  tot he middle. Fold over the  other long side and  compress to form a tight cylinder 

Place the loaf in the pan, seam side down and cover with plastic wrap. Repeat with second loaf and allow it to rise until double ( about 1 hour) 

When loaves are almost double, set a rack in the middle level of the oven and pre-heat to 400 deg. F

When the loaves have completely risen, place the pans in the oven and bake for 30 mins ot until golden brown and firm and internal temperature is 210 deg.

Unmold  the loaves to a cooling rack  to cool on side.

Cool completely and slice. Enjoy.
Pin It

Monday, November 29, 2010

Pizza at home! Conquering the 'yeastophobia'!

Does anyone remember (or have you been a part ) of the time when 'Pizza' was a very rare (if at all) treat? It was, when I was in my tweens.  We rarely ate pizza and never made at home, that is if you do not count buying Monginis base.
I would look at the small  ready to eat pizzas at the bakery and wonder why a sandwich, a round one at that, was left open and would *anyone* - *ever* want to buy something that looked so cold and (pardon me for saying this) ugly.
I don't remember the first time I ate pizza, but I do remember that I loved it! And then I was addicted, I could have eaten pizza everyday for every meal.
Pizza at home was a big affair, believe me, when I say this, not because of the effort involved- which was minimal, but because we were 'making pizza at home' the very idea and  a snack so 'foreign' in our totally Indian kitchen with it's usual, pohe, upma, idli-dosa and the likes.
We did not, for many years, have an oven ( does anyone remember these?) at home and  baking was out of the question, it was best left to Monginis and the like.
So, when we did make pizza, we hopped out to the nearest  Monginis or the grocery store and bought ready made pizza base the sauce and the cheese ( sometimes just cheese cubes, we did not really bother about mozzarella or cheddar or any type, indeed , I hardly knew about the different types! ) and used the good old 'tawa' to make and bake the pizza.
I used to help my Mother with the prep work and assembly and watch keenly, every nerve tingling in anticipation of the feast. I would gingerly lift the pizza  corner with a wooden spatula to check how evenly brown the base was getting and  wonder at the melting cheese. So different from what it is today, where one can walk into a pizza parlor and buy an entire pie or slice and not think twice or wonder and anticipate and enjoy every bite .
But over the years, I have grown weary of store bought pizza and have always wanted to re-create the magic at home, to once again feel the thrill I used to as a child. I wondered if I was capable of such enthusiasm now.
 For all those who have lately started reading this blog, I want to admit, I was afraid, *very* afraid of yeast and making breads. In my opinion, there was nothing as daunting as baking breads, for all the simple list of ingredients, I shied away from making pizza base at home, I would willingly walk a mile in tight shoes, but not bake. Yes, that about sums up my phobia! 
Then one day, the blogger in me reared  her head and demanded that I drop my cowardly attitude and swap it for the yeast packet and APF (all purpose flour) and use them up. What, if at worst can happen? a disaster, pshaw! so what, there is a large trash bin, dump it and move on....  Made sense. 
I popped in at the library and after a lot of pondering ( and finally using the 'in-pin-safety-pin' method) settled for this book on 'How To Bake'.
Leafing through the book I realized, I had picked the best book, for a person like me, who had limited knowledge and a lot of fear to deal with. The book outlines simple steps for making basic pizza dough and clear instructions. 
I bookmarked this dough and basic White Bread ( recipe to follow) as my favorites.
The Pizza base was *awesome*! It worked, I watched the flour yield to the kneading, I watched it rise, reducing my nails to shreds and listening to a drumming in my ear (which in a calmer moment I  realized was my heart) . I put it in the oven and watched it bake, yes, I did, I placed a small step stool in front of the oven and parked myself in front watching like a hawk. And boy! was I rewarded!  I sliced it up and gave M the first slice.... the  drumming was louder now, as he took his first bite and then the next and the next and gave me the thumbs up sign! I DID IT!  I MADE PIZZA AT HOME! I felt a rush of the thrill I had felt long ago. I was happy and this was a feast.

Here's how I made the Home Style  Pizza Dough: (Makes 1 - 101/2 x 15 1/2 inch Pizza)

2 1/2 Cups Unbleached All Purpose Flour ( APF)
1tsp. Salt
1 Cup Warm tap Water
21/2 tsp. or 1 envelope Active Dry Yeast
3 Tbsp. Olive Oil

Stir the flour and salt in a 2 quart mixing bowl to combine and make a well in the center

Measure the water and pour onto a small bowl, whisk in the  yeast and 2 T Olive Oil

Pour the liquid mixture into the well  in the flour and stir with a rubber spatula, until a soft sticky dough forms
Beat the dough for a minute until it looks  smoother, cover the bowl tightly with plastic wrap  and allow the dough to rise doubled in bulk (about 1 hour)

Grease the jelly-roll pan  with the remaining  Tbsp. of Oil. Without stirring or folding the dough, use the rubber spatula to scrape it from the bowl into the oiled pan. Oil your hands and press, pull and pat the dough into the pan. If it resists, let it rest for 5 mins. and then continue. Let the dough  rise for 30 mins or until it puffs slightly

Prepare topping of choice ( I used a ready made sauce from Trader Joe's, red and green bell pepper and red onions and mozzarella cheese)

Set rack at the lowest and highest level of the oven and preheat at 450 F

Bake the pizza  on the bottom rack for 25-30 minutes 

(After about 10 minutes, lift the end with a spatula and check that the bottom is not burning, if it is  coloring too quickly, slide a pan under the first one.)

Remove the pizza, slice and enjoy! 

* Notes: 
I used a fork to poke small holes ( do not stab at the dough)  in the pizza dough, this is not a part of the chef's recipe, it is my own
I baked the pizza on a pizza stone. I ensured that the stone was heated through and this takes a great deal longer than the normal pre- heating, I'd say about 25 minutes or more. The end result is a crisp and amazing base! 
Pin It

Monday, October 23, 2006

Chakli on Padwa

The fourth day is PADWA or VARSHAPRATIPADA which marks the coronation of King Vikramaditya and Vikaram-Samvat was started from this Padwa day.

Govardhan-Puja is also performed in the North on this day. As per Vishnu-Puran the people of Gokul used to celebrate a festival in honour of Lord Indira and worshipped him after the end of every monsoon season but one particular year the young Krishna stopped them from offering prayers to Lord Indra who in terrific anger sent a deluge to submerge Gokul. But Krishna saved his Gokul by lifting up the Govardhan mountain and holding it over the people as an umbrella.

Govardhan is a small hillock in Braj, near Mathura and on this day of Diwali people of Punjab, Haryana, Uttar Pradesh and Bihar build cowdung, hillocks, decorate them with flowers and then worship them.

This day is also observed as Annakoot meaning mountain of food. In temples specially in Mathura and Nathadwara, the deities are given milkbath, dressed in shining attires with ornaments of dazzling diamonds, pearls, rubies and other precious stones. After the prayers and traditional worship innumerable varieties of delicious sweets are ceremoniously raised in the form of a mountain before the deities as "Bhog" and then the devotees approach the Mountain of Food and take Prasad from it.

Goddess Lakshmi is worshipped in every Hindu household and her blessings sought for success and happiness. This day is looked upon as the most auspicious day to start any new venture. In many Hindu homes it is a custom for the wife to put the red tilak on the forehead of her husband, garland him and do his "Aarathi" with a prayer for his long life. In appreciation of all the tender care that the wife showers on him, the husband gives her a costly gift. This Gudi Padwa is symbolic of love and devotion between the wife and husband. On this day newly-married daughters with their husbands are invited for special meals and given presents.

Making chakli is a difficult task, or so I thought, till Mom came to the rescue ( don't they always?!?) and gave me another sure- fire recipe, which never fails and the chaklis are extremely crispy.
So if your chaklis are too hard, or crispy on the outside and soft on the inside, or you have a recipe for chakli that simply eats up oil.. then try my method!
Take :
3 cups Rice flour

1 cup All purpose flour (maida)

1/2 cup Ghee

1 Tsp. Red chilly powder

1/2 tsp. Turmeric
1 tsp. Sesame
1/2 tsp. Ajwain
1 tsp each Corriander and cuminseed powder
1/2 tsp. Asafetida
1/4 tsp. sugar
Salt to taste
Warm water to knead a dough
In a plate, take the ghee, add the chilly pwd. turmeric, asafetida, sesame, ajwain, corriander-cumin pwd., salt
and sugar. Mix all the above thoroughly, using fingers. Till the ghee becomes frothy.Now add the maida and rice flour and mix well. Now, very slowly, add warm water and knead into a dough (I needed approx. 1 cup water). It looks like so...
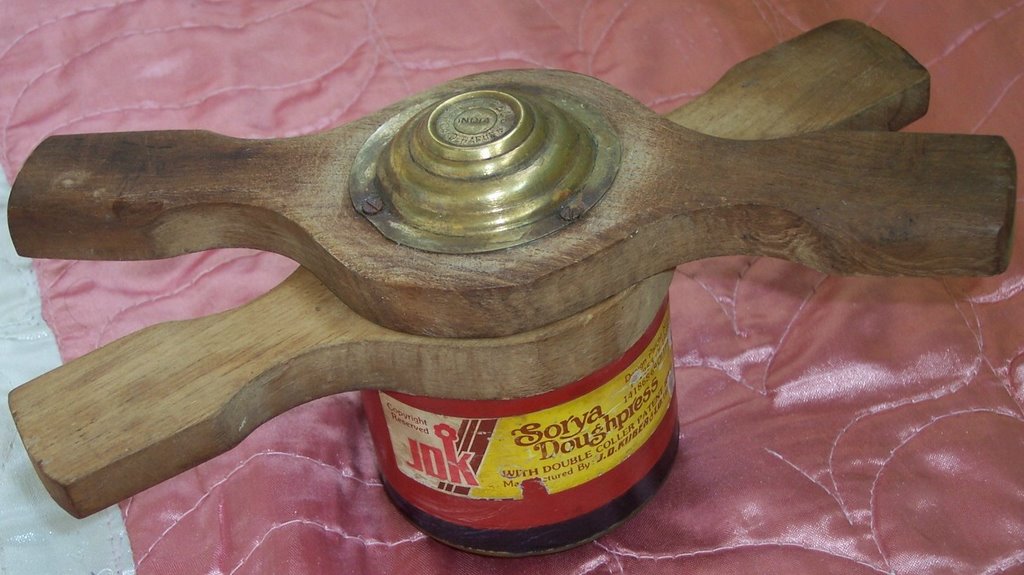
To make the chakli, use a chakli dough press.. I have an ancient one.. looks like this
Make equal portions of the dough,like hotdog franks..
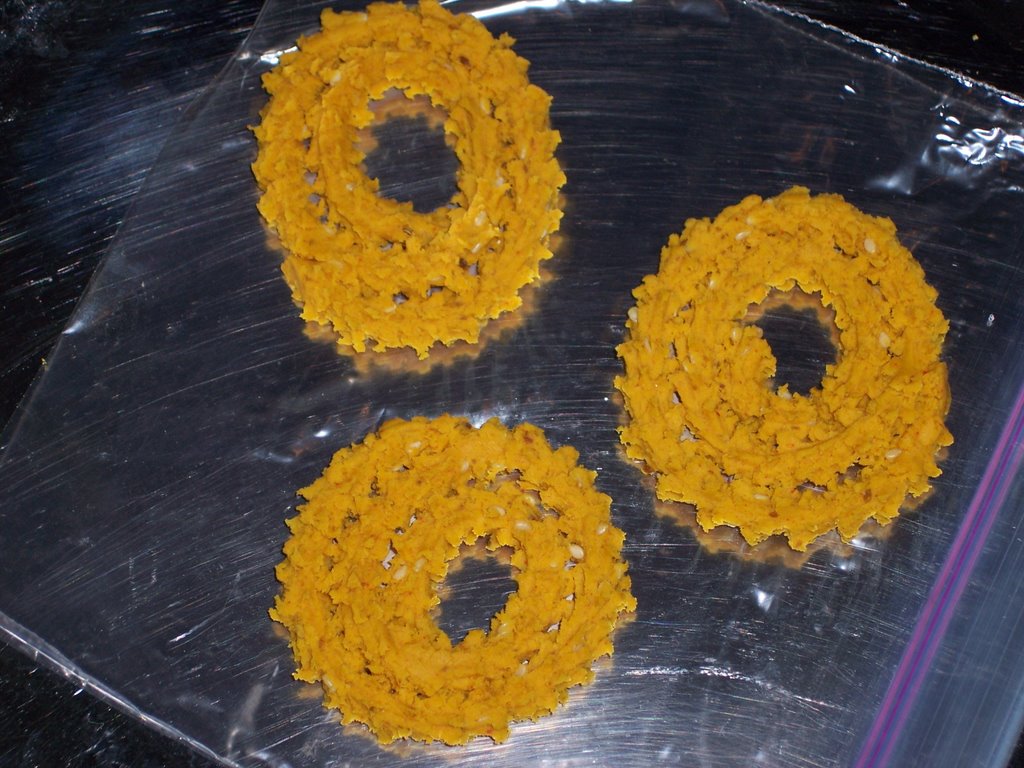
Put these into the dough press and make chaklis on a sheet of plastic, makes it easy to pick up and deep fry (whoof! my hands were aching by the time I had finished the first dozen!) Oh for a new dough press!
Deep fry the chaklis on a med-high flame to a crispy golden colour. Drain on a tissue paper.
Pin It
Share

LinkWithin

Related Posts Plugin for WordPress, Blogger...
Page copy protected against web site content infringement by Copyscape