Friday, December 30, 2016

Amba Khatta (Mango Curry) (Odiya Cuisine)

As 2016 draws to a close, I look back at it and wonder, was there a year that had so many ups and downs? 
The high was my trip to India, spending time with family and catching up with my besties from college. That one day brought back a surge of those wonderful 5 years and we just went back to being Seenagers (Senior Teenagers). These girls made the 5 years of college the best ones of my life! We shared so much, laughter, tears, food, secrets. Just thinking of them makes me smile.

The lows were, I lost my uncle and aunt, within a week of one another. Many of my closest friends also lost their loved ones and it was just one blow after another. 
I'm glad this year is almost over.

Here's wishing everyone a very happy new year. May 2017 be a really, really good year for all of us. 

The conclusion on 2016 brought about one more change for us, as a family. We have moved and will spend the next few days settling in. 

As controversial as this may sound, I'm happy to be out of Florida. It is beautiful, no doubt. But, yes, there is always a but!, it had way too many reptiles for my liking. They just made my life plain miserable. 
I am not one of those intrepid women who walk fearlessly when they see half a dozen lizards right in front of them, who just make a 'shoo' sound and pad on, watching in delight as the creepy, dirty little buggers scurry hither and tither. 
So, I'm happy, where I am. 

I will miss my friends though. That is the sad part about moving. This time I had a mixed up group of friends from all over India. Among them was my friend S, who is from Odisha (formerly Orissa).

My introduction to Odiya cuisine was at a potluck, in Los Angeles, a long time ago. my friend B had made this fantastic red tomato and dates chutney. I was bowled over. And now, S taught me this Amba Khatta which is equally delightful.

This khatta (or curry, if I dare call it that) is a fantastic blend of sweet and spicy with the wonderful mingling flavors of the panch phoron (5 spices) which when mixed with fluffy, piping white rice will have you wanting second and third helpings. 


Begin with making the Masala Paste:

1 tsp Mustard Seeds
1/3 tsp Jeera (Cumin seeds)
3 fat cloves Garlic
Ginger, half the size of garlic.


Soak all the ingredients for about 10-15 minutes and then grind them to a fine paste.

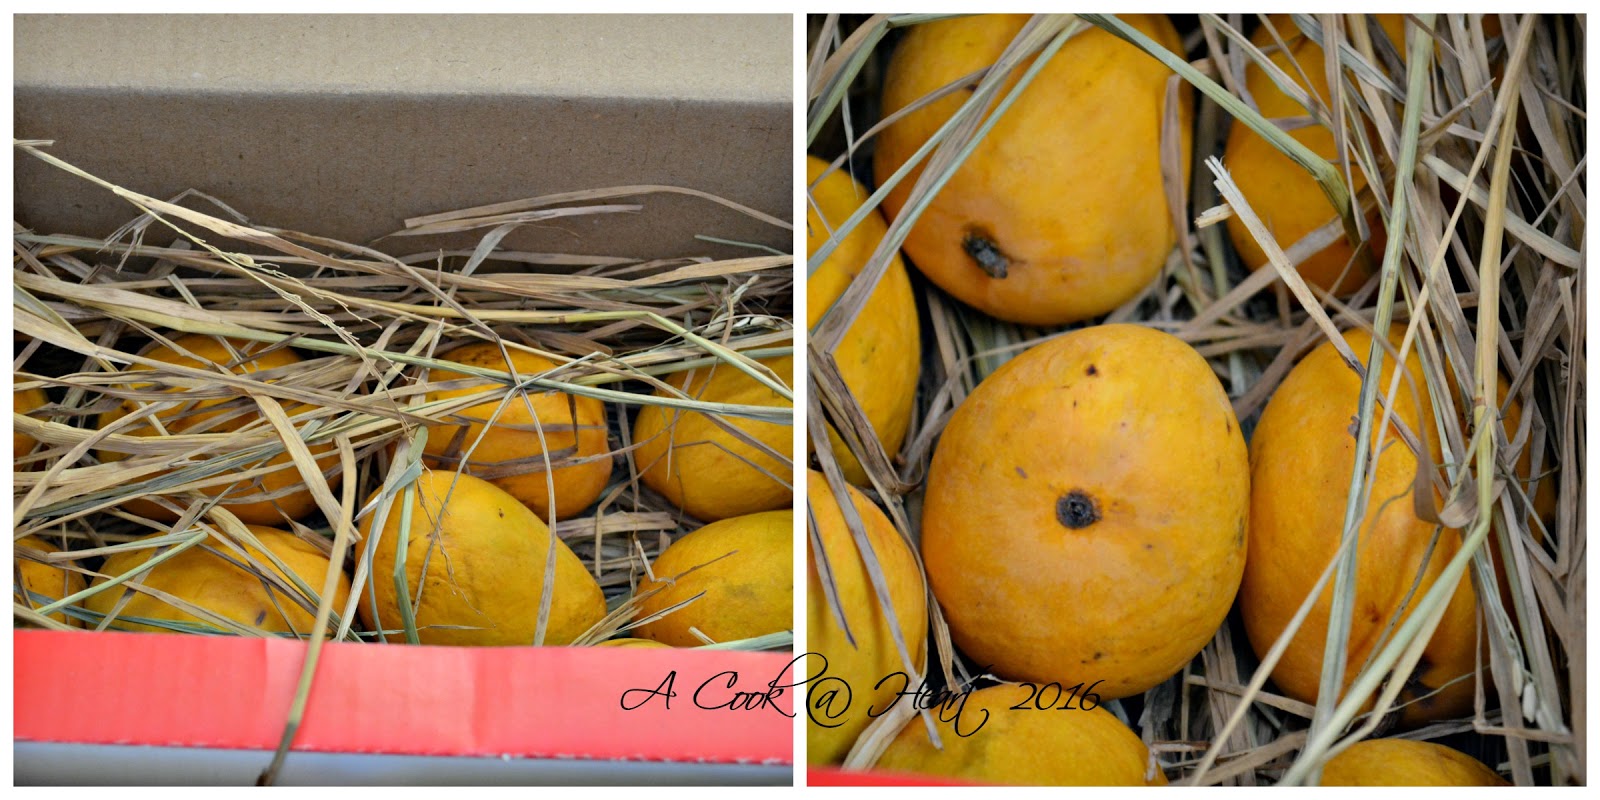
Start with one large mango (sweet but firm to the touch, I buy mine at Aldi). Wash it well and cut into large chunks.
Add water to a saucepan, tip in the mango chunks and bring it to a boil.
Cook the mango pieces till tender.
Once cooked, strain and set aside.

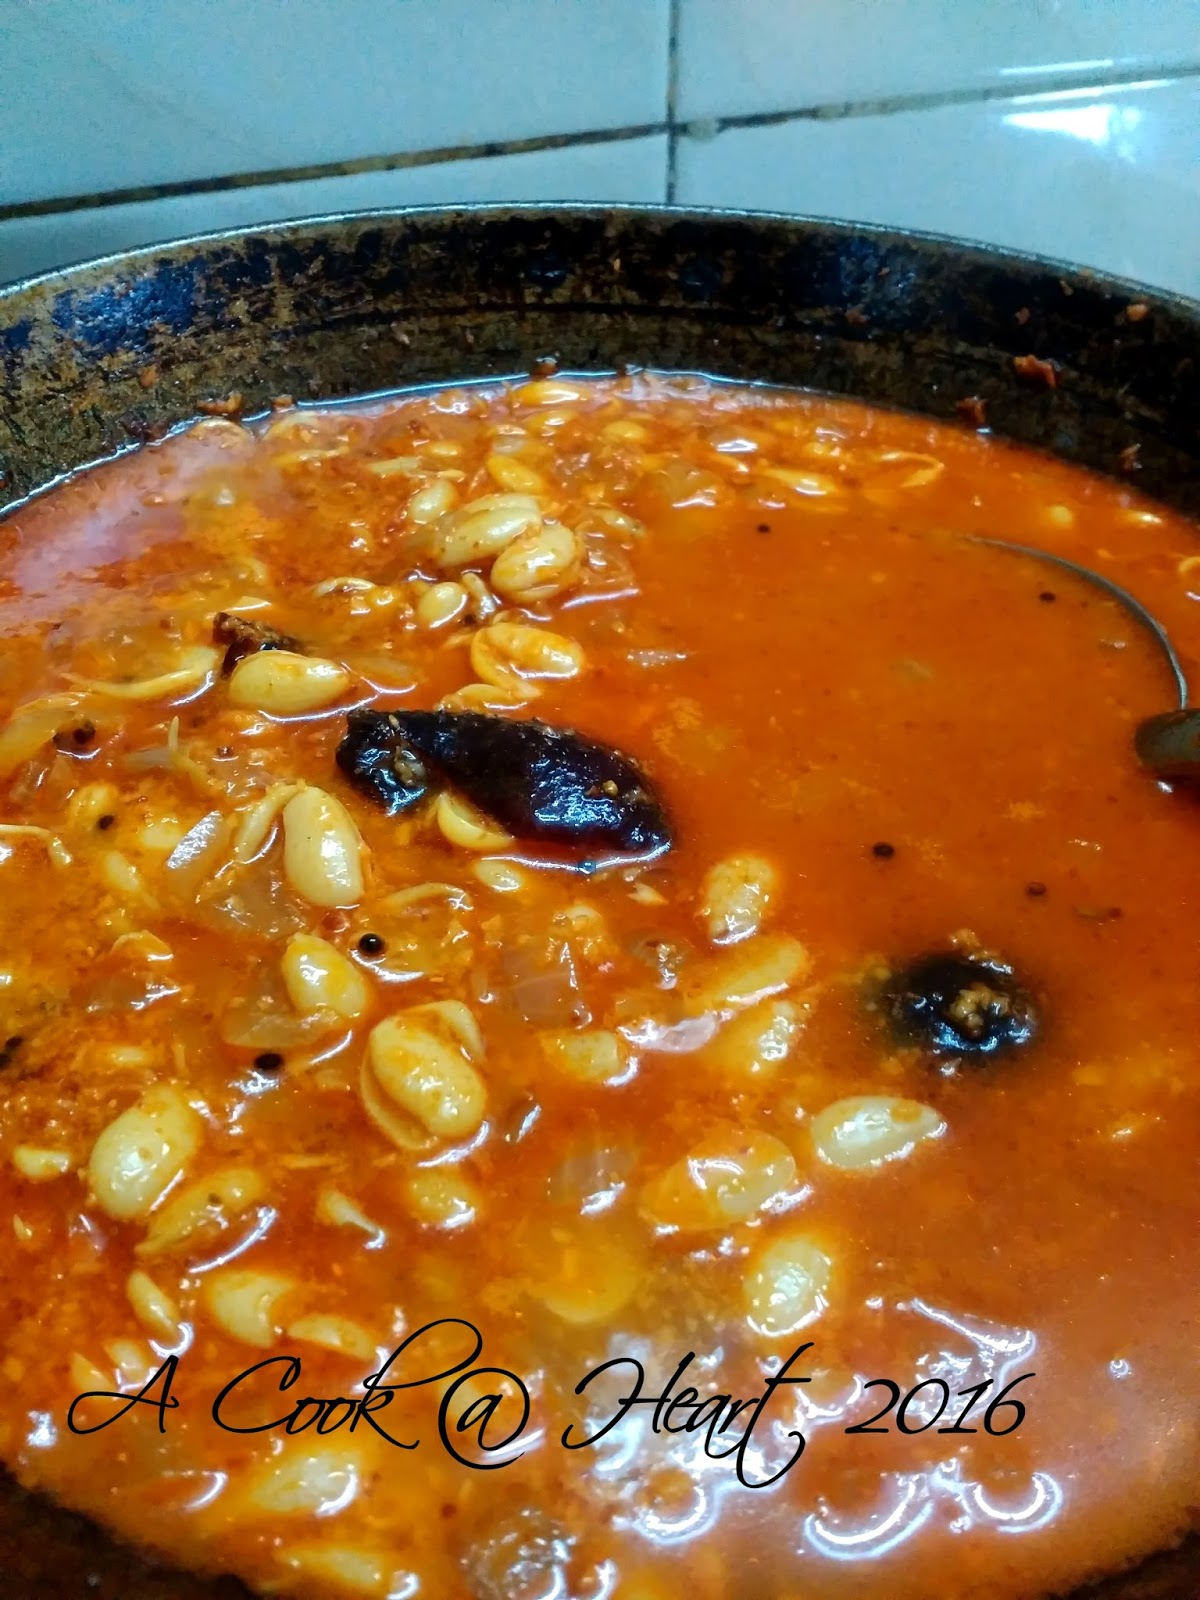
In a deep sauce pan heat 2 tbsp Oil and add 1 tsp of *Panch Phoron .

Once the panch phoron seeds pop and sputter, add in the masala paste made earlier. Saute this paste on medium- low for about 5-7 minutes.

To the masala paste, add salt to taste, 1/2 tsp turmeric and 1 tsp Kashmiri red chilies powder (or a blend of Kashmiri and cayenne). Do not make it spicy, it will just spoil the  overall taste.

Add the mango pieces and add 2 tsp. Sugar.

Cook until the spices and mango flavors come together, about 5-7 mins. Not exceeding 10 mins.

Serve with white rice.


I have this Panch Phoron blend I use. It is from a cook book borrowed long ago from a library and I haven't a clue which one. My apologies that I cannot link it. But I am not taking credit for what I have been only following for some years now!

1 Tbsp + 1 tsp Cumin seeds
1 Tbsp Fennel seeds
2 tsp Nigella Seeds
2 tsp Brown Mustard Seeds ( I use black as it is the only one I usually buy)
1/2 tsp Fenugreek seeds

Mix the seeds and store, use as needed.


To all my friends and readers, A Very Happy New Year! 
See you in 2017. Till then, stay safe and stay happy! 
Pin It

Wednesday, December 28, 2016

Tea and travel pains.

This Thanksgiving, I gifted myself ( yes, that is a thing) an Electric Pressure Cooker (EPC).
Everyone, and I mean everyone has been raving about the InstantPot. I was tempted. People seem to be cooking everything in this one gizmo.
After a lot of deliberation and delay and comparison I decided, I'm getting me one of these.
A bit of research and I zeroed in on this model. When I got it it was on sale for about $55, a lot cheaper than the IP with the same functionality. Win-Win.

I snagged it and started cooking, just the basic stuff.
Rice and daal.
Beans.
Soup.
Potatoes.
Rasam and Sambar.
Making vegetables ( it has a 'Sear' function)

I liked it, I would put the daal in the main pot, stack rice on the trivet and lay a plate with peeled and chopped potatoes (with a couple of tbsp water drizzled on top) set it and forget it.
I cooked beans to perfection. This was always a task for me. I used my regular Prestige cooker but almost always forgot to count the whistles and the beans would be underdone or mush. What a hassle!  But it was so easy with the EPC, I had only to adjust the  quantity to 'less' and set it on the beans mode and forget it. Perfectly cooked beans!
Then I made yogurt in it. Easy, but not necessary, in the Florida warmth and humidity.

My next experiment will be getting the dosa batter to ferment in this. And I can see the advantage of using the EPC to ferment the batter. You see, we have moved again.

Source: Google search
After a back breaking packing marathon and forgetting where I packed what (by then I was too darn tired to even care, I just know I took good care in packing my kitchen appliances), I bundled what ever remained in 4 suitcases, forced them shut and the husband and I heaved them into the rental car and drove to the airport. The heaviest suitcase contained my EPC, a small frying pan and my rolling pin. That is all I traveled with. Time to put the EPC to use.
The movers will bring the stuff in about 2 weeks, so I will have to make do with the 'make it all' gizmo and see if it is worth the hype and money I put into it.

The thing about travel (in my case, move) is, it lets you relax and unwind and most importantly, takes you away from the routine that you get sucked into.
Can you guess where I am?
My son and I love staying in a hotel. He likes it because it is a novelty to him. I like it because of the housekeeping cleaning up and making everything spic n span for me!
Advantage, free hot breakfast.
Disadvantage, no tea. I love me my chaha/ chai. Even a laid out breakfast cannot compete with a hot cup of ginger spiked tea.

Time to start testing the versatility of the EPC.


So day 1, I made tea in this with fat free milk. It was delicious!
Nailed it! Moment.
Day 2, half milk and half water. Delicious, again!


For my friends, who have purchased the EPC ( around the same time as I have and are experimenting with it), this is for you all.

In the main pot of the EPC, pour 2 cups of water and place the trivet in it.
In a small pot (image below) pour the usual combination of milk and water that you normally use.
Source: Google search

Wash a small knob of ginger.

Add sliced / crushed  ginger to the water+milk combo.

Add sugar and tea powder. (1:1:1 )

Place the pot on the trivet and close the EPC. Make sure the 'whistle' is set to 'Seal' (and NOT 'vent').

Press 'Manual' and adjust the timing to 1 minute ( press the '-'button to adjust).

Press 'Start'.

Go do what you were doing, take a shower, get ready. Tea will be ready by then.

Once the pressure goes down, open the EPC, strain the tea and enjoy.


Things to remember:

The EPC takes time to build pressure.

You will see the lines go round on the panel, that is normal.

Once the cooking time is done, the EPC will switch to 'Keep Warm ' mode.

Let the pressure go down normally (also called NPR).

Pin It

Monday, October 17, 2016

Chickpeas Pulav /Solanyacha Pulav (Pressure Cooker method)

We went into a stock and save frenzy. The news channel was on all the time, even the child did not change the channel. Hurricane Matthew was on the way. 
While it was still peaceful and calm in our city, we had to be prepared. 
The first instinct was, water, we need to stock up on that. 
Some food, that does not require cooking in case there was a power outage.The apartment has an electric stove, so there was no way we could have heated or cooked anything. 
Candles and lighters and matchsticks.
Fill up on gas.....

Everyone had the same thoughts running in their heads.
Everyone rushed around doing this and that. 
I joined in too. 
In the store I loaded my cart with fruit, water and some soda ( that would make my boys happy, it's a rare treat in this household). 
When I saw other peoples carts, I was a bit shocked, they were almost collapsing under the weight. 
A small doubt was creeping into my mind. Am I underestimating Matthew? I mean, just LOOK at that! Packets upon packets of any and every variety of chips, multiple loaves of sliced bread, bottles of PB&J, Gatorade, beans, soda, wine... no water though, oh! there was that gallon, at the bottom of the cart! 

I came home and decided, power outage or not, I need some cooked food, something that will last me a good 3-4 days. 
Things like masala poori (tikhat mithacha purya), plain poori, lemon rice and this 'Solanyacha pulav' were made and refrigerated. 
If nothing happened, I'd get a good break and I could relax and read or do something I wanted. 

We had high winds and lashing rain and the branch outside my living room window swayed dangerously banging and making me nervous. Glass shards in the carpet, oh dear God no! 

Thankfully, we were all ok. 

Pulav

I had a relaxing couple of days ( I made meals for just 2 days in case of any problem) and read 'Sita's Sister and found it enjoyable. 

This recipe was given to me a while ago by an acquaintance. I have made it a couple of times and it is finally decided to blog about it. Thank you, Pooja! 

This rice is a great one dish meal and a great lunch box option too. 
It pairs well with some pickle, yogurt and some flame toasted papad (of course deep fried papad is a superior option, but I rarely deep fry).

Typically, this pulav is made using Green Chickpeas (fresh ones, in this case), when in season or frozen, if you get them at the local Indian store, but I found the black chickpeas a good substitute. The recipe is also adaptable to making it an all-vegetable pulav and it tasted great like that too. 

Here's what you need to do,

Wash 1.5 cups Rice ( I used the katori / vaati, it is smaller than the standard measuring cup) in 3-4 changes of water. Add fresh water and set aside. I used Sona Masoori Rice.

I used frozen black chickpeas, 1 cup. Washed and set aside.

Slice 1 medium onion, lengthwise.

If you want to add vegetables chop them. I added one medium Potato (peel and large cubes) and 1 medium carrot (peel and cube).

Make the masala paste by blending to a paste: 2 tbsp. Fresh Coconut + 4-5 cloves of garlic+ 1.5 inch knob of Ginger and 1 tbsp. Cilantro

Heat 3-4 tbs oil in a pressure cooker. 

Once the oil is hot, add 1 tsp Mustard seeds , as they pop, add 1 tsp Cumin seeds, 1/2 tsp Asafetida, few curry leaves and 1 Bay Leaf.

Add the sliced onion and cook until golden brown and cooked through.

One the onion is cooked, add in the masala paste along with 1/2 tsp Turmeric powder, 1 heaped tsp.  Garam Masala (I use Rajwadi Garam Masala) and 2 tsp Coriander seed powder.

Reduce the heat and cook the mixture till oil separates from the sides of the mixture.

On another burner set 4 cups of water to boil. 

To the pressure cooker, add the green /brown chickpeas and other vegetables, some salt and mix very well and ensure that the vegetables are coated with the spice mix.

Cover and cook for a minute.

Drain all the water and now add the rice, mix well ensuring that the rice is also well coated with the spices.

Add the hot water and some more salt to taste. 

Close the lid of the pressure cooker and cook for 3 whistles.Switch off the heat.

Let the pressure subside naturally.

Garnish with fresh and finely chopped cilantro and serve.

Pulav lunchbox option

Notes:

- Use Basmati Rice or Ambe Mohar (if you can get it) instead of Sona Masoori

-Use vegetables like cauliflower, beans, peas.

-Substitute brown chana (as I have) with  garbanzo beans, fresh green chickpeas. red kidney beans.

-This is a mild but very flavorful pulav.

-Lightly roasting and then powdering the coriander seed (sabut dhania) makes the pulav even more flavorful.


Pin It

Monday, September 26, 2016

Comfort food and one pot meal: Moogachi khichadi ( different version)

For a quick but nourishing meal, we all resort to our comfort food. In all likelihood, your comfort food is the same as mine, Khichadi (rice, moong daal cooked with minimal or no spices added).
We all have the *most* basic version. But sometimes, even the humble version needs a makeover with almonds and raisins and some spices. 
And then we all have that version where we want to sneak in vegetables and make children ( and in some cases, older people) eat them.

During my recent India trip, my father caught a bug and came down with fever and had lost all his appetite. He lost weight and weakness enveloped him. It was so heart breaking to see him like that. 
Of course in a few days he was on the mend, slowly and along with medication and tonics, good food was needed.

This khichadi, has warming spices that give it the taste and perk up blah! taste buds. The vegetables and the moong daal (split and skin on) amp up the nutrition. 
While it tastes good on it's own, with the (mandatory, imho) generous drizzle of ghee, the popular saying, Ghee, Papad, Dahi, Achar : Khichadi ke hai char yaar, is perfect for this version.

alt="rice and lentil khichadi with vegetables"
alt= "Khichadi with vegetables and home made ghee"
Khichadi with vegetables and golden home made ghee


I have another version of khichadi that I make often, involving usage of 'goda masala' and hopefully I will blog about it soon (not too soon, though).
After all, there is no such thing as 'too much khichadi'. 
Pin It

Tuesday, September 20, 2016

The softest idlis, ever!

This summer, after a lot of back and forth I finally gifted myself a Wet Grinder
Finally.
Why did I not do this earlier? What a fool I have been.

I was always happy with the idlis I have made previously. I used Idli Rava. Urad daal and Idli rava (1:3). It was easy, I only had to grind the soaked Daal. The idlis never disappointed. 
So why would I want to change something *that* good. The only reason I changed this was, there is a difference between a good idli and a fantastic idli. 
Immodest as this sounds, I make fantastic idlis now. (yes, yes, I'm all puffed up at my success).
I read the term 'pillowy goodness' on Nupur's OHS and now, now I know what she meant. 

The grinder grinding away is sheer music to my ears. Every week.
What else can get me so excited? The very first time I made idlis using the grinder and the proportion mentioned, I could hardly wait to taste them, I did not. As soon as I could get them off the mold, I nibbled on the piping hot idli. Oh heaven! Before I knew it (well, I did, but let's just pretend I was in a trance) I had polished off 2 more. With nothing to accompany them. Just like that.
Then I ate them with just chutney.
Then with sambar.
Then with chutney and sambar.
And as if that wasn't enough, I also ate them with ghee and sugar.
Yes, I did it.

We ate nothing but idlis that day.
They are *that* good.

The weeks following haven't changed much.
My friends also declare that these idlis are far superior to the ones I had made earlier and those were superb, in their opinion.

idli


Here's how I make the idli:

1 cup Gota Urad Daal  (Whole, skinned Urad daal)
1 tsp Fenugreek Seeds
3 cups Idli Rice (specially labelled and easily available in any Indian grocery store)

Wash the daal in several changes of water, till it runs clear. Refill with fresh water and soak the daal along with fenugreek seeds for at least 8 hours or overnight.

Wash the idli rice in several changes of water and then refill with fresh water and soak alongside the urad daal.

Before grinding, discard the soaking water and rinse the daal and rice briefly.
Now, if you are using the wet grinder, add the daal in one go and some water and start grinding. Slowly add water as required.
Grind till the daal (and fenugreek)  is a smooth paste and is white in color.
As you scoop, it feels light and well, fluffy. That is what best describes it.
Once the daal is done, remove it to the container you want to use to ferment the batter.
Now, to the wet grinder, add the rice and some water and switch it on.
Grind till the rice is smooth.
Add this to the daal and mix gently.
At this stage a lot of women like to add salt and let the batter ferment. I usually do not add any. 
I add salt before I make idli.
Leave the container in a warm place to ferment. This can take from 8-12 hours.
I leave the batter in my oven and switch on the light.
Once the batter has risen, you can either make idlis immediately or transfer the batter as is to the fridge to keep until you are ready to make idlis.

To make idli:
Add about 1-1.5 tsp salt to the batter and mix *very*gently to evenly distribute the salt.
Grease the idli mold.
Fill the idli steamer /cooker with water at the bottom. Know your cooker levels and make sure that water does not enter the mold at the bottom.
Set it on the stove and let the water heat up.
Spoon the batter intot he mold cavities and stack them up.
Carefully place the idli stand n the cooker/ steamer and place the lid.
Steam on medium high ( if your stove has buttons going from 1-9 and HI, use 7.5) and steam the idlis for about 20 mins.
Once done, switch off the heat, remove the lid and let some steam escape.
Remove the stand (use a napkin or wear a baking glove) and set it aside.
Use a blunt knife (butter knife) to remove the idli from the mold and serve hot with chutney of your choice and sambar.

These idlis freeze very well. To reheat, place 3-4 idlis on a microwave safe plate and cover with a damp napkin and microwave on high for 1-1.25 mins.


NOTES:

  • Make sure the batter is light and fluffy.Airy.
  • Do not add too much water, that will not give you fluffy idlis.
  • Do not over mix the batter, this will release the air that is incorporated into the batter while grinding.
  • After adding salt to the batter, mix / fold gently.
  • If using blender to grind the daal, start at a low speed and then increase gradually. When the daal starts looking pasty, give it the max speed and let it grind for a while till it looks fluffy.
  • In winter when fermentation takes longer, I add 1-2 teaspoons of thick poha. Adding poha to the rice (after the soaking water is discarded and rice is rinsed) helps the process. 

Pin It

Tuesday, August 16, 2016

Vaalacha Birda ( Vaal beans In a coconut sauce)

So, finally this summer I shopped and packed and visited India. It was a fantastic few weeks and my son and I were left wanting more! 

Source: Google image search

The highlight, or shall I say one, of the highlights, was enjoying Alphonso Mango, the Hapoos! 


Ah! After the longest time, ever I had the pleasure of biting into this superlative fruit. Slices, 'aamras' were a daily feature and I can greedily say, I could have had some more! Mango lovers will understand and agree.

On most evenings, my son, my mom and I would walk down to the local market to buy vegetables, Pav, fruit. It was noisy, dirty, colorful all rolled in one and a wonderfully unique experience for my 8 year old. He loved going to the market with his favorite Ajji (Grandmother), ie. my mother and coaxing her to buy him some little thing, everyday,  making a stop at the the store that also has a 'chaat' corner to enjoy what he fancied on that particular day (dabeli/ pani puri/ sev puri/ gulab jamun/ jalebi) and coming home in an auto (which he hailed). 

The nicest thing about these 'vegetable markets' is, well, it isn't actually a market, the vendors just sit by the roadside with their wares and a weighing scale and you buy what you want. In one corner, I spied this old lady with a toothless smile selling sprouted beans and hurried over to buy 'vaal'.
I never fancied this in my younger years, but now, I like them. 

Sprouting and peeling these beans is a labor intensive job, so if you get these, prepped, swoop and grab. As I gleefully picked up my bag of sprouts I found myself humming, "...it happens only in India!" 

I also stopped by Majestic Book Depot (Thane W) and treated myself to these two books. The cookbook (left) has a fine collection of recipes which include Maharashtrian, Punjabi, South Indian etcetra, from across India. The book (right), on festivals and traditions observed  is also useful, it details many rituals observed during festival time as well as some recipes. I found both books delightful and a great addition to my book shelf.
Humkhass Pakasiddhi (left) and Varshache Sanwaar (right)
The first recipe I tried from the cook book was Vaalacha Birda. 
While the recipe is great and a keeper, I wish it was written well. 
For someone new to trying Vaal or this recipe, it is confusing, for ex: the author could have clearly specified what needs to be ground for the dry masala and then the coconut masala. I got my Mom to help me out there. 
I have adapted the recipe to my understanding. The end result however is a lip smacking curry that can be relished with fulkas or even better, a bhakri

You need:
About 3-4 cups Vaal ( sprouted and peeled) (author suggests about 1/2 kg)
7-8 cloves Garlic
1 tsp cumin, ground
1/2 Coconut, scraped / about 1 cup frozen shredded fresh coconut -pulsed to make a paste
4-5 pieces Kokum
2 medium Onions chopped
Salt to taste
 Jaggery to taste
2 tsp Fennel seeds 
2 tsp Coriander seeds 
8-10 dry Red chilies (I used Byadgi)
2 tbs oil
3-4 Garlic cloves ( if you have bigger cloves, use less)
1/2 tsp Mustard seed 
Dash Asafetida 
1/2 tsp Turmeric

Wash and set aside the Vaal beans.
 
Grind together the garlic, cumin and coconut, set aside.
Now grind together the coriander seeds,the fennel seed and the dry red chilies to a dry powder. 


Add 4 heaping tsp of the powdered masala, 1/2 tsp turmeric and chopped onions to the beans and mix gently. 
If the red chilies powder isn't very hot, add 1 tsp hot red chilies powder, this is optional.
Powdered masala added to Vaal beans, chopped onion and coconut paste on the side 

Heat 2-3 tbsp oil in a deep and heavy bottomed pan,
Add mustard seeds, asafetida and 4-5 garlic cloves and sauté till the garlic is golden reddish in color.
Add in the beans, stir gently. Keep a plate on the pot and add 1\2 cup water to the plate. 
Keep 3 cups of water to boil separately.

Cook the beans till they are cooked but not mushy. They should be tender when pressed between your thumb and finger.

Add boiling water to the beans, now add the crushed garlic and powdered cumin and coconut paste. Add the Kokum, salt and jaggery.

Boil and Cook till done. Be careful and ensure that the beans do not become overly soft and pasty.
Vaal Birde


Serve with soft fulkas, smeared with ghee or with bhakris (jowar, bajri or rice, any of these can be paired with the beans).


Pin It

Sunday, May 01, 2016

ALu chi Wadi

One thing that came as a 'bundle' in our home was the dhokla-aLuwadi combination. Whenever my Mother went to Dadar Kabutar Khana area, she would stop over at Saurashtra snack shop and bring home goodies. 
Sometimes kachoris (ping pong ball sized and deep fried, stuffed with a spicy-sweet moong daal filling that left you wanting one more), sometimes jilebi - sticky, orange spirals with a slight tang that were devoured even before she could transfer them to a bowl, but mostly she brought back dhokla and aLuwadi combo.  The spongy square pieces of savory-pillowy  goodness and the slightly spicy 'rolls' of colocassia /taro leaves rolled into a cylinder with a spiced besan paste inside was a treat. 

These were rarely made at home, to my mind, these were complicated things, best left to experts. 
But now, so far away from home, I cannot rely on the Indian store weekend supply of dhokla (sold at a ridiculous price ) or frozen packets or even packaged goodies to re-live those memories. 
Once in a while, we get taro leaves in the store and I try to get them (they are limited in quantity and get sold quickly or they have insect eggs on the back of the leaf and need to be trashed).
One such day I was lucky to get a fresh supply of the leaves and clean ones at that, yay! 
The only hitch was, these leaves were small and I did not get many, just 7-8. 

The longing to eat aLuwadi is a strong one and not easily put away.
But instead of making the roulade, I made 'wadi', squares. 
I found this recipe in Annapurna that I followed.


alt="Taro leaves snack" "taro leaf roulade" "alu wadi"

You need:
7 - 8 Taro / Colocassia/ ALu leaves
Lime sized Tamarind ball or 1 tsp Tamarind Concentrate (I used concentrate)
2 tsp Jaggery crumbled or substitute with dark brown sugar
1 tsp Red chillies powder
1 tsp Garam Masala
6 tbsp Rice Flour
1 Cup Gram Flour / Besan
1/4 cup shredded coconut
Hefty Pinch Asafetida
1/2 tsp Turmeric powder
3 Tbsp Oil
Salt to taste ( about 1 tsp)

If using tamarind soak it in warm water for about 10-15 mins and extract the pulp and discard solids. If using concentrate, move on to the next step directly.

Wipe the Taro leaves with a moist tissue or napkin. Cut the stem and any tough veins.
Shred the leaves finely.

Mix all the ingredients given above in to a thick-ish batter.
IF you are using tamarind pulp you may not need extra water.
IF you use tamarind concentrate, you need to slowly add water to make the batter.

Grease a container or a 'thali' that can be used in a steamer or pressure cooker and pour the batter into it.
Cover and steam the mixture for about 25-30 mins in the cooker (without the whistle).
Once done, cool and then cut into squares.
Shallow or deep fry as preferred and serve.
alt="taro leaves, alu wadi, tea time snack"

Pin It

Saturday, April 02, 2016

Spring on my cookie!

Spring is here and while that means big changes across the country, there really isn't a big change in Florida. We have some rain, but other than that, it's pretty warm and humid. Very 'Mumbai like' weather.
And while blogging had taken a backseat, I had to come out of my cave and tell you about this.
Spring is also the time to try something new ( and something you have been itching to get your hands on). For a long time now, I've been eyeing these Russian Piping tips that are taking over the cake decorating world by storm. I finally caved in and ordered a set.
Picture source Aliexpress Via Google

There are many sites selling these, but I ordered mine from here. They are a steal for the price. 
Just a word of caution, the shipping is prompt but the tips come from China, I believe and travel slow. If you are in a hurry and do not mind spending more, check out other options like ebay or amazon.

I used the tips for some cupcakes and a small chocolate cake I made, just to get a hang of these tips. They are lager than the normal Wilton ones i have been using. In fact a bit bigger than the large tips.
But they make decorating a snap.
I have used only Buttercream Frosting.
I have modified my earlier recipe. This time I used salted butter, yes, salted and in my opinion, it cuts the cloying sweetness a bit.
Its still a bit too sweet for me, but buttercream works best for  this kind of decorating. Stiff consistency buttercream is the best to create flowers.
Stabilized whipped cream might work well too, but I haven't tried it.

alt="russian tips buttercream decoration"
Chocolate cake with buttercream frosting
Here I have used a 6 inch chocolate cake and filled it with a small layer of buttercream and piped flowers on top, I did not frost the cake, that would have been a buttercream overdose.

And then, just a couple of days ago, I had to opportunity use the tips again. It was my son's teacher's birthday and I offered to decorate her 'cookie cake'.

I used this chart to color the buttercream.  I used these shades: Cherry blossom, Dried Lavender and Pancake  Batter for the flowers.
I used 2 tones for some flowers, using white buttercream with the pink and for the other, I used a combo of light and darker shades.
alt="russian tips buttercream flowers"
Cookie 'cake'
Something I learned using these tips,
  • Stiff frosting will give you well formed flowers
  • Using the tips takes a bit of getting used to, pipe a few flowers on a test surface to understand how much pressure you need to apply.
  • Some flowers need to be 'longer' to look fancy and some just need a little pressure to form a really good flower. Just pipe on a few to get a good idea.
  • These are super easy to use and not labor intensive. They make cake decorating fun! 
Pin It

Sunday, January 10, 2016

Sweet Beginnings

On the last day of warm weather, we visited a nearby beach. It was fantastic. Warm sun and a playful breeze. The water was a bit too cold for my liking and I was shocked at how parents took out babies (in diapers) into the cold water and also that the itty-bitties were squealing with joy.
Of course, standing in there, knee deep in the water I also adapted to it and loved it. 
My son had a blast! He did not want to come out of the water. 

We had to drag him out screaming and kicking and promising the beach on every sunny and warm weekend.
We know where we will be, come summer.

Then came the end of the vacation (happy dance). 

With more time on my hands and a friend celebrating her birthday, I decided to make her a cake. 
I have a small group of friends here and we decided to surprise her with cake and some brunch items. 

The cake was a 6 inch (x2) Chocolate cake, with Whipped cream between the layers. The frosting  and the decoration was done using Buttercream


Butter cream cake decorations

While I have done a course on cake decorating, I also draw inspiration from many cake decorators online.
It's so much fun to watch the videos and dream making cakes as beautiful as those.  I wish I could make such stunning cakes, I know it's all about practice, practice and more practice.

I like Vanessa's YouTube channel and her videos are very informative and she makes it look easy.
I hope to learn a lot more from her channel and also get the opportunity to make many more cakes!

As usual, I was decorating till the last minute and did not have the time to take pictures with a good camera. The pictures I have are taken on a smart phone.
Note to self: also work on organization and time management this year ( you suck at this).

I also really need to work on frosting my cake. I'm stingy when slathering on butter cream because it is *so* sweet, I'm always worried that the sweetness will overpower everything and make people regret taking a bite. This is something that does not give my cakes a very 'finished' or 'polished' look, if you get my point. But, I'll work on it.

Here's wishing you all a happy new year and may all your dreams come true! Stay positive and happy!

Pin It
Share

LinkWithin

Related Posts Plugin for WordPress, Blogger...
Page copy protected against web site content infringement by Copyscape