Showing posts with label Breakfast item. Show all posts

Tuesday, January 23, 2018

Millet Idli

My mother made idlis using idli rava at home. Weekends mostly. I remember waking up to the smell of sambar and the aroma was motivation enough to scramble out of bed, rush through everything to arrive at the table, hungry as a hunter. 
 We used to love them! I still do. In fact, these were the only ones I used to make until I got my wet grinder. And then the game changed. The previously loved idli rava idlis became a thing of the past. They are great, but there is something so perfect about the idli rice, idlis. They are heavenly! And so, I kept churning out soft pillowy idlis, week after week and enjoying every single morsel.
Every couple of weeks I make idli batter. I look forward to making soft melt-in-the-mouth Idlis. The process is simple, though time consuming. Its a great option for a quick meal or to pack in the lunch box ( for the husband, who can heat them in his office). 

The highlight of our summer (2017) was my parents visiting us. They came in time for my son's birthday and stayed for mine. Oh what a wonderful time it was! Their love and good food was the best part of last year. I cooked a lot, clicked pictures on my phone and well, they're still there. I guess I'll work on the posts this year. LOL! 

During this time, I tried a variation on the regular idlis and they did not disappoint.
Instead of rice, I used millet. Hulled millet is available packaged in most grocery stores and in the bulk bin section as well.
Pic courtesy : Google search

You need:
1 cup Gota Urad Daal 
3 cups Millet 
1 tsp Fenugreek seeds

Wash the Urad daal in several changes of water (scrub lightly with your fingers. The water will turn very cloudy. Drain it, add fresh water, repeat till the water runs clear). Soak the urad daal in plenty of water. Add the fenugreek seeds.

Wash the millet and soak it in a separate container in plenty of water.

Soak the daal and millet overnight.

Before grinding, discard the soaking water. I also give both ingredients a quick rinse under running water.

Begin with grinding the urad daal. 

If using a wet grinder or a blender, add the urad daal and start grinding. Gradually add little water. Do not add too much. You don't want a runny daal paste. That will ruin the idlis. 

Grind till the urad daal turns a pale color and looks 'fluffy'.

Remove to a container.

Grind the millet now. Take care not to add too much water. This will take a bit longer to grind. Be patient. 

Once the millet turns to a smooth paste, add it to the ground urad daal. Mix well.

The batter should have a dropping consistency. Too runny- the idli will be flat and gummy, too thick (where you need to give the ladle a shake to make the batter fall into the mold) will make rock like idlis, better used as hockey pucks.

There are two options now: 
  1.  stick the pot in a warmish oven and let the batter ferment (between 10-12 hours )
  2. Pour the batter in the inner steel pot of your Electric Pressure cooker /  Instant Pot and set it to 'yogurt' mode for 8 hours on seal mode. 
Once the batter is fermented, make idlis as usual.
If you are making idlis for the first time: 

Add some salt to the fermented batter and fold it in gently. 

Before making idlis, add water to the idli cooker and set it on the stove. 

Once the water is bubbling, grease the idli molds with either oil / oil spray or ghee.

Ladle idli batter into the molds ( do not overfill) and place the stand in the steaming water. Close the lid and steam the idlis on high ( on a dial from 0-10, keep the heat at 8-8.5). Continue cooking for 15-18 mins ( when you open the lid- carefullllly- the idli tops must be plump and not sticky.

Switch off the heat and using a thick kitchen towel or baking mitten, remove the idli stand and set it aside for a couple mins. 

Carefully unmold the idlis, these should slip out easily, if not use a spoon or a butter knife to loosen the sides and transfer to a  container.

Serve idlis with chutney or sambar or both. 

I made this zuchhini chutney for my family and they enjoyed the combination very much. I unfortunately couldn't eat it as it has peanuts.


Learn to make idlis without the rice. Use Millet to make delightful idlis for a perfect breakfast.


Notes:

These idlis are very tasty. But do not compare them to the regular rice idlis,

The batter can be used to make dosa as well.

These are a very good alternative to rice idlis, specially for people who avoid rice in their diet.

These idlis can be steamed in the Instant Pot as well, but I am not very comfortable doing that. I just haven't learned how, strange as this sounds. If you have, please share the method with me.

Pin It

Tuesday, September 20, 2016

The softest idlis, ever!

This summer, after a lot of back and forth I finally gifted myself a Wet Grinder. 
Finally.
Why did I not do this earlier? What a fool I have been.

I was always happy with the idlis I have made previously. I used Idli Rava. Urad daal and Idli rava (1:3). It was easy, I only had to grind the soaked Daal. The idlis never disappointed. 
So why would I want to change something *that* good. The only reason I changed this was, there is a difference between a good idli and a fantastic idli. 
Immodest as this sounds, I make fantastic idlis now. (yes, yes, I'm all puffed up at my success).
I read the term 'pillowy goodness' on Nupur's OHS and now, now I know what she meant. 

The grinder grinding away is sheer music to my ears. Every week.
What else can get me so excited? The very first time I made idlis using the grinder and the proportion mentioned, I could hardly wait to taste them, I did not. As soon as I could get them off the mold, I nibbled on the piping hot idli. Oh heaven! Before I knew it (well, I did, but let's just pretend I was in a trance) I had polished off 2 more. With nothing to accompany them. Just like that.
Then I ate them with just chutney.
Then with sambar.
Then with chutney and sambar.
And as if that wasn't enough, I also ate them with ghee and sugar.
Yes, I did it.

We ate nothing but idlis that day.
They are *that* good.

The weeks following haven't changed much.
My friends also declare that these idlis are far superior to the ones I had made earlier and those were superb, in their opinion.

idli


Here's how I make the idli:

1 cup Gota Urad Daal  (Whole, skinned Urad daal)
1 tsp Fenugreek Seeds
3 cups Idli Rice (specially labelled and easily available in any Indian grocery store)

Wash the daal in several changes of water, till it runs clear. Refill with fresh water and soak the daal along with fenugreek seeds for at least 8 hours or overnight.

Wash the idli rice in several changes of water and then refill with fresh water and soak alongside the urad daal.

Before grinding, discard the soaking water and rinse the daal and rice briefly.
Now, if you are using the wet grinder, add the daal in one go and some water and start grinding. Slowly add water as required.
Grind till the daal (and fenugreek)  is a smooth paste and is white in color.
As you scoop, it feels light and well, fluffy. That is what best describes it.
Once the daal is done, remove it to the container you want to use to ferment the batter.
Now, to the wet grinder, add the rice and some water and switch it on.
Grind till the rice is smooth.
Add this to the daal and mix gently.
At this stage a lot of women like to add salt and let the batter ferment. I usually do not add any. 
I add salt before I make idli.
Leave the container in a warm place to ferment. This can take from 8-12 hours.
I leave the batter in my oven and switch on the light.
Once the batter has risen, you can either make idlis immediately or transfer the batter as is to the fridge to keep until you are ready to make idlis.

To make idli:
Add about 1-1.5 tsp salt to the batter and mix *very*gently to evenly distribute the salt.
Grease the idli mold.
Fill the idli steamer /cooker with water at the bottom. Know your cooker levels and make sure that water does not enter the mold at the bottom.
Set it on the stove and let the water heat up.
Spoon the batter intot he mold cavities and stack them up.
Carefully place the idli stand n the cooker/ steamer and place the lid.
Steam on medium high ( if your stove has buttons going from 1-9 and HI, use 7.5) and steam the idlis for about 20 mins.
Once done, switch off the heat, remove the lid and let some steam escape.
Remove the stand (use a napkin or wear a baking glove) and set it aside.
Use a blunt knife (butter knife) to remove the idli from the mold and serve hot with chutney of your choice and sambar.

These idlis freeze very well. To reheat, place 3-4 idlis on a microwave safe plate and cover with a damp napkin and microwave on high for 1-1.25 mins.


NOTES:

  • Make sure the batter is light and fluffy.Airy.
  • Do not add too much water, that will not give you fluffy idlis.
  • Do not over mix the batter, this will release the air that is incorporated into the batter while grinding.
  • After adding salt to the batter, mix / fold gently.
  • If using blender to grind the daal, start at a low speed and then increase gradually. When the daal starts looking pasty, give it the max speed and let it grind for a while till it looks fluffy.
  • In winter when fermentation takes longer, I add 1-2 teaspoons of thick poha. Adding poha to the rice (after the soaking water is discarded and rice is rinsed) helps the process. 

Pin It

Friday, March 21, 2014

Muffiins, Bran Muffins for breakfast-on-the-go.

I am a picky eater. I have issues with textures. 
When I was little, I would peer into the yogurt bowl ( home made yogurt) and squint painfully to check if there was any 'malai' and if there was, I'd reject the whole thing. My parents wold strain the milk and set the yogurt. I would again squint painfully and with a spoon in hand, scrape off the top layer of yogurt to reveal the silky smooth yogurt below. 
As my tea cooled, a film would cover it. Arrgh! I'd run into the kitchen and get a super fine tea- strainer and a fresh cup, strain my tea and drink it. 
I could do all this at home but it was not so easy when I was visiting someone. I'd politely decline tea or coffee even though I was in sore need of the much needed four o'clock cuppa. Sometimes I'd fake and say I am allergic.

M does not see eye-to-eye with my picky nature. He tsk-tsks every time I pick and trash the plasticky film from the top of milk (when I need to boil it). He wonders why I run miles from food that is slimy-ish (like eggplant or oats). He loves oats, eats them for his breakfast, everyday. No sugar needed. GULP!
I prefer these oatmeal bars.
Then one day, M comes home from Sprouts and has bag of  wheat bran. I slapped my forehead and in the very 'wifey way' asked, " arey ha bhusa kashala anlay ata?"He went on and on about this stuff.  I huffed and I puffed.
Then one day, M actually tried to eat the bran like he ate oats. I could not take my eyes off the the rhythmic way his jaws were working and also noticing that he was not gulping. I nodded approvingly, "Bran is good. Loads of fiber. Loads of benefits. Very good" I added, rubbing it in.
I am perverse that way.

Finally, he decided that good or not, bran was better used in some other form. He mentioned it to me, in passing that, bran muffins were good for health.

The idea of a muffin was a good one though. And it would finish up the bran. This recipe caught my attention. 
I made a few changes to the recipe (not the measurement, of course), substitution, really. The changes worked very well and we all enjoyed the muffins, M shared some with his colleagues too. 
These muffins are very moist and slightly sweet making them a treat. They are good for breakfast-on-the-go.


Here is the recipe with my substitutions:

  • 2 cups  Wheat Bran
  • 1 cup date and nut snack  or just dates- pureed
  • 1/2 cup  dark raisins
  • 1 cup, plus 1/2 cup water
  • 1/2 cup  buttermilk ( if you do not have store brought buttermilk, use 1/2 cup milk and add 1/2 tsp Vinegar, let it stand for a few mins, then use it)  or plain low- or non-fat yogurt
  • a few swipes of fresh orange zest (unsprayed) (I did not have any, I left it out)
  • 1/2 cup  packed light brown sugar
  • 1/2 cup  vegetable oil
  • 1 large egg
  • 1 large egg white
  • 3/4 cup  flour
  • 1 teaspoon baking powder
  • 1 teaspoon baking soda
  • 1/2 teaspoon salt

  • Preheat the oven to 350F. Line a 12-cup muffin tin 

  •  Spread the wheat bran on a baking sheet and toast in the oven for six to eight minutes, stirring a few times so it cooks evenly. Let cool.

  • Meanwhile, heat 1 cup of the date snack / dates with 1/2 cup of the water. Simmer for ten minutes, or until the water is all absorbed. Puree the date snack / dates until smooth.
In a large bowl, mix together the toasted bran, buttermilk or yogurt, 1 cup water, then mix in the date puree, orange zest, and brown sugar.
Stir in the oil, egg and egg white.
Mix together the flours, baking powder, baking soda, and salt, and sift directly into the wet ingredients. Stir until the ingredients are just combined, then mix in the 1/2 cup raisins.
Spoon the batter into the muffin tins, making sure the batter is mounded slightly in each one. 
Bake for 25 to 30 minutes, or until the muffins feel set in the center.

breakfast on the go


Have a great weekend! With the weather clearing up, it is splendid outside! Pack these muffins in your picnic basket and enjoy the weather.
Pin It

Sunday, December 08, 2013

A city under siege......

The city is under a siege. A sudden drop in the temperatures and the city seems to have collapsed under it.

It all started on Thursday evening, when my friend and I had to pick up the kids after school. It was cold, very cold and a drizzle started, just as the car hit the main street. The kind of rain that hurts, when it hits you, sharp and icy, icy cold. A matter of 5 miles, which is covered in about 20 mins. (driving  normally and getting caught at some signals) took us about an hour. 
Driving home was about the same. 
Dallas, is afraid of such weather.
By evening, whatsapp was buzzing with questions, 'is our school closed tomorrow?'  No one knew the answer to that, but everyone seemed to have an opinion about how foul the weather was just about now and how it would worsen by the time the sun was up. 
The kids, however, were sure, there was no school on Friday. They stuck to that. 

Well, whaddya know? The kids were right! By 9:00 pm there was an IVR broadcast announcing that the school was closed due to inclement weather.


We woke up to a dazzling white morning. To people living in places where there is regular snowfall, this seems like nothing, and it is, nothing, but for a city, that knows little to nothing about snow, it comes as  a rude awakening. 
Men and women work from home, stores are swept clean of any and every vegetable, dairy, water and snack. Heaters are cranked up and the roads are clear, of cars, that is. 

Not many want to brave the snow and even worse, the icy streets. It's the icy streets that kept us indoors too. 
It is difficult, to sit at home and play and do stuff with an active 5 year old, who never seems to tire.
2 play dates and playing about in the scanty snow and freezing our axxxx toes  outside and the little one still showed NO signs of wear and tear. 
It was time to involve him in some activity that required minimal effort but good results and most importantly, kept him in one place for a few minutes.

On my last trip to the grocery store, I had, on a whim, picked up a roll of Crescent Rolls dough, the kind that comes in a tube. 
When it is as cold as it was outside ( it was about -7 deg. C, by the by, Celsius in the negative is so much more impressive then 2 digit Fahrenheit, no?), something warm, sweet hits the spot. Like Cinnamon Pull- Apart Bread.

I pulled out the tube of Crescent rolls (the one that makes 8 rolls, I think) from the fridge.
Pre-heat the oven t 375 deg. F ( as per tube instructions)
Melted about 2 tbsp butter
Ina  small bowl, mix 1/4 cup sugar, approximately 1 tsp Cinnamon powder  and 1/2 tsp Nutmeg powder
Clean and prep the work surface.
Pop the tube and pull out the dough. 
Roll out the dough on the clean work surface and pinch together the triangles to make one big rectangle
Brush the surface of the rectangle with the melted butter
Sprinkle the cinna-nutmeg- sugar evenly all over the rectangle, covering the entire surface. 
Here comes the part when you start the cutting and arranging.
It helps to have  loaf pan ready, greased and all.
Now, using a pizza cutter (which is the best way to cut it) or a sharp knife, cut 3 horizontal lines in the dough.
Now, carefully, lift one strip and place it on top of the other. 
3 strips piled on top of one another, think 3 mattresses piled on top of the other , just so we are clear.
Using the pizza cutter, cut the piled on strips in 4-6 squares, vertically, so they look like stacked pillows in a line.
Now pick up one stack at a time and place it in the pan, like soldiers in a line, not piled on top of one another. Just so we are clear on the placement.
Sprinkle any left over sugar on top and bake in the oven.
The tube says bake for 15 -17 minutes, but I took longer, about 25 minutes. 
At the 15 minute mark, the first pull apart was done, but inside, the rest was all soft and doughy, so I had to bung it in the oven longer. 
It may be my oven, so keep an eye after the 17 minute mark. 
Remove the pan from from the oven, click a picture while it cools and then devour.

It has the child's seal of approval.
Mission accomplished.


We still have a school shutdown and so it's time to do more stuff, indoors.
Stay warm folks! See you soon.
Pin It

Saturday, June 30, 2012

Neiappam/ Neyiappam


If  Vashi, is still what it was a decade ago, there is still a  small shop tucked away in the Mini Market, in sector 9, if I remember correctly. I cannot recollect the name of the shop, but we called it the Kerala Shop. It had all South Indian delicacies one would want. Banana wafers ( Plantain chips) , Murukku, Jackfruit chips...  and many others I have no idea about. I would visit the store every week and come back with what I loved, Neiappam/ Neyiappam. I was addicted to to the little dumplings. 

But first, let me explain how the system works in Mumbai and Navi Mumbai ( and many cities across India), 
There is a small set of apartment buildings and on the ground or first ( as it is known in the USA) floor, there are small stores selling everything one needs, including a Doctor's office and a pharmacy next door. So in short, Life sustaining and life saving, all in the same place. 

Walking  down to the stores means coming home laden with fruit, vegetables, grocery items, utensils ( spoons to stockpots and more), hardware, software, gadgets and appliances as required,  restaurants if you plan to eat out or dinner to go  and the most important part: Snacks galore! 
Among the numerous small shops, lined side by side, there is a small shop, with a name one cannot read, that is because it is a South-Indian language, but who cares? first you notice, there is a flock of  Middle aged South Indian ladies, buying plantains and Coimbatore butter, murukku . Make a beeline for that store. You are in for a treat. 
On one side of the cashier table you will find rows upon rows of snacks of all types, sweet, savory. Many are home made and are packed in plastic bags and sealed over the flame of a candle. Pick one up and you will not regret it. 
If you do not have access to store brought Neiappam, Try these.You will not regret it! 


Makes about 28 Neiappam/ dumplings
You need:

2/3 scant  Cup All Purpose flour (Take off 2-3 tbsp. from top)

2/3 Cup Rice Flour

2 Tbsp Coarse Semolina/ Sooji/ Rava
1 large Ripe Banana
3-4 Green Cardamoms, remove seeds and powder using a mortar- pestle
4 Jaggery Cubes if you have them or about 2/3 cup crumbled jaggery
Hefty Pinch Bicarbonate of Soda/ ENO regular
Fistful Shredded Coconut/ Copra
Ghee, as required

In a microwave safe bowl ( preferably glass) add 2-3 tbsp of water, place the Jaggery cubes and microwave for a minute. The jaggery will melt , stir to combine any leftover small lumps and set aside. 

Mix the flours and mash the banana. I prefer to  run the banana thru the small  mixie attachment to get a smooth paste.

 Add the jaggery syrup, shredded coconut and cardamom powder and add water as required to make a smooth batter ( like idli batter). Set aside for 10-15 mins. If you do not want to wait, go ahead, to the next step. It does not make a huge difference.

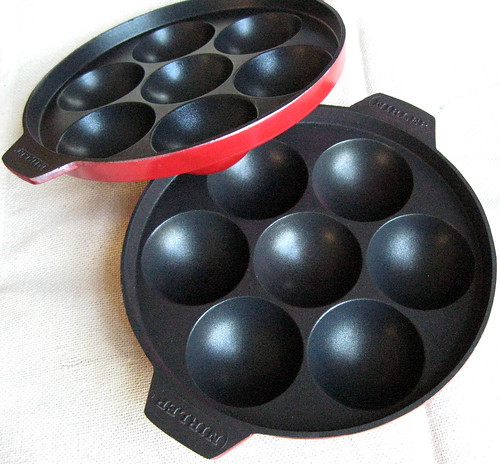
Heat the appey / abelskiver pan on medium high. Add the bicarbonate of soda and whisk to incorporate.

Add a few drops of ghee in each slot.
Carefully drop a spoonful of batter into each slot, to fill no more than 2/3 of the slot.

Cover and cook for about a minute, remove cover, the appams, you will notice that they are a nice golden brown around the edges and the tops, will look solid.

Flip the appams and cook on the other side, uncovered. Cook for another minute (or less, since the pan is well heated now, especially if it is a cast iron pan)

Remove. Repeat the same process for the remaining batter

Serve when slightly warm.
NOTES: 

There are many versions of Neiappam, many using only rice flour or soaking and grinding rice. This is my preferred ( and never-fail) method.

If using smaller sized bananas, use 2. Also intensifies the banana flavor.
My Son does not like t too banana-ey, so I keep it at 1 large, well mashed/ pulverized banana. I call them banana round cakes for him, works for me and for him! 

I sometimes find a particular batch of Jaggery a tad less sweeter than the other, in which case, add another lump or 1 tbsp. Sugar. 


I have used Jaggery lumps in this recipe - this quantity therefore, should not be confused with jaggery powder or soft jaggery, which would be used in a lesser quantity.  


In any case, once the batter is ready, taste a drop of it to ensure that the sweetness is as per your liking. I like mine mildly sweet. The kind that makes you want another bite! 

Do not skip the ghee, there is no replacement. If you do, however, be prepared for an inferior taste, you have been warned!!


Enjoy your weekend! 
Pin It

Thursday, June 28, 2012

Humble and Simple: Pohe

"मग काय ? आज कांदे - पोहे  à¤•ा?"  my Mother asked somebody on the other end of the telephone line. I sighed to myself. Why do all Mother's make such a big deal out of this? and WHY? the code language?
 à¤•ांदे - पोहे (Kande-pohe) is the code for the 'arranged marriage' scenario. Typically, the boy, comes to meet the girl at her house, both are well dressed, the house is spotless, the best china is brought out. The girl and boy meet, talk, hesitantly, then the mother calls her dear daughter to take a tray out to the guests, laden with snacks, typically,  à¤•ांदे - पोहे ( Kande-pohe), and follows with water glasses. Over the first few spoonfuls, the Mother elaborates that her daughter has made the snack, like she always does. She is so fond of cooking, gushes the Mother, goes on to add a long list of things her daughter does so well! Awkward! 
The program concludes and both parties are left to discuss the details of the meeting and decide, the future.

Times have changed, the boy and girl meet outside and discuss what they expect of one another, but the term  à¤•ांदे - पोहे still means the same thing! 


Apart from being the code word for a 'program', kande pohe is a regular on the breakfast table and many a times, in the lunch box. Best served hot, these still are a filling option otherwise. Today, we add in vegetables, to up the nutritive value and also enhance taste.

But first, let's see how to go about it,shall we?
Step one: pick the right variety of Poha/ Pohe.
You need to know that there are 3 basic varieties. super thick, medium thick & thin.
We use the medium or super thick for 'cooked' poha/ pohe.  I know of a certain girl, who fell in love with poha and attempted it at home for the first time, with thin poha. I leave the rest to your imagination! (if you still haven't guessed, read the recipe below and you will understand).
Going back to Poha.
Thick ( super thick or medium thick) is the one we use to make this dish. It requires soaking.
Thin poha is used  to make Chivda or Dadpe Pohe 

In this recipe, I have used Super thick Poha, also called Dagadi Poha. This variety requires a longer soaking time than the medium thick variety and is a bit more 'chewy, than regular medium- thick poha.
Now that we have step one well understood, let's move on.

To make Pohe for 2 people, you need:

1/2 Cup of Thick / Dagadi Pohe
1/2 Onion, chopped
1 Small Potato, cubed( place the cubes in water to prevent browning)
1/4 cup or a little less, Green Peas ( I use frozen peas)
1/2 (slender) Carrot, cut in cubes

1-2 Green chilies, chopped
Few curry leaves
Salt to taste
1 tsp Sugar
1 Lime ( squeeze the juice or quarter and serve with pohe)
2-3 Tbsp. Cilantro, finely chopped, to garnish
1-2 Tbsp. Fresh or thawed, grated Coconut,  to garnish


Wash in running water and Soak Poha( medium thick)  in water for at least15 mins. If using super thick / Dagadi Poha, soak longer or add water ( level of water just above the poha) and microwave for 1 minute and set aside for 15 mins.

Heat oil in a wok over medium high heat.

Add the  mustard seeds. Once the seeds pop, add in the cumin seed. These should sizzle  on contact with hot oil.

Add asafetida, chopped green chilies and curry leaves.Mix well.

Add chopped onion and mix. Cover and cook for a couple of minutes  till half done. Add the potato cubes sprinkle salt and cover. Cook till onion is lightly browned and fully cooked and potatoes are fork tender.


While the onion and potatoes are cooking over heat, in a microwave safe ( preferably glass) container, add the washed, frozen peas and cubed carrot pieces, add 2-3 tbsp water and microwave oh high for 1 minute.


Add the peas and carrots to the onion-potato mixture, add turmeric, mix well. 


Add the soaked Poha, sprinkle 1 tsp sugar, mix well. cover and cook for 3-4 minutes on medium heat. 


Check for salt, add more if required and cover and cook for another minute or two.


Switch off heat, add lime juice and mix well.. Spoon the pohe in plates/ bowls, garnish with  cilantro and coconut. 
Serve.


NOTES:
You can make pohe using just onions or onion- potato combination.

To add a bit of crunch, add raw peanuts to the tempering stage, that is before adding onions and saute till golden brown.

Add lime juice after switching off the heat or alternatively, serve pohe with a wedge of lime, to be squeezed if needed.

Poha is very filling and also carbs, addition of vegetables helps to tilt the scale  towards nutrition slightly!

If you like, sprinkle some sev/ shev on top just before serving.

I found these cute 'Funtensils' and they are great for kids. I kinds like them myself ;). Just wanted to share this for Mommies here, maybe your little one would like them too.


That's it for now! Enjoy your weekend.
Pin It

Tuesday, June 12, 2012

Good Morning, Sunshine Cheelas!

I was about my son's age when I first sat on a bicycle seat, about 4 or maybe 5 years old. 
I lived in a colony surrounded by friends, big and small. Just across from our colony, beyond the railway tracks, there was a slum area, and in it lived 'Ghani Bhai' -he had a small 'business' of renting bicycles. He had many cycles, all sizes and would charge 0.50 paise for 30 minutes. When tiddlers like me went to him, he'd sometimes help us carry the bikes across the rail road crossing
His bikes did not have training wheels, we usually had a parent or elder sibling or an older (and stronger) friend hold on to the seat and run behind, thus keeping the bike stable.
A few tumbles, bruises and scratches, crashing into the pavement and a grubby handkerchief hastily tied to a bigger and bleeding wound was how I learned to use a bike. 
One summer day, I had rented the bike as usual and a friend was helping me. I guess after a round or two of running behind my cycle, he had enough and decided I could manage well and after the first few feet, silently let go. I had no idea and peddled away talking, soon on not hearing a reply or even labored breathing, I shot a quick glance behind and wobbled in disbelief! WHAT! where..?  and my confidence collapsed like a pack of cards...the aftermath was something very natural, I crashed headlong into what was just up ahead of me, an old gentleman. He hopped  around for a few seconds before sitting down beside me and  saying everything impolite he could think of.. all I saw was stars. 
Somebody helped the poor old man up and walked him away from the scene. Many others came to my rescue, somebody picked me up, another  took charge of the bike and it's return to Ghani bhai and yet another ran all the way home to tell my parents. Of course that person was not the smartest, he ran all the way and panting  up to my parents said, " Pallu chi Aai, Pallu na cycle varun padli, tini na tya Ajobana thokla, doghe padle, te doghe radtayt..." (Pallu's Mom, Pallu fell from her bike and crashed into Grandpa, they both fell and they are both crying..) In his excitement, the boy had jumbled up some facts and my parents, with their hearts in their mouth, ran to where  the 'accident' had happened. They did not have far to go,  there I was, being carried by some 'uncle' from the colony, with a lollipop in my hand and a hanky tied to my knee,and some other resident, carrying my flip-flops, one 'aunty' caressing my hair at intervals, all reassuring me that it was okay, no problem.

How different from now, when  my son has a 12" bike, with training wheels and a helmet and all kinds of safety stuff! Thank God, I do not have to stoop and hold on to the bike seat and puff and pant  behind him in this monstrous heat. All I have to do is saunter behind him, enjoying my walk as he carefully cycles  around the community we live in.

As easy as it is for me, it does get tiring in this heat and I prefer to make a quick snack / dinner. And that is what I made just last weekend!  I have been making these 'cheelas' for sometime now. The original recipe is from American Masala and I am so used to making these now,that I eyeball the ingredients.

These cheelas/ crepes make  a great and quick breakfast and IMHO are best served right off the skillet.

Adapted from : Here


For the Cheelas /Crepes:


1 cup Besan / Gram Flour
2 Hefty pinches Ajwain / Carom Seeds ( about 1 tsp) 
1-2 Green Chilies, finely chopped ( I leave the seeds in, but if you prefer a milder flavor, de-seed and chop finely)
Salt to taste
2 heaped Tbsp finely chopped Cilantro
Water to make a batter


Mix all the ingredients listed above and make a smooth batter ( like dosa batter) and set aside for 10-15 minutes.
Heat a non- stick / cast iron skillet over medium heat. here is what I do, I spray lightly with oil and then with a tissue wipe it gently but deftly ( hot skillet, be careful and quick!)
Drop a ladleful of batter and in a quick motion, spread the batter into a circle, like a dosa / crepe.Drizzle oil along the corners. Let it cook for a minute or so until the bottom is a nice golden brown. Flip over and let the other side cook, till brown spots appear.


Serve hot, with Tomato chutney ( recipe below)


Tomato chutney:


2- 3 Tomatoes ( I use Roma), finely chopped
2 Shallots, finely chopped
2 Green chilies, finely chopped
fistful Cilantro, finely chopped
Salt to taste
2 tsp. Oil


Heat oil in a sauce pan/ kadhai.
Add the chopped shallot and saute till it is translucent.
Add the tomato, chilies,salt and cilantro. cover and cook till it is soft and mushy and mixed together.


* Notes:
This makes a great  quick meal


Best served right off the skillet


Do not omit the Ajwain / carom seeds, they not just taste good, but are essential ( for those of you who are not aware, Gram Flour / Besan causes tooting ( flatulence)! Ajwain helps control it.


This is a Gluten free and vegan  preparation


A big thank you to Nupur, who introduced me to Picmonkey a very easy photo editing software. It was really nice of her to share her knowledge, not just where recipes are concerned, but for all the little tips and tricks in other areas too. There aren't many like her!  I made the collage using that software. 


Till next time....
Pin It

Friday, May 11, 2012

Parfait : Summer Breakfast


Are you a breakfast person? I am a breakfast person. Miss my breakfast or do not eat it, I am a grumpy bear, with a headache. You can hear me growl for miles around! 

As a child, teen and young adult, I never made my breakfast, Mom always saw to it that we got fresh food to start our day. But, oh my! how the breakfast options have changed over the years!
Mom was a working woman and had to prepare and pack our lunch boxes before she got ready for work and dashed off to catch the 10:10 a.m local to V.T. She would make fulkas (roti/ chapati/ Indian flat bread) and a vegetable dish to go with it. I would get ready for school go into the kitchen and many a times just take the fulka off the flame, smear it with a bit of ghee and perhaps a tiny pinch of salt sprinkled on it, roll it and eat up. Or instead of salt, sprinkle a teaspoon of sugar or crumble some jaggery, roll up and eat! 
On weekends a leisurely breakfast of upma or  idli or something similar on those lines. It was a practical approach. No one thought of cereals, indeed, we did not even think of those until I went to college. Even then, with cereals, I think I'd still have preferred thalipeeth! I still do, I suppose.

Like in the past, I need my breakfast, but here is the weird part, most people are early breakfasters (err, you know what I mean) I am a bit on the late side, though an early riser, the day begins with a sip of Chai, to lift the fog, then of course there is the mad rush to get S ready and off to school. Once this gargantuan task is over and done with say by 10:00 a.m,  I like to relax, take my breakfast, sit comfortably on the sofa, feet tucked under me, start the laptop to catch up with e-mails, FB and blogs or read my book. I savor every bite of my breakfast and this whole routine makes me happy, sunny and fuels me thru out the day.

These days, with the temperature rising and making me cross as a dozen sticks, I need to keep cool! One of my easy breakfast options ( and with a chockful of nutrition) is making a parfait. Nothing as easy! 

You Need:
There are no measures, you make it up as you go! 


Yogurt ( Plain or Vanilla Flavor)
Chopped fruit- Berries ( Strawberry, Raspberry, Blackberry, Blueberry), Banana, Mango
Granola
Toasted Walnuts and Almonds 
Sugar (optional)
Vanilla extract (optional)


If using plain yogurt, add 1-2 tsp of sugar and whisk, set aside.
If using vanilla extract, add a few drops along with the sugar and whisk, set aside.


The use of sugar and vanilla is purely optional. I exclude it, I like plain yogurt.


Alternatively, use store brought Vanilla Yogurt. You can use flavored Greek Yogurt too.


In a glass bowl (like in the picture) o any other bowl you want, spoon in some yogurt to cover the bottom of the bowl.
Add the chopped fruit on top.
Layer with yogurt
Top with fruit
Garnish with a sprinkling of granola and toasted chopped nuts


Enjoy your chilled breakfast and chill out! 


*NOTES :
Use any combination of fruit that will pair well and taste well with yogurt.
Use cold yogurt
Make as many layers as you want, just make sure that it is manageable and you can finish it. It looks nice and light, but remember, yogurt is filling! 


Have a great weekend, Folks! 
Pin It

Thursday, April 08, 2010

Thalipeeth and recreating the magic at home!

One of the nice things  of living away from the home country is that you learn to appreciate the variety of food that it ( home country) offers. The second best is to make it and glorify in the fact that you made it and more importantly, made it well!! 
When I was new to this country, I missed the variety of breakfasts / snacks made at home, the time I did not have to think twice about making anything (or how Mom made them) mixes, spices were (are still are) readily available and in the quantity required and the convenience! if we ran out of a couple of items, all we had to do was make a call to the grocery store and they would  take the order and have their delivery lad bring those things home and at no extra charge. 
Those are the conveniences I miss even today. If I miss out on an item in my shopping, I have to go a mile to get it  or make do till the next week or if I need just 1 or 2 cups of something, I have to buy 2 lbs. sigh! 

Eep! How did I go from a start of ' nice things' to whine!!? Let me go back on the  'nice' track....
One of my favorite breakfast items is thalipeeth , in fact I like it anytime, breakfast, lunch or dinner. It was one of my favorite lunch box items when in school. I'm sure my Mother also favored this. The flour mix ( BhajaNi)  is readily available and all it needs is adding salt, water, chiles, cilantro and onion, or to take a shortcut, water, salt, red chile powder, mix a dough , pat it with your palms/ fingers and shallow fry on a hot skillet and you are set in a matter of 15-20 minutes! 

A friend had  given me their stock of bahjaNi when going back to India and after that my Mother got me some packets  when she visited and my Mother in Law also got me a couple of packets when she came last year. But those packets weren't much (just 250 gms each) and  were polished off in one weekend breakfast.
So finally the MIL came up with a brilliant idea, 'Make your own bahjaNi mix' ! Now we're talking! 
So on one weekday she  taught me a super easy thalipeeth flour mix. 

Here is what you need :

1 Cup Wheat flour (atta)
1 Cup Jowar (Finger Millet flour)
1/2 Cup Urad  flour
1/4 EACH Besan and Rice flour 
1 small cup (what we can call 'amti vati') full Coriander seeds
1 small cup / amti vati ( take off 2 Tbsp. from top) Jeera / Cumin seeds


In a wok, over med- high heat , individually roast all the flours. Do not mix the flours and then roast
Roast the flours lightly, just until the aroma wafts and they turn a shade or two dark
Roast the coriander seeds
Roast the cumin seeds
Cool the roasted seeds and powder them in a spice mill or coffee grinder
Mix  the cumin-coriander powder with the roasted  flour and mix thoroughly
Store and use as and when required.


To make  Thalipeeth:

I usually pick fistfuls of the flour and proceed.
Take 2-3 hefty fistfuls of the flour mix
Add a tiny drizzle of oil ( 1-2 tsp) 
Add salt as per taste
Add finely chopped green chile or red chile powder to taste 
Add finely chopped onion (1/2 medium sized onion)
Add finely chopped cilantro

I usually eyeball the ingredients, this is a very easy and forgiving  recipe. Tastes great every time.

Add water slowly to make a dough that is not too soft but pliable.
Divide the dough into balls (2-3 big sized or 4-6 to make smaller thalipeeth)
Smear oil or spray oil on a non-stick griddle and  pat a ball of dough on it, using palms and fingers, lightly pat the dough in to a circle ( I make thin thalipeeth) make a hole in the center and add a small drizzle of oil
Switch on the stove ( med-high heat) and cover and cook
My MIL cooks the thalipeeth on one side only. This makes the thalipeeth very soft and no, the dough does not remain uncooked.  
Covering and cooking  over a medium flame / heat setting ensures that it is fully cooked.
I prefer cooking on both sides, however,  I too like my thalipeeth soft and so, I cook it on the second side briefly, just until the side is lightly blistered
Serve hot with a  pat of freshly churned butter (loNi or makkhan) or a pat of butter and  a side of pickle  or thick home made yogurt
I use a pizza slicer to make wedges of the thalipeeth and serve with both butter and yogurt, my guests can choose the accompaniment they want.

I am thinking of re-visiting some of my old recipes and posting different versions that I have tried and liked.  Do you all have any special recipes that you have re-visited or re-evaluated?

Pin It
Share

LinkWithin

Related Posts Plugin for WordPress, Blogger...
Page copy protected against web site content infringement by Copyscape