Friday, April 13, 2018

East meets West. Gulab Jamun Cheesecake bites

A family get together at my Ajji's (Grandmother) home was always the happiest of times. We all sat together talking, laughing, with the 'kid gang' doing idiotic stuff and hooting with hysterical laughter at ourselves. 
There was music, my Mama (maternal uncle) had a vast collection of cassettes and we would listen to tape after tape of Lata, Rafi, Kishor Kumar or perhaps Manna Dey. 

Ajji made lots of food to feed her hungry family and dessert, favored by the 'bachhe mandali' (kids) was gulab jamun (except during Ganpati festival, then it was ALWAYS puran poli and modak).

We, cousins, would peep into the big pot full of plump gulab jamuns and mentally pick out the biggest and the best looking. So when it was actually time to eat dessert, we would point to the ones we wanted. Our parents would rebuke us saying they all are the same, but Ajji never said a word, she would patiently pick out the ones we pointed to and serve us. It was her love that made them the best gulan jamuns in the universe. 

We would sit on the floor, cross legged and out 'vati' (steel bowl) in front of us and Mama would dim the lights, and then he would play songs. We knew many of these songs and we would sing along and enjoy our dessert. 
Satisfied, we would then curl up in our respective mom's laps and listen to the melodies in the background as they gently lulled us to sleep. 

As time passed, we all went our separate ways, job, marriage, moving to a new city or country, but with those precious, precious memories warming our hearts when we missed one another and most importantly, missed Ajji. 

I sat at the dining table, holding a tin of Haldiram's Gulab Jamun a guest had brought, thinking of all those days, missing home and family.

That wouldn't do, at all! Shaking off the nostalgia, I packed the tin in the pantry and went about doing what needed to be done. 

But when I picked up this book from the library, I could not resist trying out the cheesecake. 
I love, love, love cheesecake. 
The first time I made this recipe, it turned out delicious, but I had to make some adjustments. The recipe was for 6 cheesecakes ( small ). I needed to adjust the quantity a bit as well as the baking time 
to get it right. 
 I topped my first batch with Strawberry preserves and fresh strawberry. 
My son was thrilled and loved this mini cheesecake. As against the regular Graham crackers, I used some lemon cookies I had at home for the crust. The light burst of lemon and the strawberries worked well. 
It certainly was very tasty, but a tad over baked, in my opinion. The top sunk in the middle too.
We didn't care about the sunken top, we loved every single bite. 
Mini bites disappear fast. 


I made a second batch, this time I made small changes. With the previous batch, I followed the exact measurements and that yielded 11 mini cheesecake bites. If I had made them smaller, I could have made 12, but that would have been a bit too mini, for my liking. So with the second batch I adjusted the baking time and the quantity (added 2 tbsp cream cheese).
It worked out well, the cheesecake bites were perfect and 12 in number. 

Batch 2 had some Nutella swirled into each bite.


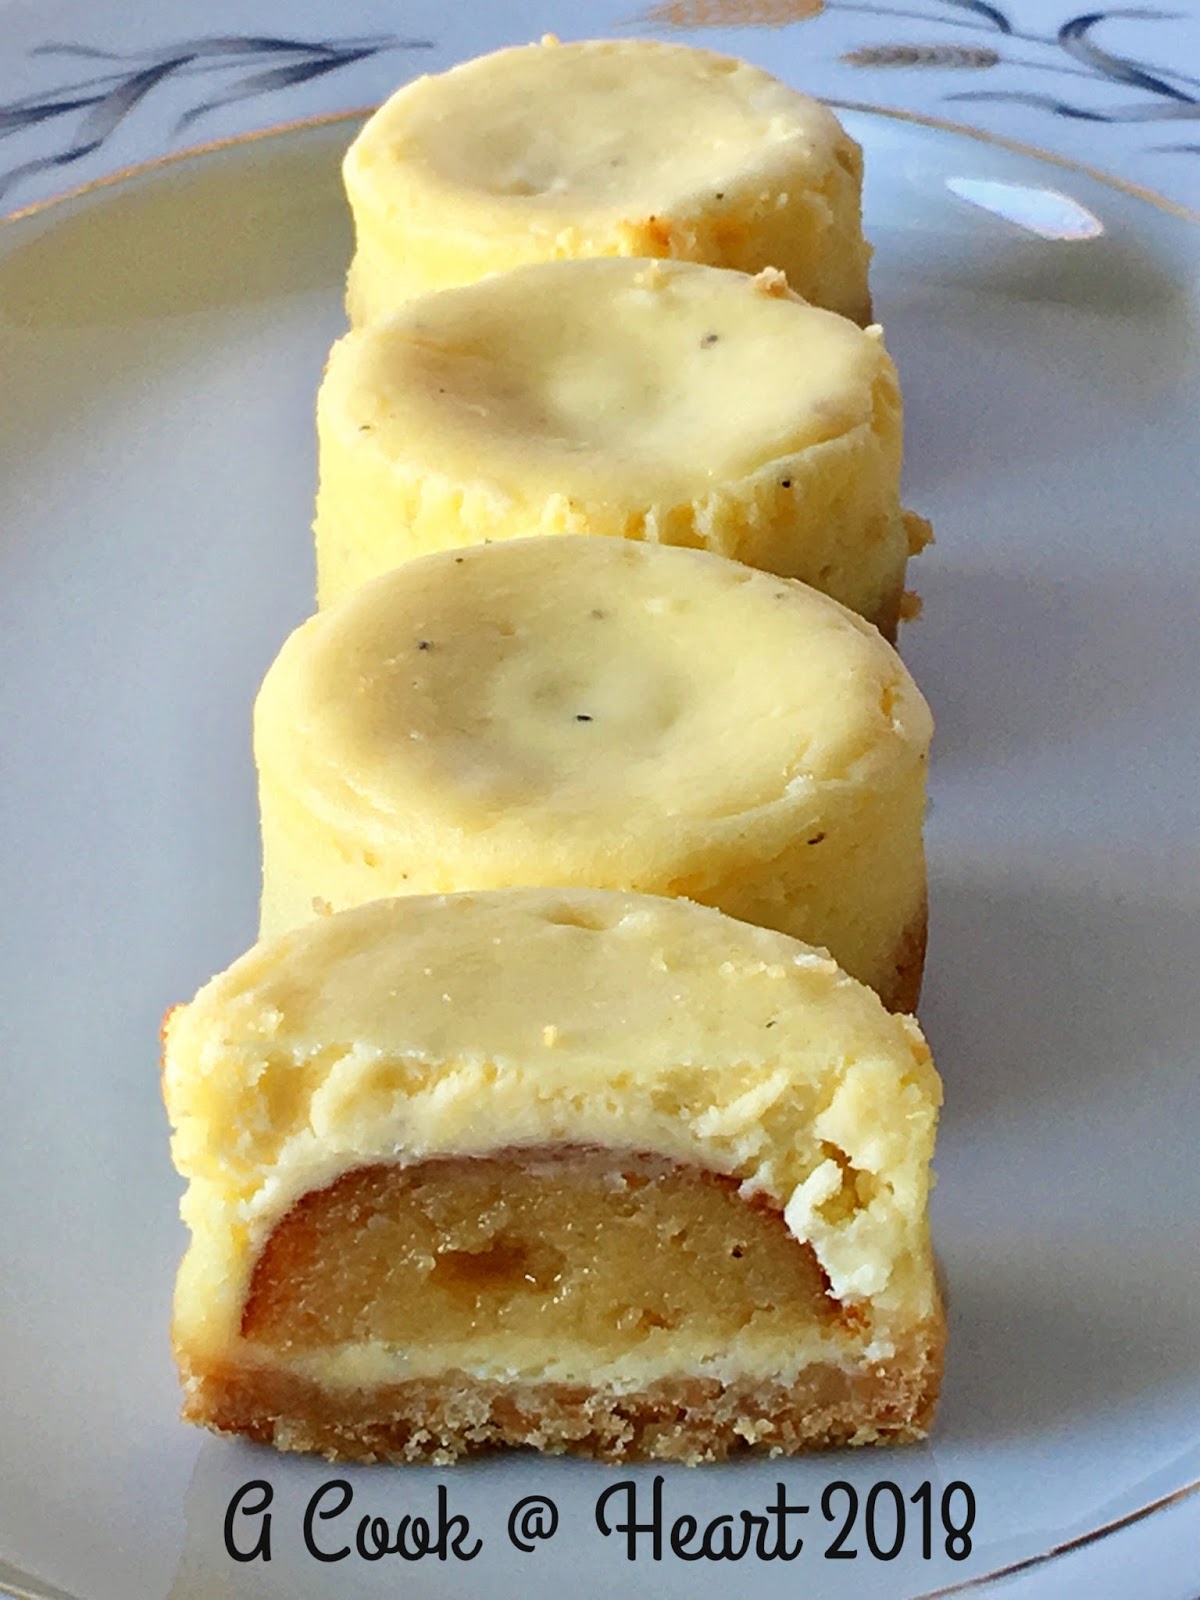
The last batch I made were a fusion batch, East meets West.
I pulled out the tin sitting in the pantry. This, would make great dessert.

Here's how:

1 1/2 cup Marie Biscuits (available in all Indian stores), crushed

2 Tbsp Unsalted butter, melted

1/3 cup Granulated sugar ( I took off some from this as the gulab jamun is also rather sweet, but this is optional)

One 8 oz. packet + 2 tbsp  Cream Cheese , softened (room temp)

1 large Egg

2-3 cardamom pods (remove the seeds and powder them)

6 Gulab Jamun pieces, halved ( do not use any syrup) I used ready made, if you have home made, those, IMHO are EVEN better! 


Do the prep:

Make sure the ingredients ( cream cheese, egg, gulab jamun are at room temp. Melt the butter and let it come to room temp) are ready and set in place.

Preheat the oven to 350 F 

Make sure the small inner disc of the cheesecake pan is in place and ready.

Pick out the gulab jamun and let them sit on a plate, I kept mine in a colander to let the excess syrup out. Halve them. Set aside.


Crush the cookies, I used my chopper to crush the cookies and then I added the melted butter to the chopper and pulsed it to make the base. If you do not have a chopper or a food processor, just add the cookies to a ziploc bag and use a rolling pin to crush and make a powder. Remove from the bag and add the melted butter to make the base.

Portion the mix into the cheese cake pan and press down well to create a smooth base. Set aside.


In a deep saucepan, add the soft cream cheese, and using a hand / immersion blender with the wire whisk attachment, whip the cream cheese till it is lump free, smooth and fluffy. 
You can also use the stand mixer bowl, but since the quantity is so little, it won't work as well. You can also use a manual whisk.

Add the cardamom powder and the egg and beat until just combined.
Spoon a little of this batter into the prepared cheesecake pan, over the cookie base. Place one halved piece of gulab jamun in the center and then pour the cheesecake batter over the jamun. Ensure that just 2/3 of the 'cake well' is filled.
Repeat for the remaining pieces. 


Bake in the oven (middle rack) of the oven for 8 mins. ( this is what worked for me. As oven temperatures vary, keep an eye, you might need an additional minute or so)

Pull out the pan and set it to cool. The cheesecake tops will have the slightest jiggle/ look sort of uncooked in the middle, at this stage. That is perfect.

Let the cheesecake bites cool in the pan for a bit. Then carefully remove ( push the removable plate at the bottom to pop the bites up) the cheesecake and place them on  a rack to cool completely.


Cool them in the fridge to set completely. 
Serve once they are chilled and set.


Notes:

- In all the 3 batches, I used different base cookies. Lemon cookies (for the cheese cake with strawberry topping), Graham Crackers ( for Original Cheesecake) and Marie biscuits (for the fusion Gulab Jamun cheese cake). All 3 worked well.

-The top will sink a little, don't worry about it.

-Unlike the traditional cheesecake, we do not use a water bath.

-As per the original recipe, this makes 6 mini cheese cakes

- This is a make ahead dessert.

Pin It

Wednesday, April 11, 2018

Ghadichi Poli and Methi Zunka, OPOS (One Pot One Shot) style.

Every Marathi household, it seems is obsessed with 'ghadichi poli'.
My mother always made 'ghadichi poli', until one day she came home, full of enthusiasm. Her Gujarati friend ( could be a friend from the office canteen or the train or, bus stop, I have no recollection, she has friends everywhere) 'taught' her the art of making fulka. After that we had fulkas for a long time.
But, she went back to making what she grew up eating, you guessed it, 'ghadichi poli'.
My grandmother also, always made the same.
I never paid any attention.
Life went on..
Then one day, I was at a friends place, she was going to get married and we had gone shopping. We returned home and after a bit of rest, she went int o the kitchen and started cooking for her father and brothers. V, deftly rolled out a circle of dough, spread a thin layer of oil and folded it into a semi circle  and then into a triangle.
This she dredged into flour and proceeded to roll the triangle into a perfect circle.

I was *very* impressed!
I was at the amoeba stage of rolling out flatbread.

Years later, after I was married and living in California, I was a part of a small group of ladies who met in the park and organized potlucks and festive get together.

 So we had this orkut  (anyone remember that now?) message circulating listing what each one of us would bring to the potluck.
When I did the final list and sent it to all concerned, pat came a reply..

Pallavi, me Ghadicha polya anat ahe. Tu faqta poli lihilays majha nava pudhe, mhanun mhatla tula sangava. (Pallavi, I am making tri-fold type chapati (poli), you have mentioned only chapati, so I thought I'd better let you know)


To this day, I have no idea what difference it made, but I never asked or argued.

But I still find it funny. Maybe it is a big deal.

To come back to this post and to introduce to you ( if you aren't familiar with it already) the OPOS system. This One Pot One Shot method is currently revolutionizing cooking.

I found a video on youtube and just clicked on it to view what it could be and found this extremely convenient method of cooking.
I am attaching links below so you all can also benefit from it.

I have tried a few recipes and have had success with all of them. Now that I am confident, I  feel it is time to share it. Tried and tested and all that.
 OPOS uses a regular pressure cooker, a 2 liter one to quickly cook food, while preserving nutrients and skipping the long step by step process. This technique is clearly and lucidly explained by Chef Rama Krishnan in the videos. 

The first thing is to standardize the equipment (a simple process) and then get cooking. click here to  follow the steps to test and standardize your cooker. LESSON 1 

The gist of OPOS style of cooking is, layer food in a certain manner and cook it on high heat, thus yielding in completely cooked, tasty food in minutes!

The other recipe I tried and was happy with is Attalysis (autolysis, is the correct term)This is an easy method of 'kneading' whole wheat flour into a soft dough for making flatbread.

The idea is to add water to flour ( follow the video to understand how) and let it absorb, undisturbed.
The flour absorbs the water and makes kneading almost effortless! The resulting dough is also very soft and also stores well in the fridge for 3 days ( that's the most I've stored it).

So how is this better or different from using the traditional method of dough making or even using the food processor or the heavy duty stand mixer?
Very different!
When using the traditional method, we add water slowly to the flour and knead the dough to the consistency we require ( roti / poori). Most women eyeball the quantity of water and go by the 'feel'.
Similarly, we, I also add water to the flour when kneading using my stand mixer. And I admit, sometimes the dough is softer than I'd like.
And with the stand mixer, I knead more dough, because of the bowl capacity. Too little flour and you cannot mix it...

But this problem is eliminated when using  'attalysis'. plus, the biggest advantage, for me, is the almost no kneading. With my tendinitis and wrist pain, it is rather difficult for me to knead dough without feeling very uncomfortable. On days when I require a small amount of dough and don't want to use the stand mixer, this is the best and the easiest method.
To make 'ghadichi poli' :

Knead the dough using Attalysis method inspired by OPOS. Method developed by Chef Rama Krishnan.
The proportion that worked for me is:

2 1/4 Cups of  whole wheat flour
1/2 tsp Salt
1 cup water

Mix the flour and salt.
Add the dry ingredients t the water and using a fork or a spoon, mix the water and dough to a shaggy mix. Don't over mix or knead. Just mix it and cover and let it rest for 30 mins.
After 30 mins., lightly oil you hand and knead the dough. You will notice  that the water has been completely absorbed and the shaggy dough is very easy to handle and comes together in a very short time to form a soft dough.
At this stage ( ready ball of dough) I cover and keep aside for 10 mins.
If you need the dough for later, just place it in an airtight container and place it in the fridge till you need it.

If you are ready to make roti /poli, set your tava on the gas and let it heat up. Now, take a small portion of the dough ( lemon sized). Roll it between the palms of your hand and make the ball smooth,


OPOS , one pot one shot
Roti Dough made using Attalysis

Dredge it in dry wheat flour and roll it applying even pressure. Roll it to approximately a poori size.


Using a pastry brush or a spoon, drizzle a bit of oil on the rolled disc and spread it around.


Fold it over and smear a bit of oil on the upper side.


Now, fold it in to a triangle, like so..


Dredge the triangle into some dry flour and start rolling. Apply even pressure and roll out the triangle into a round shape. And if it stays a triangle  (or decides to form a shape unknown), never mind, it will still taste good. Just roll it evenly. 


Once you have a thin flat bread, carefully lift the disc and place it on the hot tava. Be careful.


Keep the heat at medium-high and let the flat bread cook. You will notice that it puffs up beautifully! It will also cook well and have brown spots.


Flip it and cook it on the second side as well. If you feel that the first side is completely cooked, do not flip again. IF any portion needs a bit of browning, flip it once more and let it cook for a few seconds and then take it off the heat.


Apply ghee and serve or place in the container ( policha dabba) for later. 

Ghee is a Must!


Ready to serve and enjoy! 

NOTES:

-This method of making roti keeps the roti softer for a longer period of time
- The technique of folding and rolling out creates thin layers in the bread. 


I served the flatbread with Methi Zunka. A staple in most Marathi homes, this humble Zunka is very versatile and can be made with very few ingredients. It is 'everyday fare' for a farmer toiling in the fields and now, many fancy restaurants are serving it up, garnished and glamouring (you know what I mean) it up! 
I often make this as a 'subji' to go with my flatbread. 
This time I tried OPOSing it and boy! I was pleasantly surprised!

The OPOS Zunka is simple and time saving.

I made some small changes. 

I used 

1 cup Besan (chickpea flour) to which I added a bunch of spices, 1/2 tsp EACH of roasted Cumin and Coriander powder, 1/2 heaped tsp of Garam Masala, Salt and some sugar,  1/2 tsp of Turmeric, 1/2 tsp of  Red chili powder 

Chop 1 medium onion and divide it. 

To this dry mix I added half the finely chopped Onion and one bunch Methi (fenugreek) leaves and  mixed it to form a dry mix, Do not add any water, the salt in the dry mix will make the onions and methi release moisture and make the mix slightly damp.                           

To the 2 L pressure cooker, add 3 Tbsp water. 

Add 3-4 Tbsp oil ( I know this sounds a lot, but this is what worked for me. If you are not happy about using all that oil, cut it to 2 tbsp, as the chef recommends.)

Add the remaining onions. This is the buffer layer.

Now add the besan mixture. Do not pack it in, just layer it lightly on top of the onions. If you press it down, that will cause burning. You don't want that. 

Cook this over high heat for 1 whistle only. This should happen around the 3 min 30 seconds mark.

Switch off the heat and release pressure manually. 

Stir the ingredients.

Transfer to a serving bowl and garnish with chopped cilantro ( this is optional). 

Serve with Bhakri or Poli.

*watch the video linked above to also see how not to make this zunka in a cooker. 

- If you use 2 tbsp oil, there will be some charring at the bottom.
Since I doubled the oil proportion there was absolutely no charring and the zunka was moist and well cooked. 


#OPOS


NOTES:

- Please go through the lessons on OPOS method of cooking.
- Use the equipment as suggested.
- Keep track of the changes you make with notes, if you want to modify or understand how and where things changed if the recipe did not turn out the way you wanted,

Pin It
Share

LinkWithin

Related Posts Plugin for WordPress, Blogger...
Page copy protected against web site content infringement by Copyscape