Showing posts with label Tea -Time Snack. Show all posts

Wednesday, September 05, 2018

Kawan Samosa. Baked, Not Fried.

Every now and then, I have this intense samosa craving and it just won't go away! 
I think the Indian grocery store in my neighborhood has samosas on weekends, but I rarely go there on weekends, the store is small and overcrowded. It just isn't worth the trouble. 

That still doesn't solve my problem. I'm still without samosas. 
The craving still won't go away. 
The joy of munching on a samosa is unlike any other. 
It reminds me of movie halls and interval times when I would rush to the concession stand to buy greasy, absolutely lip smacking, piping hot samosas.

I don't feel like buying a pack of frozen samosas, they take up too much space in the freezer. 

So how do I get my samosa fix?  I guess I must make them myself. But, (here I go again), the deep frying? I don't want to do that because samosas need to be fried at low temps and for a long time to get the outer cover that, flaky texture. 

So then, I saw this brilliant hack on a Facebook forum. They used Plain Kawan Parathas to make the cover and baked them. Brilliant or what!?

So of course, I buy a packet of Kawan Parathas and prepare to feast on samosas.


For the filling, I use this recipe. It is simple and tasty. 

We now come to the most important part, making the samosa.

**Please note, I am making no claims that this is a healthier version or any such nonsense. This is a calorie rich recipe. If you are on a diet, this isn't for you. 

If you are still reading this, i must urge you to head tot he nearest Indian grocery store and buy a packet of Kawan Plain Paratha or if you have them in your freezer, pull them out and set them on the counter to thaw while you read this.


Preheat the oven to 350F
Prep the tray you want to use. I used my old tray and lined it with parchment paper. 
The thawed parathas can be very sticky, so be careful as you work. 
I used the parathas when they were just the tiniest bit hard ( the heat from your hand as you fold them will make them soft).
Place a paratha (with the plastic backing) on a smooth surface ( counter top / rolling board) . 
using a pizza cutter or a knife ( your choice. I found the pizza wheel easy to use) 
You will get two semi circles. 
Follow the pictures to make a 'cone' 
Fold the straight edges towards the middle of the round part. 


Press the ends to seal ( leaving the broad part open). Scoop the stuffing into the cone.


Now seal the samosa by bringing the sides together and form a triangle.


Similarly, make all the samosas and place them on the baking tray. 

Bake for about 15 mins till the samosas are golden brown. Oven temperatures vary and so, keep an eye on the tray at the 15th. minute. If the color isn't perfect, bake for another 2-3 minutes, 
Remove from the oven and place on a cooling rack for a couple of minutes ( the stuffing will be VERY hot )  or serve immediately with chutneys of your choice or ketchup.


Notes:
- These samosas are best served hot
- You need not make a cone and stuff the potato mixture in it. It can get fiddly. Just fold the semi-circle into a triangle and seal the edges. 
Pin It

Friday, February 09, 2018

Desserts for two. Cinnamon Streusel Cake

There are days when I pick up my son from school, hand him a lunch box with hot food and a spoon and ask him to eat up as I drive him directly to the library and then to tutoring.
On those days, he sits in the library and will finish his work and I stroll through the book aisles and pick a book here, a comic there or a magazine to flip through.
He works, I read.
Occasionally, he pays more attention to what I have, than to his work. I would too, I mean, c'mon, is math as interesting as a book which has tempting pictures of delicious desserts?

That's what I found on one of my 'walks'. A book that was just what I needed, Best sweets and treats for two
In February 2017, I went along with Nupur on the sugar free month, it's almost a year now and I am glad I broke that bad habit of gorging on something sweet. I can now say no and not regret it one bit!

But sometimes, it feels nice to have a little something to nibble on.  And who can say no to cake? But, making a usual portion is a lot and nobody wants to eat it after a day. This book solves my problem. This recipe serves 3, when the adults are careful of portion control ;)

small treat, cake, tea time


This recipe makes 2 mini loaves. What makes it a breeze is, this recipe uses a store brought mix, its semi-home made. While I like to measure out the ingredients and bake from scratch, this short cut is  rather convenient.

You need :

1 1/2 cups Store brought Yellow cake mix
1 large egg + 1 egg yolk
1/2 cup Water
3 Tbsp Butter (unsalted), melted
1/2 cup dark brown sugar ( i used light brown, it was what I had)
1/2 cup All purpose flour
1/2 tsp Cinnamon 
3 tbsp Butter, chilled and diced
1 Cup powdered sugar
2-3 tbsp Milk


Pre-heat the oven to 350F
Grease the mini loaves
In a mixing bowl of the stand mixer (fitted with the paddle attachment), combine the cake mix, egg and egg yolk, water and melted butter and mix until well combined ( about 2 mins)

Make the streusel: in a bowl, combine the flour, cinnamon, brown sugar. Using a fork or your hands rub the butter into the flour and sugar till pea size crumbles form

Pour the cake batter in the greased pans, pour half way only. Now sprinkle the streusel mix over the batter. Pour remaining cake batter. Top it off with the remaining streusel mixture.

Bake in the oven for about 20-25 mins ( until the toothpick comes out clean)

Remove from pan ( after about 10 mins) and set it on the rack to cool completely.

The book does not state the use of the last two ingredients, the powdered sugar and the milk. I'm guessing that is for the glaze. 
I did not make the glaze. The cake is perfectly sweet and does not need anything more. 

If you, however, like sweet, add the milk in the powdered sugar and mix to form a thick glaze and drizzle it over the cooled  cakes.


Last slice, hastily clicked before a hungry 9 year old grabbed it and gobbled it up! 
Since this recipe worked well, my son has bookmarked several recipes he liked in the book and has urged me not to waste any time, but try and make them all. I am tempted! And with small portions, it really works well for us. 
So stay tuned for some more sweet treats. 

That's it from me! See you soon (hopefully) with new recipes and updates. 
Pin It

Monday, April 03, 2017

(Cornflakes) Chivda for colleagues


As we walked the aisles of the Indian store, I reminded M that he wanted to pick some snacks for his office colleagues. They were interested in trying some popular snacks. 

I was thrilled that M's colleagues wanted to try something and I could not let this opportunity pass without making some home made snacks.We picked out some popular snacks and I also decided to make some chivda and send it with him. 

In the olden days, packets of chivda and ladoo were given at functions. They still are. These were primarily given to those who had traveled distances to attend the function (marriage / thread ceremony etc.) and dry snacks were travel food during the return journey. 

To me, chivda is an 'essential' snack. My favorite Diwali snack is this Indian take on a trail mix. 

This time I wanted to try Corn Flakes Chivda. Though the traditional way is buying 'corn poha' which is deep fried and then seasoned, the easier version is using boxed cereal. Buy the plain one.

I had seen this version first on The Cooker's blog and liked the idea very much. I just played with the proportions to suit our taste.

chivda


The recipe is simplicity itself.

You need:

4-5 cups of Corn Flakes (plain / original) 
4-5 Tbsp Oil
1 tsp EACH, Mustard seeds and Cumin seeds
1/2 tsp Asafetida (Hing)
1 scant tsp. Turmeric powder
1/2 tsp. Kashmiri red chilies powder (optional, just to add some depth to the color)
1 tsp. Roasted Fennel seeds, lightly crushed
2 fresh Green chilies, chopped
Few curry leaves
2 heaped Tbsp EACH, Cashew nuts, Peanuts, Raisins, roasted Gram Daal (dalia)
Salt to taste
1 small pinch Citric acid granules
Sugar to taste

Heat oil in a wide wok / kadhai.
Add in the mustard seeds and as they pop, add the cumin. 
Once the cumin sizzles, add the asafetida and then the cut green chilies and curry leaves.
Be very careful as the moment the chilies and curry leaves touch the hot oil, they sputter and hot oil drops are likely to fly here and there. If you have a spatter guard, use it, if not, just step away from the stove.
Once the chilies and curry leaves turn crisp, add the nuts, raisins and dalia and stir them until they are golden brown and the raisins swell up.
Next add the turmeric powder, red chilies powder (if using), fennel seeds and stir briskly. Be careful that the spices do not burn.
Next add the salt and citric acid granules and mix.
Add the cereal  and mix well, but gently, coating the corn flakes with the spice mix.
Switch off the heat and let the mix cool down a bit.
While it is still just warm, add the sugar and mix well.
Cool and store in an airtight container.
Serve as a tea time snack.

Corn Flakes Chivda, Indian trail mix

NOTES:
  • The measures for a chivda can be approximates, the recipe is very forgiving, except for the citric acid granules, use only a small pinch, no more.
  • Corn flakes can be substituted for plain Cheerios or plain (unsweetened) rice krispies
  • To change the taste a bit, you can also add 1 tsp of lightly crushed coriander seeds (sabut dhania).
  • Adjust the amount of chopped fresh green chilies to suit your level of tolerance. 
  • You can omit the green chilies and just use dry red chilies powder ( use 1/2 tsp, regular chilies powder for a mild taste)
  • Since we are adding Citric acid granules, do add the sugar to balance the sour, spicy and sweet taste.


Pin It

Saturday, July 25, 2015

Semi-Homemade Samosas

If you are watching a movie for 3 hours, a break is very important. 
A Bollywood Masala movie, involving drama (Nirupa Roy with tears cascading down her cheeks and sobs echoing between heart rending dialogues), to action ( Amitabh or Dharmendra transforming into super humans and single handedly fighting off hordes of villains, who fall unconscious after one punch, but our valiant heroes just bounce back after repeated blows to the head), romance (and I mean the old type romance, you know, the two flowers colliding against each other, conveying the meaning and leaving the actual to imagination, unlike today, when the on screen romance that makes you wonder, really? Making one squint in cross eyed fascination, thinking.....like that?) and the running around trees singing songs, which if you try ( running and singing and smiling and flirting at the same time) will leave you gasping like a fish out of water. So much for filmi romance ;)

So when you get 3 hours of Bollywood Masala, you need a 10 minute break. Those 10 minutes are for rushing to the rest room, if needed, but most importantly for scrambling to the concession stand to grab a paper bag containing 2 (or more) greasy, piping hot Samosas ( the ice cream bar or soft drink bottle are next, but you cannot really do without the Samosa). Heading back into the semi dark theater with the precious package and finding your seat before the movie starts. 

The satisfaction of biting into a crisp, hot samosa while watching the drama unfold on screen is happiness unlike any other.  
I would eat the base ( the crispiest part) last. Save the best for last.

Li'll S does not get to experience this. The movies (kids animated) are shorter now, we buy a bag of popcorn and head into the dark cinema hall, by the time the movie starts, we are almost done eating the popcorn ( I mean, you cannot resist the smell of popcorn and cannot stop at one, you start taking the popcorn on top, carefully and then just grab it by the fistful). All that is fine, but it isn't the same as greasy Samosas.
Potato peas samosa filling
Samosa Filling


The little one has lately developed a liking for Samosas and demands them every now and then. The store brought samosas are tasty, no doubt, but the spice levels vary and sometimes he cannot tolerate the heat, in which case, M and I are given the stuffing as he finishes the outer cover.
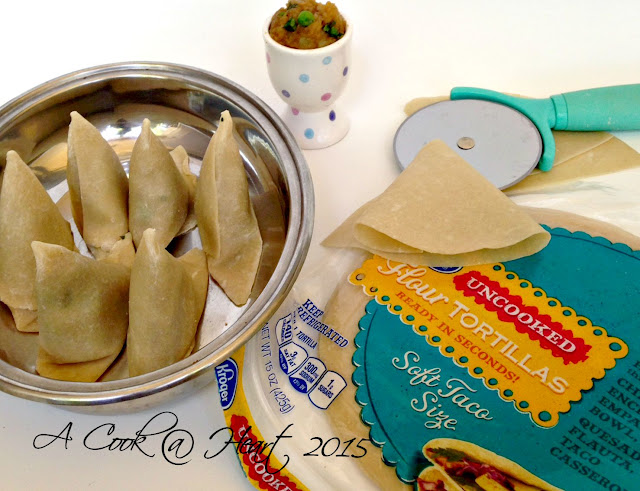
shortcut samosa, tortilla samosa
Uncooked Flour Tortillas 

Making samosas at home is the best solution. If making everything from scratch is intimidating, or you are pressed for time, I have the solution for you. 

Making the stuffing is easy, and can be made ahead of time. The outer cover is made using store bought 'uncooked' Flour Tortillas. These are found in the Refrigerated section (near the cheese, butter, bagels etc.)

The stuffing is simple with most ingredients found in the pantry. I make a little extra stuffing, the left overs can be slathered on to sliced bread and grilled on the skillet or Panini grill, making a hearty sandwich. If you like, use the filling to make Samosa-Paratha.

For the stuffing:

Boil, cool, peel and mash ( leave it a bit chunky) 4 Russet Potatoes.

Thaw about 1/2 cup Green Peas.

In a small saute pan, add about 1 Tbsp. Coriander Seeds ( Sabut Dhania). When toasted, cool and make a coarse powder. I use my mortar and pestle, you could put these in the coffee mill and give it a quick 5 second whirl. Alternatively, crush them using a rolling pin.

Mince 2-3 Green Chilies and grate 1 tsp. Ginger. (or you could add the chilies and ginger knob to the mixer /blender with a pinch of salt and blitz it to a paste, like I do)

Finely chop Cilantro and set aside.

Heat about 2 Tbsp. Oil in a kadhai/ wok.

Add 1 heaped tsp. Cumin/ Jeera to the hot oil, as it sizzles, add the green chilies and ginger paste  and a dash of Asafetida/ Hing followed by the crushed coriander seeds and 3/4- 1 tsp. Turmeric powder.

Saute briefly, you do not want the spices to burn.

Add the mashed potatoes, 1/2 - 3/4  tsp. Kashmiri red chilies powder, 1 tsp. Amchur Powder ( add a bit more if you like tart taste, I added a dash more). Season with Salt to taste. Mix well and cook for a couple of minutes. 

Before switching off the heat, add 1- 1/2 tsp Garam Masala( I eyeballed the amount, I use Badhsah Rajwadi Garam Masala, which is a bit different than the regular Garam Masala and has a strong flavor). Mix well, switch off the heat and sprinkle with finely chopped Cilantro

Taste and adjust the seasoning. I keep it mild, so my son can enjoy the samosas. 
This spice level is kid-approved, Li'll S loved then as did D, who cannot tolerate heat. 
                      

Once the Filling has cooled, Open the tortilla packet and using a Pizza cutter or a sharp knife, cut the tortilla in half. The D shaped semi-circles can be shaped like cones and stuffed. 

To seal the edges, I made a thick-ish paste of All Purpose Flour + Water.
I found this pictorial on folding the Samosa.
Its fairly simple, Fold the sides onto one another forming a triangle,making sure that the tip is closed - check the picture above ( or the oil seeps in and no one wants to eat THAT).
I apply the 'gum' paste on the outer line ( the D part) and then seal it, leaving the curved end free to fill.
Scoop up the filling and fill the cone, do not over fill, you still have to seal it.
Carefully and gently press the filling down and proceed to seal the samosa.

Fill and seal all the samosas.

At this stage, you can deep fry them or freeze them for future use.

If deep frying, fill a wok with oil (half way)  and heat it on medium-high. Once the oil is hot, reduce the heat. For crisp Samosas, you need to deep fry them on a medium-low flame/ heat setting to a golden brown.

Slide in 2-4 samosas ( depending on the size of your kadhai /wok) and deep fry.

deep fried tortilla samosa
Deep fry to a golden brown on medium heat only

Remove from the oil and place on paper towels to drain the excess oil. At this point, the samosa as ready to be devoured. Serve with Cilantro-Mint Chutney and Date and Tamarind sauce


To make it a meal, make Samosa-Chaat using Choley  or Ragda (I used Ragda).

Add some Ragda in a bowl, crush and place a Samosa on top, Garnish the ragda-samosa with chutneys and finely chopped Onions and minced Cilantro.

Serve immediately.

ragda samosa chaat
Ragda Samosa Chaat


NOTES: 
- While making these samosas is very easy, keep in mind that they need to be served immediately

- Keeping these samosas aside will soften the outer cover, since these are made using ready Tortillas and make it chewy. 

That's it for now, enjoy your weekend, folks! 
Pin It

Friday, November 15, 2013

Apple Muffins ( Made with Oil)

Last week I picked up Cortland Apples at the store. They looked really nice, well rounded and plump, one that would tempt Snow White.
Cortland apples are snow white inside and are tart. Better suited for baking or making a chutney, IMO. 

 I decided to bake. Something simple. Baking is not my strong point. I have regular bouts of panic and a low self-image whenever I plan on baking, but of course, I don't give up. I follow every word of the recipe and watch the oven like a hawk every time I pop something into it. And they say baking is therapeutic. Hah!

So to start with, I searched high and low for a recipe that suited my requirement. Simple, required just 2 apples and I could use ingredients that I had at home.

I found just that!

I made these for Children's Day (celebrated in India on 11/14) for my little one (who takes it for granted that I can bake) and also (virtually) for young T (My BFF Lisa's son), who has touching faith in my culinary abilities. He rates my baking skills highly (and that, is what makes me want to bake, this innocent faith that the boys have in me).


I have modified the recipe slightly. For the exact recipe, click here. 

To start with, this recipe yielded more than 12 muffins ( I have a 12-standard sized cupcake pan). I'd say 16, maybe. So I made 12 muffins and  used a pie dish to make a smallish cake which was cut into wedges. 


1/2 cup Canola /vegetable or other neutral oil
1/2 cup Granulated sugar
3/4 cup Demerara sugar (original recipe calls for dark brown sugar)
1 large Egg
1 cup buttermilk
2 Cups Unbleached  All Purpose Flour
1 teaspoon Baking powder
1 teaspoon Baking soda
1/4 teaspoon Salt
**1 1/2 tsp ground Cinnamon
2 Apples (I used Cortland), peeled and chopped

Pre-heat the oven at 375 deg. F. Grease the pan or line it with liners and grease them and set aside.

Beat the Oil and sugar together. 

* The original recipe calls for using the granulated sugar and just 1/4 cup of the brown sugar to be mixed in butter and beat it till fluffy. I have used oil instead of butter and did not reserve any sugar, but creamed it all at once.

Add the egg and mix well, scraping the sides of the bowl as required.

Slowly add the buttermilk.

Add the Flour, baking powder, baking soda, cinnamon and salt.

Gently fold in the apple.

Add the mixture to the ready muffin pan / liners, dividing equally.

Bake for 30 mins or until a toothpick inserted, comes out clean.

Cool the muffins in the pan for about 10 mins and then on a rack.

Enjoy as a tea-time treat or in the lunch box or when you want.


NOTES:

* If you have reserved any brown sugar, sprinkle it on top of the batter and  then bake.
**The original recipe calls for 1 Tbsp. of ground cinnamon, I dislike a very strong whiff of cinnamon and therefore used just 1.5 tsp. 

These muffins are deliciously moist because of the oil and the apples, of course and mildly sweet.
(those who do not like fruit pieces in their food (as they tend to become soft) may not approve. )

The reserved sugar will provide a nice crunch when baked. The next time I will try it or make a streusel topping.


Pin It

Friday, November 08, 2013

Blondies

I am so glad October is behind me now. It was a month full of anxiety and stress, luckily, all is well now. It taught me many things and gave me many reasons to be thankful for in life. 
I learned to overcome my fear and face tough situations. Also to think on my toes. I learned who my real friends are. 

I am ready to relax and enjoy what is left of 2013. Diwali was like a fresh beginning and I was in good spirits and made Diwali goodies and enjoyed snacking, without any shame guilt. 
With 5 days of Diwali goodies and total Indian food, I wanted to divert my mind to something a little different. 
In an ideal world, I should have been eating salads and light meals, but... we do not live in an ideal world, do we now?
So I decided that the party had to go on, just in a different direction. 
Also it was Thursday, the day my little one has chess class after school and which means he and his 2 friends (who come back with me) are hungry after school. 
On most days, I carry fruit for them, it keeps them full until we reach home and they get their milk. but the bananas were kinda spotty brown, the kind that kids turn up their noses at. 

So it was simpler to make or bake something. Just that I had only 1 egg and I am not so confident when making egg less cakes ( and the one I have bookmarked needs dates, which, I did not have on hand) and I was itching to make blondies. There are any number of recipes online, just google and get it. After poring over a few, I went ahead and made these. They are VERY simple to make, a 5 year old can make them and I intend to let my little one do just that, next time- with 'dark chocolate chips' as he pointedly told me, several times (with each bite, to be precise). My excuse, I was in a hurry ( and to myself: where are those chocolate chips anyway? I know I have them, somewhere).

So if you are in a hurry and want to make something quick and sweet and tasty, try these. 
Blondies, for those who are wondering, are brownies, minus the chocolate. Dense, moist, gooey and oh-so-good that you want another piece! 

You need:

1 stick / 1/2 cup unsalted Butter
1 cup Brown Sugar
1 large Egg
Hefty pinch Salt (about 1/8 tsp)
1 cup All Purpose Flour
1 1/2 tsp Vanilla Essence
Chocolate /Butterscotch chips ( or nuts, if you prefer them)

Preheat the oven at 350 F.
Grease a pan that you will use to bake the blondies in ( I used a square cake pan and sprayed it with non-stick PAM)
Sift the flour and salt and keep it ready
Melt the butter ( microwave it in short bursts), you want just melted, not bubbling ( that would be, almost ghee)
Add the sugar to the melted butter and beat until creamy
Add in the egg and the vanilla and mix well
Add the flour + salt and mix well
Transfer to the greased pan and bake in the oven for 25 mins ( or till a toothpick inserted comes out clean) 
Cool in the pan for about 10 mins and then transfer to a rack to cool completely. I left the pan cooling and went to get ready to go get the kids from school, no harm done. I sliced them in the pan and cooled them just a tad more, to pack them an go (and of course, take pictures).


-I carefully added butterscotch chips, each blondie had one, just so that there would be no comparisons when I handed them out to the 3 hungry ( and sometimes cranky) kids. Next time, I will add about 1/4 cup small semi-sweet chips and stir them in.

-Other options are, toasted nuts- chopped, M&M's.

-I got 16 blondies ( and I kept the edge on one side- as you can see in the pictures-for myself, I love 'em)


That's it at my end. and oh! I am planning a Thanksgiving party this year!  I am so excited about it, planning the menu and reading recipes..... What is happening in your part of the world? Drop in and leave a comment.
Hope you all have a sweet weekend ahead.
Pin It

Sunday, September 22, 2013

Dudhi Muthiya

Tea time snacks are a big hit with me. I like having a little something to munch on with my cuppa. For as long as I remember, I have always dipped something in my tea.
Raise your hands of, as a  teenager or an adult you have downed an entire packet of Parle-G biscuits with your tea! I know I have.
For those who grew up in India ( and are in their late 20's 0r 30's) , they will identify with what I have to say.
As soon as 4 O'clock sets in ( and you do not have to look at the clock) most tea addicts will have what we call 'talab'( if I am not mistaken). As if on auto pilot, the lady or in some cases the man of the house will start making tea. While the tea brews,  the 'khau che dabbe' are pulled out and an assortment of biscuits ( or cookie as you might want to call them, I'll stick with biscuits), khari (made with  puff pastry ) or jeera butter (not butter- as in the spreadable one, this is different).
Dipping a biscuit or khari in tea and eating it was routine. 

My Mother and her siblings are all tea addicts! For them, it's tea-time, anytime! 'Chaha chalel' ( I don't mind a cup of tea) was a given when we visited each other. My Uncle would visit us late evenings, sometimes. He would come from Thane to Wadala on his motorbike and when he sat down and heaved a sigh, he would say, " Akki, chaha taak na!" (Akki/ Akka= elder sister, please make me a cuppa). After the refreshing cup of tea, he would take me for a big round on his bike much to my delight! 
My Aunts were no different! Nor am I.  
Often when I am at a friends home and she asks if I want tea, I rarely refuse and of course, if they are at mine, I will make ginger-tea.

Over the years, hot buttered toast, Marie biscuits and Parle G and many a times chivda have played kho-kho with each other. And now, we have a new contender. Muthiya! 


I had heard of Muthiya and seen packets in the frozen aisle, however, I never felt like picking one up, just to try.

Then one day, Sonali shared some with me and I loved it! I finished what she gave me and shamelessly asked for seconds.
Of course I asked for the recipe. And having tasted fresh Muthiya, I was not going for the frozen version. I wanted to make it at home.

I made these a couple of times, but they did not taste as good, something was not clicking. It did not taste as good as the one I had tasted at Sonali's. I was disappointed, thankfully I was not ready to give up.

I made very few changes and finally arrived at what worked for me. The result! Tasty Muthiya, as you can see.


You need: 

One Medium sized Bottle Gourd / Lauki/ Dudhi- peeled and grated (discard the spongy interior and seeds)
1 Cup Whole Wheat flour / Atta
1/2 Cup Besan /Chickpea Flour
1/4 Cup Rava/ Semolina ( coarse)
2-3 Green Chilies ( about 1 tsp) or less, if you prefer low heat
1 inch piece Ginger 
2 Tbs Sugar
3-4 Tbsp, Plain thick Yogurt ( start with 2-3 Tbs and go on adding the remaining as required)
Salt to taste
3-4 Tbs Oil
1 Tbs Baking Soda
2-3 Tbs Lemon Juice
1 tsp Turmeric / Haldi
1 tsp Red chili powder ( optional)

TEMPERING:
2 Tbs Oil
2 tsp Mustard seeds
Few Curry leaves - optional
2 tbs Sesame seeds ( I usually eyeball this ingredient. We like the crunch and so I am liberal in it's use)
Minced Cilantro to garnish.

Pulse the ginger and green chilies in the mixie and make a paste. Alternatively, use a mortar-pestle and pound it to a smooth paste. 

Slice off the top and bottom of the gourd. Peel the outer skin off. Grate the gourd/ lauki. Do Not  grate the spongy inside and the seeds. Set aside.

Mix the flours and semolina. Add the ginger-chilies paste and all the remaining ingredients (oil, sugar, yogurt, turmeric, lemon juice and red chili powder- if using) except the ENO fruit salt.
Squeeze the grated lauki /bottle gourd and add it to the above mix.

At this stage, set the steamer on the stove. Prep the steaming plate, grease with oil / cooking spray.  As the water comes to a boil,  add the baking soda to the mix above and bind in to a smooth dough. This will be sticky, scrape the dough off your hands, oil them if required and  knead it gently.

Make 4 equal sized portions and with oiled palms, make 'logs' of the dough and set them gently in the steamer. 
Cover and let them steam and cook for about 20-25 mins or until a toothpick inserted comes out clean.

Cool the logs and cut into rounds. I prefer making small bite size pieces (quartering every round). 

Heat 2 Tbs oil in a non-stick pan. Once the oil is hot ( not smoking) add the mustard seeds. As the seeds pop, add the sesame seeds and curry leaves. 

Add the Muthiya pieces and mix gently, coating the pieces with the seeds.

Let the Muthiya pieces sit in the pan for a minute or so until they have a golden brown color and a slight crunch on the outside.

Take off the heat and garnish with minced Cilantro and serve with a hot cup of tea.


Notes:

- Muthiyas make an excellent snack on the go. They are filling and also a healthier option than chips! 

- Adjust the heat as per your liking.

- These can be frozen and eaten at a later date.

- They  have great shelf life and make a good 'picnic/ traveling' food option
Pin It

Friday, April 05, 2013

Handhwo

I used to be very excited about April Fool's day. I would actually spend time thinking about how I would like to fool  my parents.
Maybe it was all those Enid Blyton books I was addicted to. Reading all about how those school going girls tricked their friends and family and teachers would make me yearn to pull one on my near ones too.
Of course I realized that there was no store that sold jokes or trick packs in India and had to 'compromise'.

I would do silly things like, when my parents were getting ready for work, I'd quietly open the main door, ring the bell and close the door ( very quietly, of course) and scuttle off. My Mother or Dad would go to open the door and find no one and I'd shoot out from my hiding place singing, "April fool banaya...". The other trick I had up my sleeve was, during those days ( 80's) MTNL ( the phone company) had a 3 digit number, which when dialed (and after you have hung up) will send a ring back to your telephone. I have no idea behind the logic here, but it was useful in pulling a prank.
I'd dial the number, and scuttle, my parents would come to answer the phone and I'd spring out singing the song, or I would pretend to answer the phone, and call out to my Mom or Dad and inform them that one of their friends was on the phone or my Ajji was on the phone to talk to Mom- here I would pretend that I was asking polite questions etc. and then holler for mom,  they would rush and I would wait till the first "hello" and  start singing the annoying song, again! 

I have no idea if they knew what I was doing, but they played along or they really fell for it. but whatever it was, today it is a sweet memory, one I will always cherish! 
This year, like the last few years, April Fools day was like any other day, wake up, breakfast  school bus, meals, study time, dinner, bed........... 
Maybe one day, my little boy will play a harmless prank and make me laugh out loud, again.
Innocent fun! How I miss those moments.

Not that the recipe I have for you today has anything to do with pranks or April Fool's day. 
I have another Gujarati Classic for you. A wonderful tea-time snack, Ondhwo / handhwo is a savory cake. I guess one can call it that...
It has vegetable content, so it is healthy! Do you need any further persuasion?


Recipe source: Kamini aunty 

You Need:

1 cup Rice
1/4 cup Chana dal
1/4 cup Toor daal 
1 tbsp Urad dal 
1/2 cup Plain, thick Yogurt 
1 inch Ginger piece
2-3 cloves Garlic
1-2 Green chilies ( + / - to suit your taste buds)
2 tsp Sugar ( can substitute with jaggery)
1 tsp Ajwain (Bishops weed)
1/2 tsp Pickle Masala
1 Medium Lauki / Dudhi/ Bottle Gourd, grated
Salt to taste
Few curry Leaves
1-2 Dry Red chilies ( optional)
1 tsp Mustard seeds
~2 tsp ( I did not really measure these, just sprinkled generously) Sesame Seeds
1 tsp Eno/ fruit salt, regular flavor
1/2 tsp Turmeric powder
Pinch Red chili powder

Wash the rice and daals and soak it for a minimum of 6 to 7 hrs.
Drain all the water the grain was soaked in and coarsely grind using  yogurt- no water. Do not use any water when grinding the rice and daals. 

Then take above mixture in a bowl and add ginger, garlic and green chillies paste and salt, mix thoroughly. Leave it over night.

Next morning add turmeric powder, sugar/ jaggery, ajwain , pickle masal and grated bottle gourd / lauki . 

Mix well . Taste it and adjust seasoning, if needed. 

Heat a small skillet, add 1 tsp oil, once the oil is hot ( not smoking) and add few curry leaves and little red chilli powder . Pour  into the batter.

At this stage, prepare a baking dish, grease it or spray it with oil. Preheat the oven (350 F)
Then add 1 tsp eno to the batter and mix well. Pour the mixture in an oven safe dish/ bakeware 

In the same skillet, make a tadka ( oil , mustard seeds, hing, sesame seeds and 1 or two whole red chillis -if using ). Pour this on the batter.

Now cover the baking dish with aluminium foil and put into preheated oven . Bake for 30 to 40 min until bottom layer is light brown in color. 

Then uncover and broil for 8 to 10 min. Watch  this broiling stage like a hawk.
The top can go from golden brown to charcoal very quickly! 

Cool in the pan for 5 minutes and then on a cooling rack. 

Slice in wedges and serve with a cup of tea.


Notes:

Traditionally, bottle gourd is used, however you can add different vegetables, to up the nutritive value. Add petite green peas, grated carrot or corn kernels.

If you have a lump of jaggery that is hard to crumble / grate,  place the lump in a microwave safe bowl, add a tsp water and microwave it for 20-30 seconds.  Add the melted jaggery to the mix.

My friend, Ashwini, has a recipe for Ondhwo that uses Quinoa and flax seed.

Pin It
Share

LinkWithin

Related Posts Plugin for WordPress, Blogger...
Page copy protected against web site content infringement by Copyscape