Friday, May 18, 2007

KHATARNAAK CHAAT !!

Hahahahahahahaha!!! What a title! It's just that we made AluTiki and Chana-Chaat and on tasting it M exclaimed "Kya KHATARNAAK banaya hai re apan ne yeh chaat!!"

Thanks to Trupti and her brilliant idea of having an event involving Friends and Family in the kitchen, I snagged the chance of getting M in the kitchen to help out. It's not that he does not want to help, but his work pressure is so high, that when he comes home tired... one look at his tired, haggard face sets me bustling like a mother hen, off to make a hot cuppa.
However, occasionally when he does wander into my domain, he lends a helping hand, which happened today! And I took the opportunity of taking some pictures (since the camera is always at hand in the kitchen !)

We decided that the evening should be dedicated to lolling in the bed, watching movies and not doing anything else... for this plan to succeed we had to prepare ..
One dish .. that's it.. one item which would satisfy the hunger pangs and satisfy the taste buds.. hmmmm, what do I make then? Chaat!! can there be another choice!! I ask You!!
Action plan for the remainder of the day:

Step into the library : GRAB all the available Sherlock Holmes series and also GRAB the Jeeves and Wooster series
Dash to the stores to pick up any items as needed. Dash home...Don the apron and cook!

Item by unanimous choice : Aloo Tikki with Chana (choley)

M's first concern... will this take the entire day? (this is when I saw my chance..) Not if you wanna pitch in... , M is all set...
So while I do the potatoes, he speedily tidies around the house (bless him even for shoving things into corners ! I love him for doing that!!) and joins me in my *tiny* kitchen

We collect all the items we need ( M needs to *see* everything before him, to get creative)
For the Tikkis , I used my old recipe without the sweet chutney filling. On the broad lines, this is how we made it...
Potatoes
Green chillies
Cumin seeds
Ginger- Garlic paste
Cilantro
Salt to taste
Amchur powder/ Lemon juice
Oil
Boil, peel and mash the potatoes.
Grind together the cumin , ginger garlic, chillies
Add the paste to the potatoes
Add salt, amchur / lemon juice and chopped cilantro
Mix all the above and make patties
(if the above mix seems a bit soggy, add a slice of bread in it and knead it into a dough)
Heat a skillet, place the patties on it and drizzle oil on the sides and cook to a lovely, crispy golden brown .. as M demonstrates!!
The real stuff


For the choley
1 Can of Garbanzo Beans or 1/4 kg. Chick peas soaked overnight
2 onions
1 Tomato
2 inch piece Ginger (chopped into thin straws)
1 tsp. Red chilly pwd (+/- to your taste)
3/4 tsp. Garam Masala
1 med.Potato
1-2 tbsp Oil
Salt to taste
Cilantro
1 Bayleaf
If using dry chick peas, soak the chick peas in water overnight.Drain water, rinse. In a pan , bring water to a boil, add 1 tsp. tea powder/ leaves and make a decoction. Strain, use this water to cook the chick peas in. This will give the chick peas a dark color. Add salt to the water and chick peas and the potato
If using a can of garbanzo beans, cook potato seperately
Slice the ginger into thin straws
Make Onion Paste
Make Tomato Paste/ puree
In a wok/ saucepan, heat oil, add Bayleaf
Add the ginger straws, onion paste and cook till the onion is a nice brown
Add the Tomato puree, red chilly powder
Add the Garam Masala.
Remove and set aside the water from the cooked chick peas. Add the chick peas and mix well
Add mashed potato
Now pour in the water that was reserved (in which the chick peas were cooked) with a pinch of turmeric and salt
To give the choley a tangy taste, add 1/2 tsp of Tamarind Paste
Chutneys
Green chutney
Grind :
1 bunch cilantro
4-5 Serrano green chillies (+/-)
1 tsp Cumin seeds
approx 1 inch Ginger
4 cloves Garlic
Salt
Juice of 1 Lemon
Sweet chutney
5-6 Dates (seedless)
2 tbsp. tamarind conc.
1 marble size lump of Jaggery
1/8th. tsp Salt
1/2 tsp Red chilly powder
Pressure cook or add water and microwave dates till soft
Crush the dates to a paste
Add the remaining ingredients , mix well, add some water and bring it to a boil. Cool and use
Trupti, don't turst the snap..M is just showing off... multi-tasking and doing it all-by-himself..as he calls it
Step 1: Place Patties in the bowl
Step 2: Pour choley on the patties


Step 3: Green chutney on the choley


Step 4 : Sweet chutney


Step 5: Garnish with chopped cilantro and finely chopped onion


Step 6: make 2 extra bowls of chaat.... sit comfortably, get hubby to start the movie and dig into the chaat while enjoying the mystifying adventures of Sherlock Holmes (or any other .. your choice).

Take a small break, grab the next helping, now switch from adventure to the sublime comedy of Jeeves and Wooster recreated by BBC ! Aaaaaaaaaaaaaaahhhhhhhhhhhhhhhhhh!!! What more can one ask? Wonderful movies, AWESOME food and extra helpings of both!! Life does not get better than this!!

Pin It

Monday, May 14, 2007

“Things I do daily"

I got tagged by Swapna, for this MeMe long back.... Sorry Swaps, I took my own sweet time, but, better late than never!!


Here's a peek into 'A day in Manasi's Life' ...........


Is it morning already???Oh Noooooooooooo!!


Where's the bathroom? Help me crawl to it..


Top on the agenda....


Motivation to Work!!!


Home and doing what I want to !! THIS I LOVE!!!

The inevitable!!


To-Do list for tomorrow .... Thinking how I can procrastinate!!


Relaxing.......LOVE this too!


Pin It

Wednesday, May 09, 2007

P is for PALAK PURI

Here I am .. in time this time too ! for 'P' of Indian Veges @ Nupur's One Hot Stove !!

Every once in a while I go and pig out on oily stuff! Oh Stuff those 'too much fat' 'too many calories' talk.. The bounce off me easily!!

I like to keep in shape.. the nice round shape I am in!

So to treat myself I made puri! with a slight change.. I made Palak Puri! Happily enough I had just this half bunch of spinach in the fridge... fat lot of good that was for making Alu Palak.... wouldn't feed a chicken.. but then... do chicken feed on palak!!??!! hmm...

Anyway... so Palak Puri it was!!

This deep fried goody holds a special place in every body's heart (or so I imagine). We always had Puri on a festival day (Ganesh Utsav, Diwali or when we had guests over for dinner) which was eaten with plain potato vegetable (maybe I'll post this later!!) or with a sweet, like Basundi.. heavenly!!

Or Mum would make masala puri when I had my school picnic, which was an instant hit and the first item to be cleaned up!

For the Puri, I basically used approximates.
~2cups Wheat Flour (Atta)
1/2 bunch of Palak / Spinach
2 tsp Farina/ rava / Sooji
1/4 tsp salt (or to taste)
4-5 sprigs Cilantro
1/2 Serrano Chilly (just to give it a hint of heat)
Water to bind to a dough

Blanch the Spinach and Drain the excess water
Grind spinach, chilly, cilantro to a paste
Mix the paste in the Flour, add the Farina, Salt (the farina makes them crisp)
Bind to a dough (should be stiffer than the normal Roti Dough)

Cover and keep aside for 15 mins
In the meantime, heat oil in a kadhai/ wok
Take small marble size and roll it to a puri
Deep fry in oil.

I served the puri with Alu subzi, and Beet Raita (canned beet (1 tin), chopped into cubes and mixed with plain yogurt, salt and 1/2 tsp of MDH~Raita Mix)

The puris taste great as they are, without any accompaniment, so personally i enjoyed them with Raita and as they are.
Pin It

Monday, May 07, 2007

~SIGHHHHHHHHHHHHHH~

Yep, changed it again... and will modify it a bit more!! I loved the old template... the one with the bright, inviting looking kitchen... but........ it was the old style and difficult to make swift changes to...

So here I am (why me??)..... struggling once more with the task of making my blog look nice!!! Your suggestions are welcome! Pin It

Friday, May 04, 2007

O is for Oven Baked Eggplant


Hah!! I made it this time for Nupur's A-Z of Vegetables ....
It's been so long.. or at least feels so long since I had a post for this event! I made Oven baked Eggplant...
There is no love lost between me and the eggplant... however it's the exact opposite with M! His eyes glaze over, a benevolent smile wreathes his face and he rubs his hands in anticipation. That is the Only reason why the 'Baingan Raja' ever finds its way into my kitchen.
Now this little sucker with it's siblings, was lying in the dark regions of the fridge, untouched for a week now... I would look at it...ponder over the possibilities (which, I know are numerous).. shake my head and pick up another vegetable, talk about being prejudiced! So finally, last evening, casting aside my feelings, I pulled up the eggplant and decided to make this appetizer... a treat for M... he had a gruelling day at work and deserved something that would bring back that 'smile'!!
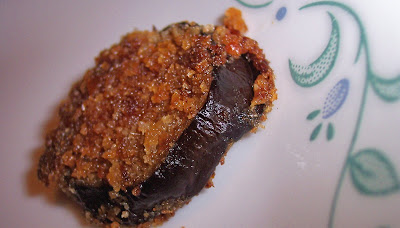
Now ,I have no clue where I got this recipe from, in one of my moods I had taken out sheets and sheets of recipe printouts, so safe to say that the source is Google.


Making it is also no big deal! So simple and quick too!

1 med. size Eggplant
5 tbsp Mayonnaise
Parmesan cheese (I did an approx. on this)
Salt
1/4 tsp. Pepper powder
Breadcrumbs

Preheat the oven to 350 d. F
Place foil on the oven tray (spray with oil if u want), I used Olive oil spray
Mix the mayo, cheese, salt and pepper and mix to make a nice paste
Spread the breadcrumbs on a plate
Slice the eggplant into discs
Dip the eggplant discs into the mixture
Pat on both sides on the breadcrumb plate
Place on the tray and bake for 10 minutes on each side
Done!!

Variations : Using a dash of Italian seasoning

Using the Large Eggplant (one that is commonly used in making 'bharta')

Substituting any other cheese instead of Parmesan

Verdict: Very NICE!! (the 'smile' is back in it's place!) I could put in a better way... as Jeeves (not his own, of course! It's Browning!!) would say...The lark's on the wing;The snail's on the thorn; God's in his Heaven --All's right with the world!

Pin It

Wednesday, May 02, 2007

Mini Idli and chutney

This is just a small post, to show you all my new cute idli stand! When I first came to CA,I got my old but serviceable idli stand, which has been with us for as long as I remember! It is an old 3 idli, 4 tier thing my Mom used .. I would stand by her watching her ladling the batter in to the greased idli stand and set it on the stove top... and after the steam started coming out of the lid, I would glance at my watch to wait another 7 minutes before the idlis were all done ( that is what the Hawkins pressure cooker manual advised), sometimes humming the jingle.."Hawkins ki sitti baje.... khusboo hi khushboo ude... mazzedar, lajjatdar khana hai tayyar...." of course not to apt for idlis as we do not use the sitti (weight/ whistle) but at an age when commercials were not as frequent as now, I found these rather catchy and liked to hum them at odd intervals.
Unfortunately, when I came here I got the old stand and a new pressure cooker (oh a Hawkins alright!) which was smaller and my stand would not fit into it. I was very disappointed and after having borrowed a small stand from my friend a couple of times initially, I decided to go ahead and get my own.. the trouble with that was , the stand in the market here was not one that complied with the cooker size! So it was either don't buy the stand or buy a new cooker! Finally Ma-in-law came to the rescue!! My neighbor was coming to L.A. and Ma-in-law sent me this cute li'll stand!!

Cute, ain't it!!!

It sits perfectly into my cooker and makes 15 mini idlis at a time! i love it! the small idlis are so cute to look at!

I sometimes make idlis in the no-grind method (using urad flour & idli rava) but when time permits I go for the usual method of Soaking 1 cup urad Daal in water for a minimum of 5-6 hrs. Grinding it to a paste. Adding 1 1/2 cup Idli Rava and leaving it overnight to ferment. making Idlis after that is of course a snap! Grease the mould, ladle batter and set it in the pressure cooker without the weight and let Hawkins do the job for you in about 8-9 mins!

I served these mini idlis with coconut chutney

1/2 packet of frozen shredded coconut

3-4 sprigs of cilantro

2-3 green chillies (+/- to taste)

1 inch piece of Ginger

Salt to taste

Sugar (optional)

1 tsp. Cumin seeds

Grind together using little water. (I made this a bit thick so that it would be easier and *less messy* to carry in the lunch box, but you can add more water and change the consistency)

You can also add a 'Tadka' to it , heat 1 tbsp oil, add mustard seeds, when the pop, add a good dash of asafetida, add a few curry leaves and 1 red chilly broken in half.

Another variation to the taste of the chutney is adding a bit of chana daalA (not the one we use in daily cooking in the tempering! the other one, used in chiwda, the one that can be eaten as it is.. whaddya call it??!!!)


That's it guys.. hope to see u all soon ...!!! Pin It

Tuesday, May 01, 2007

JFI GREENS - Methi Parathas in a hurry! and Daal Palak with Parathas.

This is a late post (methi parathas) .. I wanted to send it in for Nupur's A-Z of Veges... but things have been a bit hectic for me. Couple of weeks ago, I landed a full time job.. and I am still kinda getting the rythym of things. Apart from that my laptop is giving me a lot of trouble so I was off this track a bit..

I guess this entry can now go in for JFI GREENS along with another one I had planned.

Methi seeds have their own special place in our kitchens and are used for tempering in daals, dahi kadhi as well as in many vegetables, pickles and curries. As widely as it is used in the kitchen this herb has its use in the medicinal world too. Methi seeds soaked overnight and ground to a paste can be applied to hair to get rid of dandruff and is also a good conditioner. People suffering from arthritis and diabetes also benefit from consuming Methi

Methi has a bitter taste and a strong characteristic smell, that was the one reason my Mother used to be careful in just picking leaves off the stalk. In CA,I do substitute Kasuri Methi (dried methi leaves) for lack of fresh, inviting looking methi . Kasuri methi too has the same strong characteristic smell of fresh methi (if not stronger!). The only annoying thing is sometimes getting a bit of a hard stalk in the mouth... but that is not much of an issue!!

Coming to blogging.... though I am enjoying everything at office enormously, I do miss blogging the most! I have a bunch of pictures ready, but I haven't uploaded them to the laptop! Now that I am a bit strained for time (at least until I set a routine), I am also looking at 'quick fix' meals to carry in the lunch box for me and M. For one such quick fix, I made Methi Parathas. these are very flavorful and can be eaten by themselves with or without any accompaniment.... a bit of mango pickle is always welcome, though!!

For this version of Methi Paratha I have used Kasuri Methi. The taste was not compromised on at all, but if you have fresh, tender leaves... USE 'EM!!

1 cup Wheat Flour
1 tbsp. Besan
1 tbsp. Rice Flour
1/4 tsp. Turmeric
1/2 tbsp. Ginger - Garlic Paste
2 Green chillies minced (or if you prefer , grind them with the ginger-garlic)
1 bunch Methi Leaves
Salt to taste
Oil / ghee

Wash and chop the methi leaves (not necessary if using kasuri methi)
Mix the wheat flour, besan and rice flour
Add the turmeric, ginger-garlic paste, green chilly, salt, methi leaves
Bind into a dough.
Cover and keep for 15 mins..
Roll out parathas
Heat a griddle and roast the parathas drizzling oil / ghee around the corners (or use oil spray)
Serve with pickle / yogurt


My second entry is DAAL PALAK and Paratha

My motive in making daal palak was simple... daal and vegetable rolled into one! What with work and home (dishes... laundry, clearing the humongous mess) and a whopper of a migraine attack, I felt a bit overwhelmed and after shoving tablets down the throat and crankily croaking at the husband about how, now was the time for all good men to come to the aid ... rally around dear!! .. I behaved sort of like one expiring all over the carpet...

Later , revived and almost as fresh as a daisy, I steam-rolled in to the kitchen to appease the growing and gnawing hunger pangs.

I largely modelled my Daal Palak on Asha's recipe. The outcome was a delightful accompaniment to rice and parathas. But the mistake I made (and lesson learnt!) was in not using a lot more spinach! I had just one bunch of Spinach and I thought that would do! Well, there is always the next time!I also used normal Tomatoes instead of cherry tomatoes. Forgot to add the sugar.... nevertheless, as I mentioned earlier... the end result was delightful!


For the Parathas

2 cups wheat flour

2-3 pinches salt

Water

Oil

Ghee / Butter

Combine the flour and salt, add enought water to make a smooth dough.

Make equal portions of the dough.

Take one portion, roll out to a thick roti, apply oil on the inside and fold over, forming a semi-circle. Brush with oil and fold again, now forming a triangle.

Dust with wheat flour and roll in to a triangle (keeping it a little thick)

Shallow fry (I use the word 'fry' because I sed a tad more butter when roasting htese parathas) on a hot griddle, until brown spots appear on the paratha and it puffs up.

Serve with daal palak

Pin It

Tuesday, April 24, 2007

Raw Banana Vegetable - RCI

A long, long time ago..... when I was a college student and pocket-money was a mere trickle at the end of the month.... we lived upon the mercy of our friends (Mother's) who lived nearby. Dropping in at their apartments needed no second thought.. and the yummy food was too good to resist.


On one such day, we trickled in, as was our custom to appease the pangs of hunger, gnawing at our insides.. to find Mrs. Iyer chopping raw bananas.... First though.... " umm... doesn't that look a tad too thick for kela wafer (plantain wafer) ?" second thought.... on seeing Auntie pop the plantain pieces in boiling water.... "Yow! aren't you supposed to deep fry those?" But these words were never said out aloud... curiousity as to what will happen next and delicacy prevented me from putting my foot in my mouth.


Now that Lakshmi is hosting RCI- Tamil, I thought this would be perfect time to try a recipe that I had tasted long ago and liked, despite the initial misgivings, for myself.


I used to classify everything into the 'banana' category, honestly knew nothing except the fact that the big ones are used to make chips and the regular ones that we eat.

Just some info I found on the net .. thot I should share it...
Plantains
Starchy
Used as a vegetable
Longer than bananas
Thicker skin
Resemble green bananas, but may be green, yellow or black


Bananas
Sweet
Eaten as a fruit
Shorter than plantains
Thinner skin
Color is green when not fully ripe, yellow when ripe


For the recipe... well, it was the usual 'hath ka andaz' information I got.... soak chana daal in water for a few hours. Roughly chop the plantain , and cook it for a few mins. in boiling water... grind coconut and green chilly and a bit of cilantro... temper ... cook ..add salt. You are done!!


Right... how useful is that now?


So with this information I kinda did it myself.. the result was, let me assure you, not at all disappointing!


(For 2 people)

1 big Plantain

1/4 cup Chana daal ( you can reduce this, but I like chana daal.. so i put in a generous amount)

1 Serrano green chilly

1/2 cup dessicated / fresh coconut

1/2 tsp. Cumin seeds

1/2 tsp. Mustard seeds

Dash Asafetida

1/4 tsp. Turmeric

Salt to taste

3-4 Curry leaves

1tbsp. Oil


Do the Prep:


Wash and soak the chana daal in water for an hour

Grind the coconut, chilly and cilantro (without using water) into a paste

Peel and chop the raw banana into cubes

In a sauce pan boil water.

Once the water boils, add the plantain cubes and cook them for ~ 5 mins.

Drain the water and keep aside the cubes


Heat oil

Add the mustard seeds

After they pop, add cumin seeds

Add the Asafetida

Add curry leaves ad turmeric

Add the chana daal and cook for a few minutes

Add the ground paste, salt.

Add Plantain. Mix well.

Cover and cook for a couple of minutes

Mix again... cook for another 2-3 mins.

Serve with Rice and sambar, fulkas


Lesson learnt : I bought the plantain , but left it sitting for a good 3 days, as a result it ripened and became slightly sweet (which tasted good nevertheless).. however this also had a direct impact on the cooking... 1) As it was ripe , boiling in water for 5 mins. was not necessary, infact what I did was make the cubes softer than needed

2) The final mixing and cooking time was also reduced to 3-4 mins.

3) The palntain was a bit too soft.... as in the cubes did not stay cubey... if you know what I mean.

4) End result: Very tasty despite the above mentioned points. Will make again... and keep in mind the lessons learnt!
Pin It

Saturday, April 14, 2007

L is for Lal Bhoplya chi Bhaji


The everyday pumpkin is Lal Bhopla in Marathi. This is my entry for Nupur's A-Z of Vegetables....
All thru my childhood I associated 'bhopla' with a zero (that I used to get in my math paper!) my Father would count, re-count the marks and send a prayer upward for the unseen hand which guided me to passing marks , I would count the 'bhoplas' and grin impishly (and shamelessly)!
As for eating pumpkin vegetable, I did not mind it... though not a particular favourite of mine. My Mother made it with a sweet-sour tamarind jagery gravy and peanut powder. I used to call it 'Upvasachi bhaji' (vegetable consumed during a Fast).
Then came a delightful version of Gharge, which satisfied my sweet tooth and my respect for this bland vegetable went up.
Today I am trying out another version, taken from Lokpriya

1/4 kg Red pumpkin
1 tablespoon Grated coconut
2 Red chillies
1/2 teaspoon Turmeric
1/4 teaspoon Fenugreek seeds
1/4 teaspoon Mustard seeds
1 pinch Asafoetida
2 tablespoons Grated jaggery
1 tablespoon Oil
Salt (As per taste)
1/4 tsp Cumin - I added this
Method

Chop the pumpkin into 2 inch cubes.Heat oil in a deep bottomed pan and add mustard seed, red chillies, turmeric and asafoetida. When the mustard seeds start crackling add the fenugreek seeds. Fry for 1-2 seconds.
Add the chopped pumpkin and saute for 2-3 minutes. Cover and cook for another 3-5 minutes, stirring occasionally. Pour 1/2 cup of water on top of the lid, this enhances steaming. Add water into the pan only if required.When the pumpkin is half-cooked, add the jaggery and stir well and cook covered till it is thoroughly cooked. Add the coconut and simmer for 2 minutes.Serve hot with rotis.
Verdict: Simple and Tasty! I was a bit apprehensive as there are no spices (lesson learnt... spices are not always necessary!), but the methi (fenugreek seeds) and jaggery are sufficient.
Pin It

Wednesday, April 11, 2007

Ruz Wa Banadoura & Falafel in Pita pockets....


Wow... I wish I had a genie like this... oh, and more than just 3 wishes!!
This is my very first attempt (like many of you) at cooking Middle Eastern food. In fact when I saw this theme on Meeta's blog I wanted to try it out! All I knew then, was that there is this dish called Falafel, which I had once seen on some Cookery Show on Star TV... that was waaaay back, when I was a student in India, and I also recollected that this was a vegetarian preparation.

So I popped into the library and made a beeline for the cookbook section... where, a few weeks ago I had seen this book on middle eastern cooking , glanced thru it, but since I had a lot of books already, I shoved it back in to the shelf!

Thankfully I found it there, grabbed it and headed home, where I could sit and go thru the whole book.
What first struck me was the simplicity of the ingredients (for the recipes I chose). The combination of two or three spices bring out the wonderful flavors of the dish. I followed the recipes to the T.

Ruz Wa Banadoura... if that has confused you, how does Rice with Tomato sound? That's just what this is!!
And here's how you make it:

1 Small Onion, chopped
1 tbsp. Olive oil
1 Small Ripe Tomato, Diced
2 cups Water
1 tbsp. Tomato Paste
1/2 tsp. Black Pepper
1 cup Rice
Salt to taste
Saute the onion in the olive oil until transparent.
Add the diced tomato and cook for a couple of minutes
Add water, tomato paste and pepper
Bring to a boil, then add the rice
Cover and simmer over low heat for 20 mins. or until rice is tender and the juice has been absorbed.


For the Falafel :
1 lb. dry Chickpeas (Kabuli chana / dry choley)
1 medium Onion
1 cup chopped Parsley
1 cup chopped Cilantro
1 tbsp. ground Corriander
1 tbsp. Cumin
1/2 tsp. Black Pepper
1 tbsp. Baking powder
Salt to taste

Soak the Chickpeas in cold water for 24 hrs.
Mix all the ingredients, except, the baking powder
Grind the mixture in a food processor until it turns to a paste
Add the baking powder and let the mixture set for 30 minutes.
Then, shape into patties
Deep fry (in Olive oil)
* Traditionally falafel are deep fried, but if you want to drastically cut down on the calories, they can be broiled in the oven
For the lack of a better pic...
** Leson I learnt... I do not have a food processor... and so, I had a tough time grinding the mixture... all I have is a small Chopper and a Blender (which needs an adequate amount of water to work well!) So (after a few unladylike words!) I first ran the whole thing in the chopper.. then thru the blender, ended up using water when not required.. the end result was not disappointing ( as my friends, who have eaten falafel before, told me), but on the whole... tedious.
Falafel is served on mini pita loaves with its condiments of chopped onion mixed with sumac, sliced tomatoes, pickled turnips and tahini sauce. I liked them as they are too! As an accompaniment / dip I used (store bought) Hummus Tahina sauce, and mixed ground garlic, lemon juice and some red chilly flakes in it (for a bit of a punch!)

Till date I had only heard of Pita Bread, but never tasted, and so I was a little apprehensive of making them. So I hunted around on the net and finally settled down for this recipe and boy, was it GOOD!! I was thrilled to see the dough rise.. then the pita bread puff up in the oven!! Here's how they turned out...

For your convenience, here is the recipe ( link above )

Pita Bread
Makes 8 pitas
3 cups flour
1 1/2 teaspoons salt
1 Tablespoon sugar or honey
1 packet yeast (or, if from bulk, 2 teaspoons yeast)
1 1/4 to 1 1/2 cups water, roughly at room temperature
2 tablespoons olive oil, vegetable oil, butter, or shortening

If you are using active dry yeast, follow the instructions on the packet to active it (see the note on yeast above). Otherwise, mix the yeast in with the flour, salt, and sugar. Add the olive oil and 1 1/4 cup water and stir together with a wooden spoon. All of the ingredients should form a ball. If some of the flour will not stick to the ball, add more water (I had to add an extra 1/4 cup).
Once all of the ingredients form a ball, place the ball on a work surface, such as a cutting board, and knead the dough for approximately 10 minutes (or until your hands get tired). If you are using an electric mixer, mix it at low speed for 10 minutes.
(The purpose of kneading is to thoroughly combine the ingredients and to break down the flour so that the dough will become stretchy and elastic and rise well in the oven. A simple hand kneading technique is to firmly press down on the dough with the palm of your hand, fold the dough in half toward you like you are closing an envelope, rotate the dough 90 degrees and then repeat these steps, but whatever technique you are comfortable using should work.)
When you are done kneading the dough, place it in a bowl that has been lightly coated with oil. I use canola spray oil, but you can also just pour a teaspoon of oil into the bowl and rub it around with your fingers. Form a ball out of the dough and place it into the bowl, rolling the ball of dough around in the bowl so that it has a light coat of oil on all sides. Cover the bowl with plastic wrap or a damp kitchen towel and set aside to rise until it has doubled in size, approximately 90 minutes.
When it has doubled in size, punch the dough down to release some of the trapped gases and divide it into 8 pieces. Roll each piece into a ball, cover the balls with a damp kitchen towel, and let them rest for 20 minutes. This step allows the dough to relax so that it'll be easier to shape.
While the dough is resting, preheat the oven to 400 degrees. If you have a baking stone, put it in the oven to preheat as well. If you do not have a baking stone, turn a cookie sheet upside down and place it on the middle rack of the oven while you are preheating the oven. This will be the surface on which you bake your pitas.
After the dough has relaxed for 20 minutes, spread a light coating of flour on a work surface and place one of the balls of dough there. Sprinkle a little bit of flour on top of the dough and use a rolling pin or your hands to stretch and flatten the dough. You should be able to roll it out to between 1/8 and 1/4 inch thick. If the dough does not stretch sufficiently you can cover it with the damp towel and let it rest 5 to 10 minutes before trying again.
Open the oven and place as many pitas as you can fit on the hot baking surface. They should be baked through and puffy after 3 minutes. If you want your pitas to be crispy and brown you can bake them for an additional 3 to 5 minutes, but it isn't necessary (in the batch pictured here I removed them at 3 minutes).


For the Final step... stuffing the falafel in the pita bread....
I sliced the bread in 2. Chopped a tomato in thin slices.
I had very little lettuce, so I usedthat too (but you cannot see it in the snap :( ... )
Arranging it was simple, open the pita pocket, layer with shredded lettuce, tomato, some hummus , Falafel... eat!!


Oh how I wish I could take better pics!!
This is my contribution to Monthly Mingle @ Meeta's. Thank U Meeta, for this wonderful theme which gave me an opportunity of exploring a wonderful cuisine!!
Pin It

Tuesday, April 10, 2007

Kothimbir Wadi

This is a typical Maharashtrian snack! The main ingredient being... you guessed it, Kothimbir (Cilantro). This savoury cake is available in most restaurants who serve predominantly Maharashtrian cuisine. Shivaji Park (Dadar,Mumbai), is where I had my first taste of this wonderful snack.We used to do our Diwali shopping in SP and after the shop-till -u-drop session we would head for the nearby restaurant and tuck in!
There is also a place on the Mumbai-Pune OLD highway, where one takes a turn for Mum-Goa road.. (DattaGuru Snacks) where brisk business happens and the snacks (the usual highway snacks batata wada, samosa, pakodas and Kothimbir wadi are sold). This is one of the BEST places to get kothimbir wadi.
The first time I made this was at my cousin's house. She had to meet this guy (the arranged marriage scenario) when just an hour before the guests were to arrive, my Grandma bustled in with 2 bunches of fresh cilantro and said, "let's make kothimbir wadi.... the usual kande-pohe is so boring!"
So while my cousin went to get ready, I made this snack with my Grandma's directions.
2 bunches (fairly big) of Cilantro
1 cup Besan (chickpea flour)
2 Green chillies (+/ - to taste, I used Serano, so 2 were enough)
1/4 tsp. Tamarind paste ( I use readymade concentrate)
1/2 tsp. Jaggery
Salt to taste
1/4 tsp Baking Soda
Oil
Sesame seeds to sprinkle on top
Water
2 tbsp Rice flour (Grandma's tip: to make the wadis crisp)
Steamer / pressure cooker (without the whistle/ weight)
Do the preparation... if you are using a presure cooker, do not use the whistle/weight, pour adequate water in the cooker/ steamer and get the water boiling.
Grase a pan ( I used a cake tin) with oil and set aside.
Wash and chop the cilantro. Keep aside 2 tsp. for garnish
Finely chop the green chillies
Add the besan,rice flour, salt, tamarind pulp, jaggery, soda
Add water and mix well.
The mixture must look like a thick cake batter at this point of time
Pour the mixture in the greased pan , sprinkle sesame seeds on top
Place the pan in the cooker/ steamer and steam for 20-25 mins (do the usual toothpick test, the toothpick should come out clean when inserted). This is how it looks:
Let it cool, then cut into squares. The traditional way is to deep fry them , but this time I shallow fried them (like patties/ tikkis) and they turned out great!
The steamed wadis and the fried wadis.. before and after

Garnish with the cilantro kept aside.Serve hot, with Coconut chutney, tomato ketchup.

Pin It

Friday, April 06, 2007

A quick snack.. Semiya upma

What do you do when you are feeling lazy? What do you do when you want to have a quick snack? I make Semiya Upma.
Until a couple of years ago I probably would have raised an eyebrow and said huh?!? if anyone would have told me about Semiya upma.Then I tasted this in a friend's lunch box,and i quite liked it... she just chuckled it and said, " you like this? its a quick fix ! who has time for more when you have to report here at 8.00 am?!" True, who has time.. hmmm..
At home, my parents are fans of the sooji upma, they did not quite fancy semiya version, so I never had the chance to make it. But now, M & I both like it, so it has become a regular evening snack.M likes it as it is, I prefer it with tomato ketchup.
So this evening I was feeling a bit lazy... maybe the weather... or maybe the book I'm reading, don't feel like putting it down, just want to curl up in the rocking chair and keep reading..but I'm hungry too, and so will M be, once he gets home from work. Lazy as I was feeling, it was definately not a chai- biscuit evening, something better... semiya upma - bingo!

SoI dragged myself to the kitchen, took out

2 cups semiya
1 med. size onion
1/4 potato
A few florets cauliflower
1 tbsp. oil
1/4 spn. cumin seeds
1/4 spn. mustard seeds
Dash asafetida
1/2 spn. cumin-corriander pwd. (optional)
2-3 green chilies
2-3 curry leaves
1/4 spn. turmeric
Salt to taste
2 cups water

Heat oil in a kadhai, lightly roast the semiya till they turn a nice light golden colour or u can just microwave it too for about 2 mins. Keep aside. Chop the green chilies,onion, potato and cauliflower. In the kadhai, add oil, once hot, add mustard and cumin seds,. After they crackle, add asafetida, green chilly, curry leaves, turmeric, onion and chopped vegs. Mix well, cover and let them cook till tender.
Add Semiya, saute. Add water, salt, dhania-jeera powder.Mix and cook till soft. If after a while the upma looks sticky, just add a dollop of butter, mix and cover and cook for a couple of mins.
Garnish with chopped cilantro.Serve hot.


Pin It
Share

LinkWithin

Related Posts Plugin for WordPress, Blogger...
Page copy protected against web site content infringement by Copyscape