Tuesday, August 16, 2016

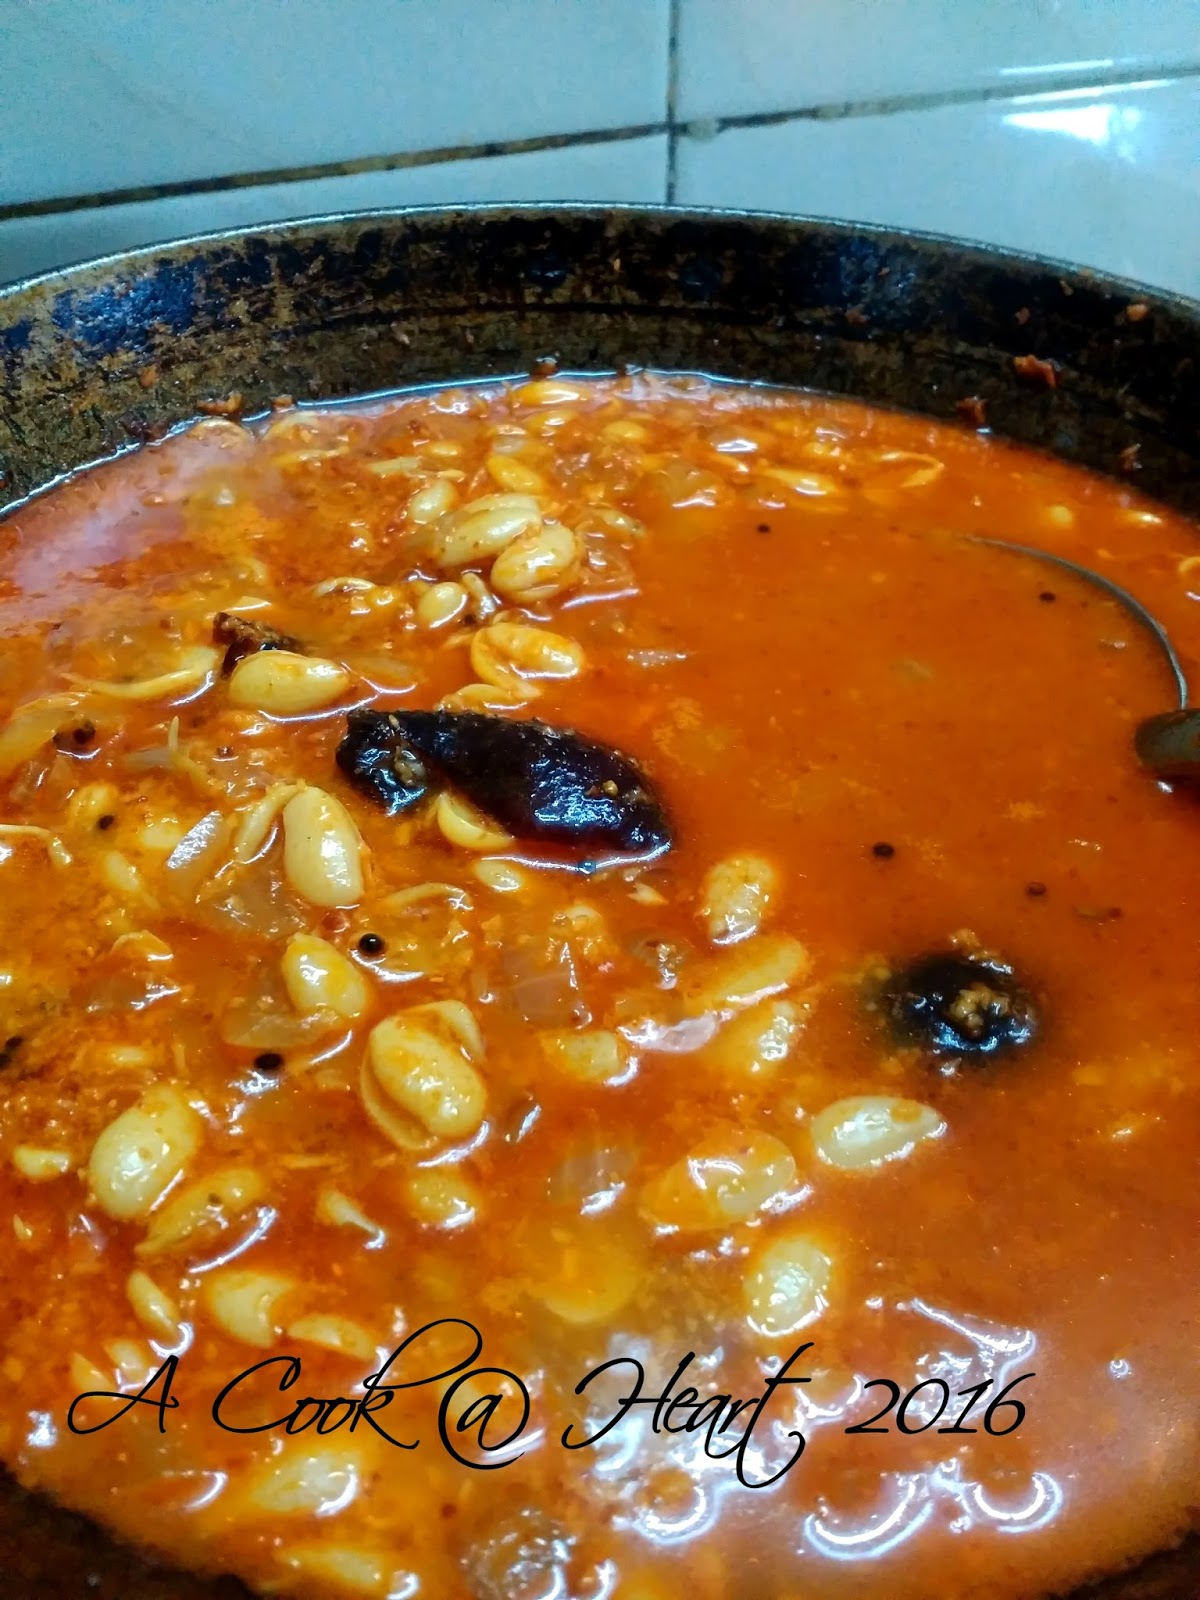
Vaalacha Birda ( Vaal beans In a coconut sauce)

So, finally this summer I shopped and packed and visited India. It was a fantastic few weeks and my son and I were left wanting more! 

Source: Google image search

The highlight, or shall I say one, of the highlights, was enjoying Alphonso Mango, the Hapoos! 
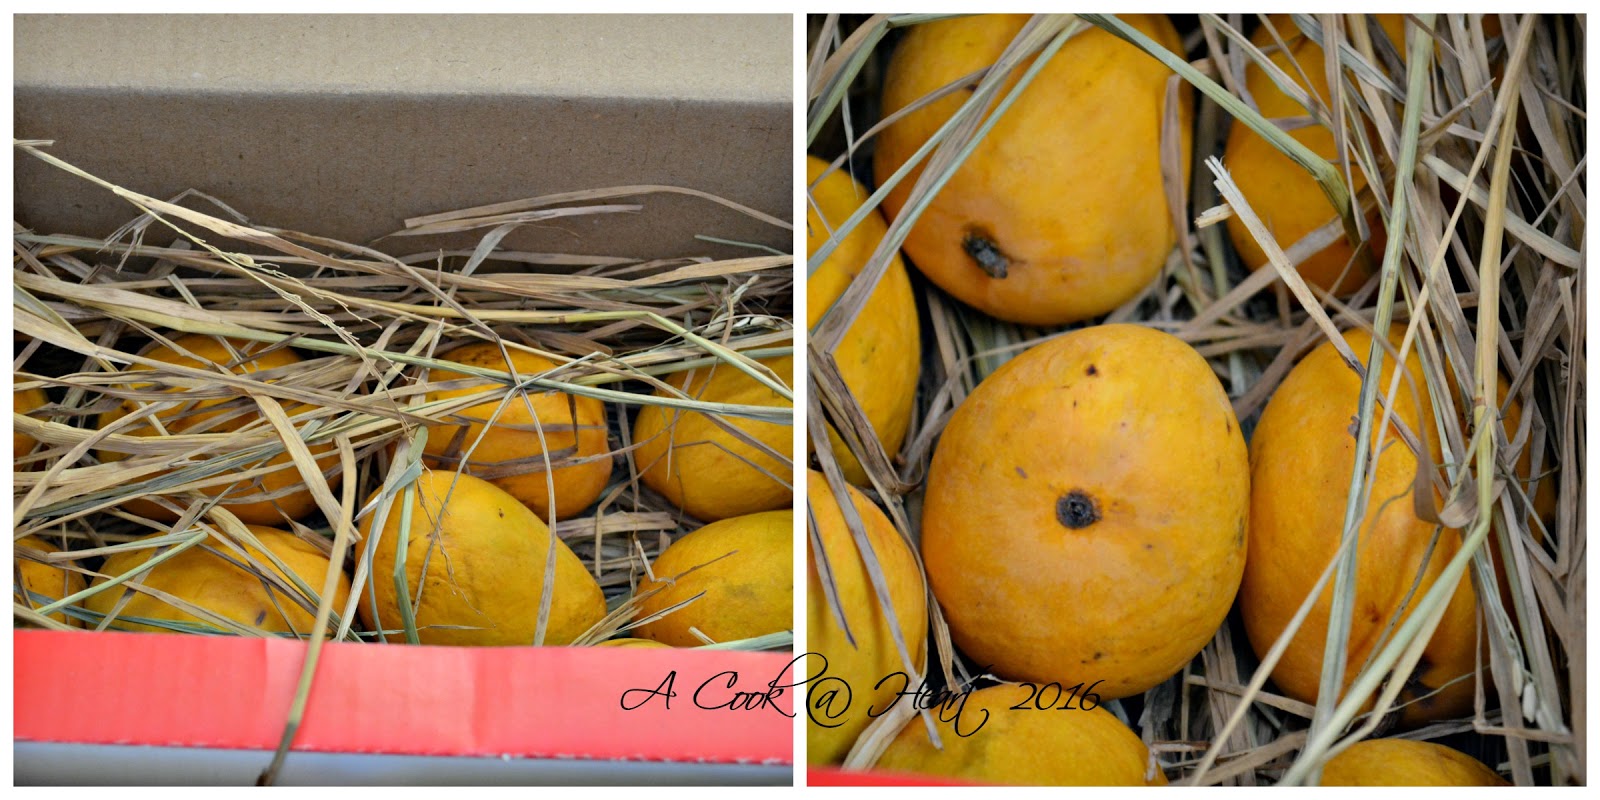

Ah! After the longest time, ever I had the pleasure of biting into this superlative fruit. Slices, 'aamras' were a daily feature and I can greedily say, I could have had some more! Mango lovers will understand and agree.

On most evenings, my son, my mom and I would walk down to the local market to buy vegetables, Pav, fruit. It was noisy, dirty, colorful all rolled in one and a wonderfully unique experience for my 8 year old. He loved going to the market with his favorite Ajji (Grandmother), ie. my mother and coaxing her to buy him some little thing, everyday,  making a stop at the the store that also has a 'chaat' corner to enjoy what he fancied on that particular day (dabeli/ pani puri/ sev puri/ gulab jamun/ jalebi) and coming home in an auto (which he hailed). 

The nicest thing about these 'vegetable markets' is, well, it isn't actually a market, the vendors just sit by the roadside with their wares and a weighing scale and you buy what you want. In one corner, I spied this old lady with a toothless smile selling sprouted beans and hurried over to buy 'vaal'.
I never fancied this in my younger years, but now, I like them. 

Sprouting and peeling these beans is a labor intensive job, so if you get these, prepped, swoop and grab. As I gleefully picked up my bag of sprouts I found myself humming, "...it happens only in India!" 

I also stopped by Majestic Book Depot (Thane W) and treated myself to these two books. The cookbook (left) has a fine collection of recipes which include Maharashtrian, Punjabi, South Indian etcetra, from across India. The book (right), on festivals and traditions observed  is also useful, it details many rituals observed during festival time as well as some recipes. I found both books delightful and a great addition to my book shelf.
Humkhass Pakasiddhi (left) and Varshache Sanwaar (right)
The first recipe I tried from the cook book was Vaalacha Birda. 
While the recipe is great and a keeper, I wish it was written well. 
For someone new to trying Vaal or this recipe, it is confusing, for ex: the author could have clearly specified what needs to be ground for the dry masala and then the coconut masala. I got my Mom to help me out there. 
I have adapted the recipe to my understanding. The end result however is a lip smacking curry that can be relished with fulkas or even better, a bhakri. 

You need:
About 3-4 cups Vaal ( sprouted and peeled) (author suggests about 1/2 kg)
7-8 cloves Garlic
1 tsp cumin, ground
1/2 Coconut, scraped / about 1 cup frozen shredded fresh coconut -pulsed to make a paste
4-5 pieces Kokum
2 medium Onions chopped
Salt to taste
 Jaggery to taste
2 tsp Fennel seeds 
2 tsp Coriander seeds 
8-10 dry Red chilies (I used Byadgi)
2 tbs oil
3-4 Garlic cloves ( if you have bigger cloves, use less)
1/2 tsp Mustard seed 
Dash Asafetida 
1/2 tsp Turmeric

Wash and set aside the Vaal beans.
 
Grind together the garlic, cumin and coconut, set aside.
Now grind together the coriander seeds,the fennel seed and the dry red chilies to a dry powder. 


Add 4 heaping tsp of the powdered masala, 1/2 tsp turmeric and chopped onions to the beans and mix gently. 
If the red chilies powder isn't very hot, add 1 tsp hot red chilies powder, this is optional.
Powdered masala added to Vaal beans, chopped onion and coconut paste on the side 

Heat 2-3 tbsp oil in a deep and heavy bottomed pan,
Add mustard seeds, asafetida and 4-5 garlic cloves and sauté till the garlic is golden reddish in color.
Add in the beans, stir gently. Keep a plate on the pot and add 1\2 cup water to the plate. 
Keep 3 cups of water to boil separately.

Cook the beans till they are cooked but not mushy. They should be tender when pressed between your thumb and finger.

Add boiling water to the beans, now add the crushed garlic and powdered cumin and coconut paste. Add the Kokum, salt and jaggery.

Boil and Cook till done. Be careful and ensure that the beans do not become overly soft and pasty.
Vaal Birde


Serve with soft fulkas, smeared with ghee or with bhakris (jowar, bajri or rice, any of these can be paired with the beans).


Pin It

Sunday, May 01, 2016

ALu chi Wadi

One thing that came as a 'bundle' in our home was the dhokla-aLuwadi combination. Whenever my Mother went to Dadar Kabutar Khana area, she would stop over at Saurashtra snack shop and bring home goodies. 
Sometimes kachoris (ping pong ball sized and deep fried, stuffed with a spicy-sweet moong daal filling that left you wanting one more), sometimes jilebi - sticky, orange spirals with a slight tang that were devoured even before she could transfer them to a bowl, but mostly she brought back dhokla and aLuwadi combo.  The spongy square pieces of savory-pillowy  goodness and the slightly spicy 'rolls' of colocassia /taro leaves rolled into a cylinder with a spiced besan paste inside was a treat. 

These were rarely made at home, to my mind, these were complicated things, best left to experts. 
But now, so far away from home, I cannot rely on the Indian store weekend supply of dhokla (sold at a ridiculous price ) or frozen packets or even packaged goodies to re-live those memories. 
Once in a while, we get taro leaves in the store and I try to get them (they are limited in quantity and get sold quickly or they have insect eggs on the back of the leaf and need to be trashed).
One such day I was lucky to get a fresh supply of the leaves and clean ones at that, yay! 
The only hitch was, these leaves were small and I did not get many, just 7-8. 

The longing to eat aLuwadi is a strong one and not easily put away.
But instead of making the roulade, I made 'wadi', squares. 
I found this recipe in Annapurna that I followed.


alt="Taro leaves snack" "taro leaf roulade" "alu wadi"

You need:
7 - 8 Taro / Colocassia/ ALu leaves
Lime sized Tamarind ball or 1 tsp Tamarind Concentrate (I used concentrate)
2 tsp Jaggery crumbled or substitute with dark brown sugar
1 tsp Red chillies powder
1 tsp Garam Masala
6 tbsp Rice Flour
1 Cup Gram Flour / Besan
1/4 cup shredded coconut
Hefty Pinch Asafetida
1/2 tsp Turmeric powder
3 Tbsp Oil
Salt to taste ( about 1 tsp)

If using tamarind soak it in warm water for about 10-15 mins and extract the pulp and discard solids. If using concentrate, move on to the next step directly.

Wipe the Taro leaves with a moist tissue or napkin. Cut the stem and any tough veins.
Shred the leaves finely.

Mix all the ingredients given above in to a thick-ish batter.
IF you are using tamarind pulp you may not need extra water.
IF you use tamarind concentrate, you need to slowly add water to make the batter.

Grease a container or a 'thali' that can be used in a steamer or pressure cooker and pour the batter into it.
Cover and steam the mixture for about 25-30 mins in the cooker (without the whistle).
Once done, cool and then cut into squares.
Shallow or deep fry as preferred and serve.
alt="taro leaves, alu wadi, tea time snack"

Pin It

Saturday, April 02, 2016

Spring on my cookie!

Spring is here and while that means big changes across the country, there really isn't a big change in Florida. We have some rain, but other than that, it's pretty warm and humid. Very 'Mumbai like' weather.
And while blogging had taken a backseat, I had to come out of my cave and tell you about this.
Spring is also the time to try something new ( and something you have been itching to get your hands on). For a long time now, I've been eyeing these Russian Piping tips that are taking over the cake decorating world by storm. I finally caved in and ordered a set.
Picture source Aliexpress Via Google

There are many sites selling these, but I ordered mine from here. They are a steal for the price. 
Just a word of caution, the shipping is prompt but the tips come from China, I believe and travel slow. If you are in a hurry and do not mind spending more, check out other options like ebay or amazon.

I used the tips for some cupcakes and a small chocolate cake I made, just to get a hang of these tips. They are lager than the normal Wilton ones i have been using. In fact a bit bigger than the large tips.
But they make decorating a snap.
I have used only Buttercream Frosting.
I have modified my earlier recipe. This time I used salted butter, yes, salted and in my opinion, it cuts the cloying sweetness a bit.
Its still a bit too sweet for me, but buttercream works best for  this kind of decorating. Stiff consistency buttercream is the best to create flowers.
Stabilized whipped cream might work well too, but I haven't tried it.

alt="russian tips buttercream decoration"
Chocolate cake with buttercream frosting
Here I have used a 6 inch chocolate cake and filled it with a small layer of buttercream and piped flowers on top, I did not frost the cake, that would have been a buttercream overdose.

And then, just a couple of days ago, I had to opportunity use the tips again. It was my son's teacher's birthday and I offered to decorate her 'cookie cake'.

I used this chart to color the buttercream.  I used these shades: Cherry blossom, Dried Lavender and Pancake  Batter for the flowers.
I used 2 tones for some flowers, using white buttercream with the pink and for the other, I used a combo of light and darker shades.
alt="russian tips buttercream flowers"
Cookie 'cake'
Something I learned using these tips,
  • Stiff frosting will give you well formed flowers
  • Using the tips takes a bit of getting used to, pipe a few flowers on a test surface to understand how much pressure you need to apply.
  • Some flowers need to be 'longer' to look fancy and some just need a little pressure to form a really good flower. Just pipe on a few to get a good idea.
  • These are super easy to use and not labor intensive. They make cake decorating fun! 
Pin It

Sunday, January 10, 2016

Sweet Beginnings

On the last day of warm weather, we visited a nearby beach. It was fantastic. Warm sun and a playful breeze. The water was a bit too cold for my liking and I was shocked at how parents took out babies (in diapers) into the cold water and also that the itty-bitties were squealing with joy.
Of course, standing in there, knee deep in the water I also adapted to it and loved it. 
My son had a blast! He did not want to come out of the water. 

We had to drag him out screaming and kicking and promising the beach on every sunny and warm weekend.
We know where we will be, come summer.

Then came the end of the vacation (happy dance). 

With more time on my hands and a friend celebrating her birthday, I decided to make her a cake. 
I have a small group of friends here and we decided to surprise her with cake and some brunch items. 

The cake was a 6 inch (x2) Chocolate cake, with Whipped cream between the layers. The frosting  and the decoration was done using Buttercream. 


Butter cream cake decorations

While I have done a course on cake decorating, I also draw inspiration from many cake decorators online.
It's so much fun to watch the videos and dream making cakes as beautiful as those.  I wish I could make such stunning cakes, I know it's all about practice, practice and more practice.

I like Vanessa's YouTube channel and her videos are very informative and she makes it look easy.
I hope to learn a lot more from her channel and also get the opportunity to make many more cakes!

As usual, I was decorating till the last minute and did not have the time to take pictures with a good camera. The pictures I have are taken on a smart phone.
Note to self: also work on organization and time management this year ( you suck at this).

I also really need to work on frosting my cake. I'm stingy when slathering on butter cream because it is *so* sweet, I'm always worried that the sweetness will overpower everything and make people regret taking a bite. This is something that does not give my cakes a very 'finished' or 'polished' look, if you get my point. But, I'll work on it.

Here's wishing you all a happy new year and may all your dreams come true! Stay positive and happy!

Pin It

Wednesday, December 23, 2015

Sweet things and hoping for a better new year!

As we come to the end of another year, it's time to reflect. Time to plan and make new year resolutions. In my case, I have stopped making any, I don't keep them. I don't need the guilt on top of everything.

But like you all, I am hoping for a better new year and I'm going to try my best to make it a good one.
I have learned a lot this year, some through personal experience, some from friends and their experiences.

In the end, I know one thing for sure, I have so much to be thankful for.
People have a lot going on in their lives and are battling situations every day. They still smile and trudge on.
This is one lesson I will carry with me, not just in the new year, but always, I am blessed and I am thankful for that.

Now, after this heavy dosage, let me get on to a better topic. Under such circumstances, weather is the safest topic.
You all know how I like to crib about the weather.I'm not cribbing here, just sayin'.
The weather in FL is still *very* warm. While many of you are bundled up in layers and others in a jacket, we still go around in shorts and wipe the sweat off our brow and still switch on the AC.
No kidding, we sweat. Yuck! I know, it's healthy and all that, but honestly.... yuck!

I'm taking it slow on the baking front, I made a batch of chocolate chip cookies, which never fail and this time, they did. I was shocked. They taste good, no doubt, but, they went flat. I have no clue why, I'm guessing it was the baking soda. I will make another batch soon, once I have the courage and another fresh pack of baking soda.

I do want to share a picture ( a poor one, sadly) of the last cake I baked for my friend T. I made this in October and was waiting for better pictures taken on a good quality SLR by another guest. But, he hasn't obliged.
In any case, the photo shows the details and I want to share them with you all.

This picture was taken on my iPhone and in a hurry. The children and the birthday girl were eager to cut the cake!

This was a basic chocolate cake, 9 inch and 2 layers with whipped cream filling and the decoration is butter cream. I used my favorite, Wilton 104 to make the roses and the star tip for the basket weave. 

I had a lot of fun making this cake and learning too. I know now, for example, that I suck at frosting a cake. I just cannot dollop a gob of butter cream on the cake and spread it in a thick layer. Butter cream is SO sweet and I am very hesitant when applying a thick layer on. I accept it and prefer to make a basket weave, hoping, that it used less frosting. I may be wrong. 
I love making floral cakes! 


With all the pumpkin and squashes flooding the market, I made the 'subji' version a lot. The family finally got a little tired of it, despite the constant variation. So with just half a butternut squash left and no one willing I had to make them in to ''Ghaarge', or Pumpkin Poories. 


In this version, however, I made some changes, I did not use any rice flour. I used some fine rava/ semolina ( just a couple of tablespoons) and whole wheat flour.
I used a bit more jaggery, my son likes his sweets properly 'sweetened'. I like it that way too. Not cloyingly sweet, mind you, but just right for us. So I ended up adding an extra 2 tbsp jaggery.


The dough is a tad sticky and difficult to roll ( traditionally these are patted into a round shape and deep fried)  but I managed and the end result is right here!
My son loved them and a friend, with whom I shared these liked them a lot as did her 2 adorable little daughters.

Here is a quick re-cap of the recipe:

I used

Butternut squash ( medium sized ) grated, about 2- 2.5 cups.
3/4 cup Crumbled jaggery  ( plus 2-3 tbsp, in my case) 
1/4 tsp  ( or 2-3 hefty pinches) Salt
1 tbsp Oil  to be used while kneading
2 tbsp Ghee
1 - 1.5 cups Whole wheat Flour / Atta
2 pinches Cardamom powder
Oil to deep fry the poories

Heat Ghee in a kadhai and add the grated pumpkin /squash. Cook it till it is soft. This takes about 3-5 minutes on  medium heat.
Switch off the heat and add in the crumbled jaggery and mix well. The jaggery will melt and the mix will become a gooey golden syrupy mass. Add half tbs oil.

Mix the flour, rava, cardamom powder and salt and gradually add the dry ingredients to the wet and make a dough. The dough must be firm. Towards the end add the remaining oil (1/2 T) and knead and form a ball.

Do not use any water when kneading the dough.

Heat oil in a wok (about 2 inches). While the oil heats up, roll the poories or pat them into small circular discs.
I made a large round 'roti' /'tortilla' and used a round cookie cutter to shape them. 4 poories to one roti.

The dough will stick to the rolling pin and board, just dust some flour between rounds and take it off.

Do not dust the poories. This will only make the oil murky.

Once the oil is hot ( drop a small piece of the dough and if it rises to the top steadily, you are set) slide in 3-4 poories ( depending on the size of your kadhai) and deep fry these beauties to a golden brown. Do not crowd the kadhai.

Drain on paper towels and store in a tight-fit lidded container ( you know what I mean).
These can be stored at room temperature for a couple of days. Beyond that, no idea, we never need to store any! These are good!

* You can also add a hefty pinch of Nutmeg /Jaiphal powder to the mix, it tastes good.

Enjoy these poories as a snack.


Here's wishing you all a VERY Happy New Year and see you all soon! Till then, take care of yourself and your loved ones! 
Pin It

Tuesday, November 24, 2015

Quick Pulav and giving Thanks.

Earlier this moth, we moved (yes, A-G-A-I-N!) this time to another state- in a hurry. I packed and moved in under 2 weeks.
When I look back, I keep asking myself, did I really do that? 
4 years, all boxed up in a week. Furniture sold or trashed. Things dear to my heart ( read, anything that is used in the kitchen, like my beloved cast iron pan, my pizza stone and assorted stuff  passed on to friends) and one afternoon, just like that, we boarded the flight to start a new adventure in sunny Florida.

It was really difficult saying good bye to Dallas. I had a good friend circle, the location was SUPER convenient and the Indian stores! Oh those fabulous BIG Indian stores with anything and everything any Indian kitchen needs! I miss that the most! 
I still recoil in horror and dismay at the sad vegetables in the Indian store here, it pains me to see just one or two brands of Basmati or Sona masoori rice sacks and the prices, let's not even go there. Suffice to say, I doubt I will ever get a big fat bunch of Methi / Fenugreek leaves for 50 cents or even vegetables at a reasonable rate, here you pick a vegetable and they put a price to it, not that I object, but I like to know the price before I buy.

But there is always a silver lining, always. 

The weather, its perfect, right now. 
And then there is this view, 

I love waking up to this view everyday. 
I love to sip my tea and watch the sun rise, I just sit and gaze.
I love how there's plenty of natural light that fills the rooms and makes them bright.


We moved here just as it was Diwali. Which is my favorite time of the year. But this year, it was all a mess.

No Diwali lights ( well, just 4-5 diyas), no goodies made, no traditions observed. We had very little stuff  and that was a dampener. 
What is Diwali without chivda, chakli, ladoo, shev, karanji, shankarpali, right?  
Right! 


My parents knew that and they stepped in! 

Just in time for Diwali, on the day !


A whopping big parcel which made the Fed Ex guy bend, was delivered to our door at 10:30 am. 

We lugged it upstairs and waited. It was SO difficult not to rip the tape and just take in all the goodies inside, but I waited, knowing that li'll S would be thrilled to receive a big parcel from his beloved Ajji and Ajja. Those li'll hands got busy the moment he spied the parcel. 


A parcel from my parents is never just one thing, the box was packed and bulging. Among the goodies nestled books, 'kesar veldoda syrup', kokum agal, an apron and a must have in most home, 'Kalnirnay' Calendar and so much more! 

I was thrilled to get this cookbook. I have seen this book, 'Annapurna' and 'Ruchira' gifted to almost every new bride. 
The recipes are wonderful and you will find many scattered across blogs. 


The day our boxes arrived, we were super busy and late at night, all I had the courage to whip up was this quick pulav from 'Annapurna' with the addition of vegetables.

It is tasty and flavorful and a great option for a lunch box, a potluck or to make on a day you are expecting guests. Pair it with some raita / koshimbir or a veg. gravy and papad + pickles. 


For the 3 of us, I used

1 cup Basmati Rice (wash in 3-4 changes of water and soak in fresh water) 
1 Onion, finely chopped
1 small piece Cinnamon
2 Green Cardamoms
1 Bay Leaf
Ghee
* 1 Cup chopped vegetables ( My addition, I used Carrots, french beans and some peas)

For the Masala Paste:
2 small Garlic cloves
A small knob Ginger
A Hefty pinch Red Chilies Powder
1 Tomato
2 pinches / 1/4 tsp Fennel  /saunf seeds

Grind the Masala Paste ingredients and set aside.
Cook the rice (ensure that each grain is separate)  and spread it on a plate to cool.
Chop the vegetables in small and equal sized pieces and microwave with a couple of tbsp. of water to cook.
Heat ghee in a deep pot /pan.
Add in the spices (bay leaf, cinnamon and cardamom)
Once the spices smell aromatic, add the onion and cook till its is soft and light brown.
Add the masala paste and cook till it smells good ( basically the raw garlic smell must go away)
Add the vegetables and rice and mix gently.
Serve with papad + Pickles or a raita. 


Happy Thanksgiving to all of you! 

I know I am thankful for a LOT! Most of all, for my wonderful parents for their thoughtfulness and love! 

Pin It

Sunday, October 25, 2015

Kakki's Metkut- A family recipe ( spiced lentil powder)

My father is a meticulous man. He would come from work, relax a bit, help me with homework, when I was around to do it. He would then help my mom out in the kitchen, while she cooked, he would lay the table, his style. The dinner plates would be rinsed, so would the bowls (vaati) and glasses. He would then place the bowls and invert the dinner plate over it. 
When we sat down, we would begin our meal with steaming white rice drizzled generously with ghee/ toop and metkut, the spice powder. I would insist on my dad mixing my portion. He always, always made it so tasty. Magic touch? I do believe so. 

But , there was more to it than just the mixing part. The making the spice mix part. While there was always the ready made option, my mom had this mix that her mother-in-law made. 
My father's mother was lovingly called Kakki. She was a fantastic cook. I am of the opinion that relatives visited us only so they could eat what she made. Yes, she was that good. My mom often tells me, Kakki's puranpolis were 'the best'. Hands down, the best, ever.

Her 'amti masala' or Goda masala as it is called, is a special blend and is also spectacular. And then there is this Metkut. Dazzles up plain ol' white rice. 
It is a staple at my table now. My 7 year old loves it. He also loves the variation, 'ola (ओलं) metkut', which is the spice powder mixed in a tart-sweet, tamarind paste/juice and jaggery mix and tempered with mustard seeds, curry leaves and dry red chillies.

maharashtrian metkut

Kakki's measurement ( Kakki used vati (वाटी), the typical steel bowl used everyday, but feel free to use your standard measurement cups if you like). I have used the typical 'vati' as a measure because the other spices are with reference to this measurement.
ETA: To clarify, a vati  (vatya, being plural) is also called a katori. 

2 vatya / katoris Chanadal
3 Dry Red chillies
2 Sunth (Dried whole Ginger) pieces
3 Halkunde (Dried whole Turmeric)
1/2 vati Dhane / Coriander seeds
1/2 vati Rice
1/2 vati Wheat
1/2 vati Udid dal
3/4 vati Jeere /Cumin seeds
1/2 Spoon Methi / Fenugreek seeds
2 spoons Hing / Asafetida

Roast each item separately
Roast chana dal, Sunth, halkund first.
Grind the ingredients except Hing ( as this is already in the powdered form). Add hing last.
Cool the mix and grind it to a fine powder.

I used my coffee mill to grind this, my 2c, use a mortar-pestle to pound the whole turmeric and ginger pieces.

Metkut recipe
Store in an airtight container and use as required.

Ola metkut / à¤“लं  à¤®ेतकुट

Take 2-3 tbsp. Metkut powder in a  bowl
Use 1/2 tsp tamarind pulp (or 1/4 tsp tamarind concentrate, Tamicon) and add double the amount of jaggery powder to the metkut.
Add salt to taste.
Taste and check the balance of tart to sweet and make adjustments as per your choice.
Heat a teaspoon of oil, add mustard seeds.
As the mustard pops, add a dry red chili, halved and 2-3 curry leaves.
Take it off the heat and pour over the metkut, mix well.
Serve with steaming white rice and a add a generous drizzle of (preferably, home made) ghee.


metkut
Pin It

Saturday, July 25, 2015

Semi-Homemade Samosas

If you are watching a movie for 3 hours, a break is very important. 
A Bollywood Masala movie, involving drama (Nirupa Roy with tears cascading down her cheeks and sobs echoing between heart rending dialogues), to action ( Amitabh or Dharmendra transforming into super humans and single handedly fighting off hordes of villains, who fall unconscious after one punch, but our valiant heroes just bounce back after repeated blows to the head), romance (and I mean the old type romance, you know, the two flowers colliding against each other, conveying the meaning and leaving the actual to imagination, unlike today, when the on screen romance that makes you wonder, really? Making one squint in cross eyed fascination, thinking.....like that?) and the running around trees singing songs, which if you try ( running and singing and smiling and flirting at the same time) will leave you gasping like a fish out of water. So much for filmi romance ;)

So when you get 3 hours of Bollywood Masala, you need a 10 minute break. Those 10 minutes are for rushing to the rest room, if needed, but most importantly for scrambling to the concession stand to grab a paper bag containing 2 (or more) greasy, piping hot Samosas ( the ice cream bar or soft drink bottle are next, but you cannot really do without the Samosa). Heading back into the semi dark theater with the precious package and finding your seat before the movie starts. 

The satisfaction of biting into a crisp, hot samosa while watching the drama unfold on screen is happiness unlike any other.  
I would eat the base ( the crispiest part) last. Save the best for last.

Li'll S does not get to experience this. The movies (kids animated) are shorter now, we buy a bag of popcorn and head into the dark cinema hall, by the time the movie starts, we are almost done eating the popcorn ( I mean, you cannot resist the smell of popcorn and cannot stop at one, you start taking the popcorn on top, carefully and then just grab it by the fistful). All that is fine, but it isn't the same as greasy Samosas.
Potato peas samosa filling
Samosa Filling


The little one has lately developed a liking for Samosas and demands them every now and then. The store brought samosas are tasty, no doubt, but the spice levels vary and sometimes he cannot tolerate the heat, in which case, M and I are given the stuffing as he finishes the outer cover.

shortcut samosa, tortilla samosa
Uncooked Flour Tortillas 

Making samosas at home is the best solution. If making everything from scratch is intimidating, or you are pressed for time, I have the solution for you. 

Making the stuffing is easy, and can be made ahead of time. The outer cover is made using store bought 'uncooked' Flour Tortillas. These are found in the Refrigerated section (near the cheese, butter, bagels etc.)

The stuffing is simple with most ingredients found in the pantry. I make a little extra stuffing, the left overs can be slathered on to sliced bread and grilled on the skillet or Panini grill, making a hearty sandwich. If you like, use the filling to make Samosa-Paratha.

For the stuffing:

Boil, cool, peel and mash ( leave it a bit chunky) 4 Russet Potatoes.

Thaw about 1/2 cup Green Peas.

In a small saute pan, add about 1 Tbsp. Coriander Seeds ( Sabut Dhania). When toasted, cool and make a coarse powder. I use my mortar and pestle, you could put these in the coffee mill and give it a quick 5 second whirl. Alternatively, crush them using a rolling pin.

Mince 2-3 Green Chilies and grate 1 tsp. Ginger. (or you could add the chilies and ginger knob to the mixer /blender with a pinch of salt and blitz it to a paste, like I do)

Finely chop Cilantro and set aside.

Heat about 2 Tbsp. Oil in a kadhai/ wok.

Add 1 heaped tsp. Cumin/ Jeera to the hot oil, as it sizzles, add the green chilies and ginger paste  and a dash of Asafetida/ Hing followed by the crushed coriander seeds and 3/4- 1 tsp. Turmeric powder.

Saute briefly, you do not want the spices to burn.

Add the mashed potatoes, 1/2 - 3/4  tsp. Kashmiri red chilies powder, 1 tsp. Amchur Powder ( add a bit more if you like tart taste, I added a dash more). Season with Salt to taste. Mix well and cook for a couple of minutes. 

Before switching off the heat, add 1- 1/2 tsp Garam Masala( I eyeballed the amount, I use Badhsah Rajwadi Garam Masala, which is a bit different than the regular Garam Masala and has a strong flavor). Mix well, switch off the heat and sprinkle with finely chopped Cilantro

Taste and adjust the seasoning. I keep it mild, so my son can enjoy the samosas. 
This spice level is kid-approved, Li'll S loved then as did D, who cannot tolerate heat. 
                      

Once the Filling has cooled, Open the tortilla packet and using a Pizza cutter or a sharp knife, cut the tortilla in half. The D shaped semi-circles can be shaped like cones and stuffed. 

To seal the edges, I made a thick-ish paste of All Purpose Flour + Water.
I found this pictorial on folding the Samosa.
Its fairly simple, Fold the sides onto one another forming a triangle,making sure that the tip is closed - check the picture above ( or the oil seeps in and no one wants to eat THAT).
I apply the 'gum' paste on the outer line ( the D part) and then seal it, leaving the curved end free to fill.
Scoop up the filling and fill the cone, do not over fill, you still have to seal it.
Carefully and gently press the filling down and proceed to seal the samosa.

Fill and seal all the samosas.

At this stage, you can deep fry them or freeze them for future use.

If deep frying, fill a wok with oil (half way)  and heat it on medium-high. Once the oil is hot, reduce the heat. For crisp Samosas, you need to deep fry them on a medium-low flame/ heat setting to a golden brown.

Slide in 2-4 samosas ( depending on the size of your kadhai /wok) and deep fry.

deep fried tortilla samosa
Deep fry to a golden brown on medium heat only

Remove from the oil and place on paper towels to drain the excess oil. At this point, the samosa as ready to be devoured. Serve with Cilantro-Mint Chutney and Date and Tamarind sauce. 


To make it a meal, make Samosa-Chaat using Choley  or Ragda (I used Ragda).

Add some Ragda in a bowl, crush and place a Samosa on top, Garnish the ragda-samosa with chutneys and finely chopped Onions and minced Cilantro.

Serve immediately.

ragda samosa chaat
Ragda Samosa Chaat


NOTES: 
- While making these samosas is very easy, keep in mind that they need to be served immediately. 

- Keeping these samosas aside will soften the outer cover, since these are made using ready Tortillas and make it chewy. 

That's it for now, enjoy your weekend, folks! 
Pin It

Wednesday, July 22, 2015

Sol Kadhi

It was in the 90's I remember, we went to Goa, with my Ajji (Grandmother). Her best friend ( Kolwalkar Maushi, as we called her) lived very close to Calangute beach, in an old, traditional home.
The lifestyle was so very different from the busy life of Bombay. 
The old sprawling hose with the red stone floor which was cool to the feet even on the hottest day, with many rooms and old fashioned locks, a massive kitchen with a big sized mortar and pestle set in the floor. Though they had a mixie/ blender, this mortar and pestle were used, to lend food and authentic flavor. 

The two things that I absolutely loved in that old house, the kitchen, everything so traditional, so quaint and the old but sturdy rocking chair that we all took turns sitting in. 
When our hostess and my ajji were cooking, I'd stroll around the garden which had many trees, full of sweet smelling flowers or fruit, I remember plucking chikoo / sapota, washing it under the tap near the garden and eating it, so sweet! 
There was a fresh supply of coconuts and one evening, we were treated to Sol Kadhi. Now this was something I had never tasted in my life. So as it grew dark I sauntered into the kitchen and watched K Maushi sit on the floor with a mound of freshly shredded coconut, she was making coconut milk. It seemed a lengthy process, grinding the coconut in the stone mortar pestle, looked like fun. She let all of us take turns, my mom too, using something like this was a novelty in Bombay (Mumbai) and as a working woman, my mom rarely did something like this. 
I did some grinding, then my hands were tired, I relaxed in the rocking chair until called to dinner.
This is the one meal I remember, we all drank copious bowls of Sol Kadhi. It was so cooling and refreshing! 
All the hard work of an hour or more and gone in minutes! 


Years later, I made this in my kitchen in Los Angeles, with shortcuts. It was easy.
This summer, I introduced the same to my 7 year old. He was not so blown away, but the husband and I finished every drop.

Here is a tutorial if you want to make coconut milk from scratch.
I use a can.

The other shortcut is using Kokum Agal. This is easily available in Maharashtra ( and probably other states) but is difficult to get hold of, in the USA.
Picture from Google search option.
Here is how I made Sol Kadhi

Soak about 5-6 Kokum in warm water, if you can, do this over night, otherwise and hour.
Squeeze the kokum and extract the juice, discard the solids.

Shake thoroughly and open a can of coconut milk. 

Mix the coconut milk and kokum extract. Add salt and sugar to taste.

Grind 1 ( or to taste) Green Chili and 1 small clove of Garlic. Add it to the kadhi.

Heat 1 -2 tsp of Ghee.

Add 1 tsp of Cumin seeds. As the cumin sizzles and browns slightly, add 1/4 tsp of Asafetida and a few Curry leaves. Some people like to add a halved dry Red Chili, if you want, add it in at this stage. 
Pour the sizzling tempering / tadka on the kadhi, Mix well, Garnish with finely chopped Cilantro.


Typically, Sol Kadhi is pink in color, mine was pale, I believe it is because of the kokum I used.
When I made this Kokum Kadhi, I used superior quality Kokum ( given to me by a fellow blogger). However, with packaged ones from the store, one cannot really tell, I suppose.
The taste was perfect, but if you are a stickler for details, good quality kokum is a must.

Enjoy this easy to make and very tasty kadhi on a hot summer day!


Pin It

Saturday, June 27, 2015

Bunchi Moong Daal Khichari

If there is one comfort food we all agree on ( most of us, I should say), it is Khichadi / Kitchree/ khichari, a comforting mix of rice and moong daal as the star ingredients often tempered with a ghee tadka and minimal spices.The combination is so simple yet makes the food flavorful. Whoever invented this dish was a genius! 

With Li'll S and I, both going through a bit of a recovery phase after a nasty bout of cough and fever, this khichari was a welcome treat to our taste buds which had fallen into a temporary coma. 

While I was coughing and checking my temperature at regular intervals, I was also reading a book, 'The art of Indian vegetarian cooking' by Yamuna Devi.
It made me feel good, just reading the recipes.

Every once in a while I pick up this enormous book from the library and try something from it. 
This time I tried this Khichari which is made at the Lord Jagannath Temple in Puri, Odisha ( Orissa) around the time of the famous Festival of the Chariots.
This recipe takes the humble Khichari to a whole new level. 
We enjoyed it with some roasted papad and pickle. 


alt="Odisha temple khichuri, bunchi khichuri"
I have changed the measurements to suit a small family but the ingredients are all the same.

You need

1/2 cup Basmati rice
1/2 cup Moong Daal ( Yellow, in this case)
1 tsp Turmeric ( haldi)
5 cups Water
3-4 tbsp. Ghee
2 tbsp. Raw Cashew halves
2 tbsp. Sliced raw Almonds ( I had regular almonds, which I just pounded and broke into pieces)
2 tbsp. Dry coconut 'ribbons' ( I grated some dry coconut and used it)
2 tbsp. Raisins ( I used the Golden variety)
~ 2 inch Cinnamon stick
5-6 Cloves
2 tsp Cumin seeds ( Jeera)
2 Dry Red Chilies
1 tbsp. Sugar / jaggery
1/4 tsp. Asafetida
1/2 cup Green Peas ( I used frozen)
Salt to taste
2 Tbsp ghee to add towards the end
Cilantro, minced, to garnish

Wash the rice and daal in 3-4 changes of water. Stir in the turmeric, mix it well and set the daal+rice mixture.
Heat Ghee in a saucepan. One by one fry the cashews, almonds and coconut till they are a nice golden brown. Remove the nuts and coconut and now add the raisins to this mix ( do not fry the raisins) and set aside.

To the ghee in the saucepan, add the 'khada' spices, the cinnamon, cloves, cumin seeds, red chilies and the sugar. Saute till the cumin is fragrant and the sugar is caramelized, but not burnt. Add the asafetida and then the rice and daal mix.
Stir and mix everything well and saute for a couple of minutes.
Add in the water and turn up the heat to high and  let it come to a full boil.
Reduce the heat to medium low and cover the sauce pan and let the khichari cook. The author recommends that the frozen peas ( thawed before use) be added towards the end, but I am not patient so I just add them before the cover and cook  stage

Stir occasionally to ensure that it isn't sticking to the bottom.
Once the khichari is cooked ( the rice and daal are cooked through and are soft and mushy and the water is absorbed completely)  Stir in the salt and 2 tbsp. Ghee.
Before serving add in the nuts and garnish with minced cilantro.

alt="lord Jagannath temple bunchi khichuri"

Pin It
Share

LinkWithin

Related Posts Plugin for WordPress, Blogger...
Page copy protected against web site content infringement by Copyscape